Not all lovers of regular manicure use a base coat and sealer. But in vain, because the nail polish fixer not only makes the nail polish shine, but also protects it from various external influences, such as water when washing dishes or the sun's rays on a hot summer day.
Fixer and clear varnish
One of the most common misconceptions is that nail polish sealer is just regular clear nail polish “by another name.” Although in fact these are two completely different products in composition and properties.
Regular varnish without colored pigment is not able to protect the finished manicure. In addition, it will most likely take a long time to dry and, on the contrary, will increase the likelihood that the design on the nails will be damaged: it can become smeared or damaged from the slightest impact, it will be erased or quickly become chipped and will almost certainly begin to peel off.
How can I replace nail polish fixer?
The nail polish fixer acts as a fixative. It fixes the pigment, forms a thin film on the plate and acts as an additional layer.
Some girls believe that the fixative can be replaced with ordinary transparent varnish, but this is a mistaken opinion, since the transparent base has the same composition as the decorative varnish.
To fix the color coating, purchase a keratin transparent base. It has additional effects, compacts the plate, heals, and protects from all kinds of damage. Perfect for covering up color pigment and extending wear time.
Fixer and top coat - advantages of use
The main task of the fixative at this time is to protect the nail surface and manicure as a whole. It dries relatively quickly, strengthens the decorative varnish and prevents it from fading and peeling in the future. Very often, manufacturers also enrich the composition of such products with various nutritional components and even entire vitamin complexes for the benefit of nails. So this can be an auxiliary help for those who want to have beautiful, healthy and well-groomed nails.
Editor's choice: Video: how to do a hardware manicure at home
A fixative is especially relevant when a manicure is done not in a salon, but at home. Moreover, it is needed not only for ordinary varnish, but also for the now popular hybrid gel polish. To prevent it from cracking and delaminating, after the last gel layer has dried, a special top coat must be applied on top - an analogue of the fixative of a regular varnish.
But that's not all. The fixative can be a real godsend for girls who paint their own nails. When applied over a finished design, it fills the “voids” between the lines, smoothes the surface of the nail and gives a shiny effect. After such processing, even the drawing of a novice manicurist will be able to look neat enough to wear.
Newbie mistakes: why the product does not apply evenly
The varnish sealer may apply unevenly if the product begins to thicken. When working, it is necessary to stretch the composition over the nail. In case of unsuccessful applications, you should add a little more product and try to start coloring from the center of the nail.
If the texture is light, moderately liquid, this mistake will not happen. The main thing is not to overdo it and not to push the material close to the root part. In any other cases, you can use an orange stick, which can easily eliminate leakage into the side rollers and onto the cuticle.
Matte topcoat or dryer should not be applied in a thick layer. This will cause the material to lie unevenly and there will be bumps on the nails. Top coats with a thick base, on the other hand, should be applied in a thick layer and spread over the plate like a regular clear coat.
Learning to choose a quality fixer
The quality of the fixative plays a very important role, since a poor product is not always able to perform the necessary functions. First you need to pay attention to the composition. If ingredients such as vitamins A, E (B) and protein are not listed there, then most likely it is a fake or an obviously unsuccessful product.
You can learn a lot about the chosen fixative during the first “crash test” in the form of application. A good product will keep your manicure on your nails for at least six days with proper care. If after some short time the layer of fixative begins to crack, turn yellow or lose its shine and other properties, its place is probably not in a cosmetic bag, but, alas, in the trash bin.
Editor's choice: White and gold manicure
If stores provide testers to their customers, then it is better to start checking products not after purchase, but right on the spot. The presence of such obvious defects as uneven application and bubbles indicates disgusting quality. The fixative should not be too liquid and spread across the nail onto the skin or be applied in streaks.
Another sure sign of quality is the glossy finish. Because matte fixatives simply do not exist. The finished manicure should shine without any distortion or blemishes.
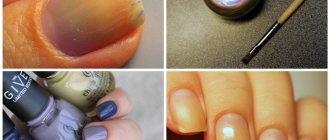
Strength test or my arsenal of varnish fixers in pictures
Hello, beauties!
Today we’ll talk about nail polish fixers with photos of nails. Just showing the fixatives just didn’t seem interesting enough to me, so I decided to conduct a small experiment, comparative testing. All fixatives will be tested for strength and other characteristics using varnish as an example.
Orly In a Snap Nail Dryer
Wet nail effect: yes
Drying speed: 5
How long does the varnish last: 4-5 days
Other features: with drying effect
Rating: 5
Insta-Dri Anti-Chip Top Coat Sally Hansen
Wet nail effect: yes
Drying speed: 5+
How long does the varnish last: 4-5 days
Other features: Tiny nasty bubbles on nails if you shake the bottle before applying. With drying effect.
Rating: 4
Smart enamel Complex 7
Wet nail effect: yes
Drying speed: 4
How long does the varnish last: 4-5 days
Other features: I would even find it difficult to completely repeat what this thing does. 7 in 1.
Rating: 5-
Glosser from ORLY
Wet nail effect: yes
Drying speed: 3
How long does the varnish last: 3-4 days
Other features: no
Rating: 3
Sally Hansen Diamond Shine Base & Top Coat
Wet nail effect: yes
Drying speed: 3-
How long does the varnish last: 4-5 days
Other features: Base and fixer 2 in 1.
Rating: 4-
Strength experiment.
Well, let's move on to our experiment. Chanel varnish was taken as a sample. For those interested in learning more about him: post.
I painted all the nails without a base in 2 layers and covered them with the above fixatives in the following (chaotic) order for cleanliness of the experiments:
Left hand:
Big:
Complex 7 #3
Index:
Insta-Dri #2
Middle:
Diamond Shine #5
Ring:
Glosser #4
Little finger:
In a Snap #1
Right hand:
Big:
Diamond Shine #5
Index:
In a Snap #1
Middle:
Glosser #4
Ring:
Complex 7 #3
Little Finger:
Insta-Dri #2
This whole complex scheme was made to ensure that the testing was fair, because on the little and ring fingers the varnish lasts a little longer, since the main work falls on the thumb, index and middle fingers (personally, they peel off faster for me).
Left hand:
Illustrates the correct positioning of the fixative bottle and nail. Do you see the slightest difference between them? Me not.
Well, the debut of my right hand))
There are also absolutely no differences: everything looks absolutely identical.
But testing is a thorough thing, so I decided to conduct a drying experiment.
Drying speed.
As you can see, all nails have acquired shine compared to the initially matte sample, with a “wet nail” finish.
BUT!
First place
Insta-Dri Anti-Chip Top Coat Sally Hansen
ranked in terms of drying speed. That is, having fixed the varnish with it, you don’t have to worry about the fact that dents or “scars” will remain after the night if you paint in the evening.
Second place
Ranked in this Orly In a Snap Nail Dryer
Light, light dents that weren’t quite shown in the photo, but happened in real life.
Third place
Unexpectedly for me, Complex 7
. There are a little more obvious dents that are in the photo, but in general, considering that it was not dried, the result is excellent. If you dry it enough, you won’t end up with a scar.
Fourth place
Borrowed Glosser from Orly
. But the gap from third place is significant. If after some time you slightly dent the nail on which it is applied, you get a dent from the fixative and varnish. I don’t know exactly how long it takes to dry, but it’s definitely a lot longer than the other three that are taller than it.
Fifth place
Sally Hansen Diamond Shine Base & Top Coat
came with an even slightly worse drying result . It will take a lot of patience to dry it completely, especially if you apply 2 coats of varnish and base. When trying to crush it after a while, “everything got mixed up in the Oblonskys’ house.” You need to have truly angelic patience (which I don’t possess) to dry it completely and still I wouldn’t be sure that there would be no “crimple”.
An unpleasant surprise.
Next, I wanted to write to you how great I am, I dried all the fixatives and everything is fine. Yes, I dried them all, and the next morning everything was fine, but then... then I realized that one nail was not completely dry and when it came into contact with something, dents and stripes remained. And this is in a day! Two coats of varnish even without a base!
Next to another nail covered with another sealer. This turned out to be the penultimate drying speed Glosser from Orly.
In general, it never completely dried out.
Evening of the fourth day.
Now it's time for the varnish to come off.
What happened??? Left hand.
It is quite predictable that the varnish of tears is stronger on the index finger, but the fact that it shed heavily on the ring finger is unexpected for me. The large and medium ones are holding up well. The little finger gave out a little.
Balance of power.
Right hand.
And then, quite unexpectedly, the index finger was almost not worn out, but the middle finger was badly damaged. The rest were worn out about the same.
Balance of power.
Final conclusion.
As a result of all of the above, I was most disappointed -
5th place - Glosser from ORLY
It took a very long time to dry, it didn’t dry completely and dents formed every other day. His nails turned out to be the most shabby in both cases.
I decided to combine 4th place with 3rd because it was difficult for me to decide.
Insta-Dri Anti-Chip Top Coat Sally Hansen
and
Sally Hansen Diamond Shine Base & Top Coat.
both Sally Hansen products took 3-4 or 4-3 places.
Insta-Dri
did a wonderful job of drying but flaked earlier and more than others, while
Diamond Shine
took a very long time to dry but held the polish well.
2nd place.
Quite unexpectedly for me, Smart Enamel Complex 7
. Normal drying speed combined with better long-lasting performance and less peeling.
1 place. Favorite.
For myself, I have decided that now I will wear Chanel polishes with Orly In a Snap Nail Dryer
. Excellent drying speed combined with very good durability. Others may have different opinions, but I decided for myself who my favorite is.
Thank you for your attention, I hope I haven’t tired you with my varnish-fixing quest for the truth. Have a nice weekend, my dears! Lena.
PS Spring is coming! Have a sunny mood everyone!
picture.
Increase
Using a fixative - how to preserve your manicure
For the durability of the coating, it is very important to properly prepare the nail and pre-apply the base before the main varnish. But it is also necessary to use the fixative correctly to get the maximum benefit from it.
If the product is incompatible with a wet base, then you must first wait until the manicure dries thoroughly. And only after that start applying a fixative to it.
It is advisable to apply it in three light movements, starting from the center and then sequentially and carefully working on the sides. Try to apply it in a thin layer. It dries quickly, while a thick one may not dry at all, making the manicure soft and damaged.
Editor's choice: Japanese manicure, features, types, technique
The procedure can be considered complete when the fixative has completely set and dried. After which you will be able to enjoy the results of your labors for at least a week. And with careful handling of nails - even more. In the case of gel polish, the original appearance of the manicure is easily preserved for 20-30 days.
But that's not all. This time can be increased if you periodically adjust the manicure, renewing the fixative layer 4 days after the start of the previous application.
Varnish fixer: what is it, how to use it and what are its principles of action?
On the shelves of any cosmetic store there is a sufficient selection of various products for manicure and pedicure. Decorative cosmetics please with their assortment, but the basic product, of course, is varnish.
How to apply it correctly?
No manufacturer guarantees that it will last longer than a week. To ensure that treated nails last for several weeks, manufacturers came up with a simple product that looks like a transparent gel. This is a nail polish fixer. Sometimes this product is called a top (finish) coating. The principle of action of the fixer is to glue all the layers on the nail plate, allowing them to last longer.
It also protects the nail plate from unwanted cuts or scratches.
The functions of a good fixative are as follows:
- smooth coating - the fixative should not leave bubbles on the surface;
- glossy finish without color change;
- maintaining manicure for longer than a week;
- enriching your marigolds with vitamins.
How to apply nail polish fixative correctly, you ask? After using the usual product, when it is already dry, apply a fixer to the nail plate on top of the base. By the way, it can be used every day. Drying is very important. The varnish fixer can be dried either in normal mode or using special equipment - an ultraviolet lamp.