After exclusivity, the main advantage is that such decor cannot be accidentally disturbed, as happens with lace, rhinestones or ribbons. It does not deteriorate and does not fall off the glass, so the wine glasses have a long service life.
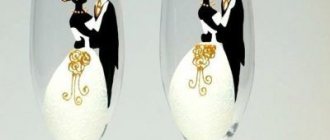
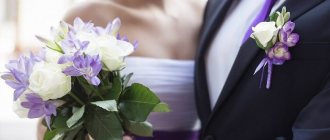
How do you decorate glasses for a wedding?
Depending on the execution technique, certain paints are used, which vary for each case. When the drawing is done in a mixed style, several types of materials are used.
The main types of paints used to decorate a glass:
- Water-based acrylic (stained glass) paints acquire a muted glossy sheen when they harden, and when undiluted they give a slightly convex pattern. The picture on the glass takes a long time to dry; it may require firing to consolidate the result, but this method is dangerous for thin-walled wine glasses.
- Solvent paints, also classified as stained glass paints, are based on varnish compositions, which is why they are more fluid and harden quickly. Therefore, to increase transparency, a special solution will be required. Pictures look good on glass, especially if the design does not involve a ribbed surface.
- Contour paints are a thick mass placed in a tube with a sharp spout, made specifically for drawing thin lines. To make the pattern convex, the manufacturers created a fairly dense texture. After all, it is used for drawing details or contours.
Techniques used to paint wedding glasses:
- Dotted or confetti. The selected colors are applied with matches, toothpicks or cotton swabs, depending on the required diameter. In this case, acrylic paints are used to create the pattern.
- Decoration. Thematic motifs are depicted using brushes. Most often, buds or other plant patterns bloom on the glass. This technique will require some experience in drawing and working with glass.
- Picture in stained glass style. This design creates a specific pattern using stained glass paints, after which, after drying, an outline is applied depicting lead or gilded bindings. To make the glass look like a real cathedral, the base paint should be slightly translucent, showing the passage of light rays through the picture. This creates the feeling of a mosaic.
Stained glass paints are often used to create drawings, especially in an authentic style. And contour pictures are used to draw schematic pictures, or individual small details that should protrude above the surface.
Glasses covered in snow
Have you ever decorated your glasses with artificial snow?! If yes, then, for sure, you have already made sure that this beauty is indescribable, and if you haven’t even tried to contemplate this wonderful creation at home, then let’s boldly take on the experiment. For the New Year 2021, we invite you to decorate not only your existing wine glasses, but also glasses, shot glasses and other table drinking vessels with your own hands in a fairly short time.
To work you will need:
- a jar of artificial snow;
- glue;
- glasses;
- glitter;
- brush;
- alcohol to degrease the vessel.
The process of creating New Year's decor:
- Having placed all the glasses you like on the table in front of you, carefully degrease them with an alcohol solution. This will allow us to get rid of unnecessary marks and stains on the vessel, and will also give the future material applied to the glass surface tenacity and strength.
- We take a convenient brush and use it to apply a thin layer of glue along the entire outer circumference of the wine glass and immediately sprinkle our product with artificial snow and shimmering sparkles, previously purchased at a specialized store.
- We should remove the excess of this available material with the same brush, but after fixing our festive decoration. If you have an uncontrollable desire to add something of your own to the decoration of the glass, then go ahead! Your possibilities are endless, as you know. You can easily attach small snowflakes, beads, rhinestones, sequins and other decorative elements chosen to your taste to such vessels with your own hands. In any case, by the New Year you will have wonderful wine glasses that you just can’t take your eyes off.
How to decorate wedding glasses with your own hands: dot painting on glass
The simplest way is dot decoration. To create it, you don’t need the ability to draw, and you don’t need a lot of time and resources.
Materials:
- acrylic paints;
- cotton swabs, matches;
- disposable container, from 2-3 cm in diameter (can be made from foil);
- cotton pads or cloth;
- alcohol or acetone.
First, wash the glasses and let them dry. After this, the surface is further cleaned with a cotton swab dipped in alcohol. When everything is done, the wine glass is turned upside down.
This method of preparation will remove all contaminants that could disturb the future decoration.
Paint of the selected color is poured into a disposable container. Having dipped a cotton swab into the paint, they begin to make dots from the very bottom of the bowl. The distance between them is approximately the same so that the decoration looks uniform.
After completing the first row, the next one begins, while the pressure with the stick decreases - this method will produce smaller circles. When this ceases to work, they switch to painting with matches. The higher the dots rise in the glass, the less common they are.
At the same time, they are arranged in a chaotic order. Sometimes they are made into curls or pyramids.
Stop placing dots 1.5-2 cm before the edge of the glass. This is done to prevent paint particles from getting into your mouth.
The leg and stand are most often left clean. But sometimes inscriptions are made on the stand using contour paints of the same shade.
When newlyweds want more variety, glass decorations are made from several colors.
This style of execution can look rude, just like identical mugs, so it is necessary to monitor moderation in the design of glasses.
Conclusion
With just a little effort, you can turn ordinary dishes into a work of art. And if you organize work with the whole family at one table, then an excellent pre-holiday mood, as well as wonderful, warm memories will be ensured. Children will absolutely love decorating their glasses and participating in the New Year's rush.
Previous
Do-it-yourself Making ceramic dishes with your own hands at home
Next
Do-it-yourself candlestick made from a glass: 6 life hacks and instructions for making it
How to paint wedding wine glasses with an outline on glass - master class
Painting glasses for a wedding with an outline on glass is a fairly easy technique. But at the same time, you need to try to create dots and lines on the paper so as not to spoil the workpiece.
For painting you will need:
- contour paints;
- masking tape;
- cotton pads and alcohol;
- stencil.
Glasses are cleaned and degreased with alcohol or acetone. After preparation, thin strips of tape are used to glue the stencil onto the bowl.
Take a tube of paint of the main color and begin to apply dots along the outline of the stencil. When the figure is completed, the adhesive tape is removed and the gluing area is degreased with a cotton swab.
After the glass has dried from the alcohol, the boundary is closed and the next stage is started. Sometimes there is a more complex method of execution - drawing a solid line.
When the main figure is completed, dots begin to be drawn on the sides of the wine glass. At the same time, they try to ensure that the different colors and sizes of the circles are distributed randomly.
The dots gradually become smaller, leaving large gaps between them. At the same time, a clean strip the size of the main pattern is maintained at the back. This is done to make the glass look lighter and lighter.
New Year's decor inside glasses, glasses and wine glasses
Glasses, wine glasses and goblets can be decorated not only on the outside, but also on the inside. Almost any housewife will have glass or crystal containers that have lost their presentation. Scattered glasses of various sizes and shapes are also suitable for decoration.
Glasses, wine glasses and goblets can be decorated not only on the outside, but also on the inside.
How to make decor
For the New Year, old glasses can be turned into original candlesticks. The main thing here is that the vessel has a long stem and the edges of the bowl are wide. It is advisable to choose transparent vessels so that the interior decor is visible.
It is advisable to choose transparent vessels so that the interior decor is visible.
For the first option, you will need the glasses themselves, candles and small Christmas tree balls of golden, red or silver color. The containers should be rubbed until shiny, Christmas balls should be placed in them, carefully turned over, and candles should be attached on top. This can be done by dropping a couple of drops of hot wax onto an inverted stem and placing the candle itself directly.
The whole New Year's composition in a glass looks original - a candlestick with a Christmas tree inside. You will need:
- Red wine glass;
- Old CD;
- Glue gun;
- Glue "Moment";
- PVA glue;
- Watercolor brush;
- Silver glitter;
- Beads (one color);
- Sewing accessories metallized in a shade similar to sparkles;
- Silver gift wrapping tape or paper.
You should make a Christmas tree from an old fir cone. To do this, the cone is covered with glue and sprinkled with glitter. After complete drying, beads are attached to the cone using a gun. A larger bead can be attached to the top, thus simulating the top of a Christmas tree.
After drying, the homemade Christmas tree should be attached to the CD. Using a brush, cover the surface of the CD with a layer of PVA glue. A Christmas tree is attached to the center of the disk, and the remaining space is sprinkled with glitter and small pieces of silver foil (gift paper).
Treat the edges of the glass with Moment glue, turn the vessel over and secure it to the disk. Cut a strip from the sewing accessories and use it to glue the junction of the disc with the edges of the glass using a gun.
Using a brush, cover the candle with PVA glue and sprinkle with glitter. Place on the upside down stem of the glass and let dry.
The whole New Year's composition in a glass looks original - a candlestick with a Christmas tree inside.
New Year's glasses without stems can also be turned into candlesticks. What do you need:
- Regular transparent glasses with thick walls;
- A couple of spoons of granulated sugar;
- Metal container;
- Masking tape;
- Golden nail polish;
- Golden glitter;
- Watercolor brush;
- Small candles in metal stands.
The masking tape needs to be torn off along the edge. The absence of straight edges on the strip is welcome. Cover the entire outer surface of the glass with the resulting strip. Pour a small amount of water into a metal container and add sugar. Put on fire. Heat, stirring constantly, until the syrup boils and becomes thick. Using a brush, completely cover the inner surface of the glass with thick sugar syrup and let it dry. Pour some water into the glasses and shake well so that the inside surface is slightly moistened. Then pour golden sparkles into the glasses and, rotating the glass, carefully distribute them over the inner surface. The rest can be poured out. Cover the outer surface of the glass completely or only with painter's tape free areas of the glass with golden nail polish. After the varnish has dried, remove the masking tape.
In order to use the New Year's wine glass for its intended purpose, you can make a decorated candlestick with water out of it. In total, you need to fill the vessel with two-thirds of water. Place decorations in it (small Christmas balls, a spruce branch, fir trees, beads, flowers, etc.) and carefully place candles in them in a metal stand.
New Year's glasses without stems can also be turned into candlesticks.
Ready-made decoration examples
In the absence of imagination and creativity in general, ideas for festive decoration of the internal filling of vessels can be found on the Internet. As you can see from the examples, any available materials are suitable for decoration, but thematic decor is especially welcome. This could be, for example, old Christmas tree decorations in the form of snowmen.
Entire compositions are made from such homemade candlesticks. For example, you can build a kind of magic ball from two glasses, decorating the stems of the wine glasses with ribbons, and attaching twigs of thuja or fir to Moment glue.
Any available materials are suitable for decoration, but themed decor is especially welcome.
Where to put it to decorate the interior
The correct arrangement of ready-made New Year's decor in a glass will help create a wow effect, add style and sophistication. The classic combination of golden and silver balls inside the glass is ideal for a festive table. If there is space, then it is better to place such candlesticks along the center line.
They can become a spectacular decoration not only for the table, but also for fireplaces, window sills, and coffee tables. Original glass candlesticks will organically fit into any interior. They can be installed free-standing or stacked several on a tray. It all depends on the number of homemade candlesticks.
The classic combination of golden and silver balls inside the glass is ideal for a festive table.
DIY painting of wedding glasses with acrylic paints – tips and ideas
Painting is the most difficult way to create a design on glasses. This technique is only suitable for people with developed drawing skills.
Materials:
- 2 plastic plates;
- 1 plastic glass (for washing);
- brushes;
- cotton buds;
- acrylic paints of the desired colors;
- cotton pads and degreaser.
The glasses are prepared for drawing and turned upside down. After this, water is poured into a glass, and paint is squeezed onto one of the plates. The second vessel will serve as a stand for wet brushes.
To draw the stamens, cotton swabs are dipped in paint and dots are randomly placed along the bottom of the glass. In this case, the colors and sizes of the circles should differ slightly. When the stamens are finished, they are left to dry for 2-3 hours.
Sometimes it is advised to bake paints to finish the job faster, but wedding glasses are fragile and can crack from high temperatures. Therefore, it is better to let the paint dry naturally.
After drying, draw the petals of the plant. They are made with a thick brush, and then the veins and details are drawn. When all the small elements are completed, the glass is again given time to harden.
The last step is decorating the stem of the glass. It is covered with green paint, depicting the stem of a plant.
This is the easiest way to create an original glass. But if a person has extensive experience in drawing, he can make more complex plant designs on the bowl.
Second way
This method is suitable for those who do not know how to draw or want to make the drawing more even. To do this, you need to prepare the following materials and tools:
- glasses;
- acrylic;
- brushes or sponges;
- stencils;
- degreaser;
- cotton pad;
- scotch.
Related article: Crochet butterfly patterns
Progress:
- Soak a cotton pad in alcohol or other surface-degreasing liquid and wipe the outside of the glass with it;
- Choose a stencil design or make it yourself, for example, for wedding glasses, a simple stencil in the shape of a heart is suitable, and secure it to the surface of the glass with tape;
- Apply paint evenly with a brush or sponge;
- Peel off the stencil and let dry;
- If necessary, draw details with a thin brush (you can use the dot technique).
After drying, if desired, coat the glass with matte acrylic varnish and allow to dry thoroughly.
You can use masking tape as a stencil. Strips of adhesive tape are glued to form drawings or geometric patterns (stripes, squares, triangles, etc.). The glass is painted over the top and left to dry. After this, the tape comes off. You can use several colors: paint the glass, stick it with tape and apply paint of a different color on top. It all depends on your imagination!
How to make painted glasses for a wedding yourself: templates, stencils with patterns
In this video you will learn in more detail about painting a wedding glass:
When there is a desire to create a complex design on wedding glasses, but there is no skill in working with paints and glass, ready-made sketches and stencils will help. After all, the principle of creating decor is to print and cut out the pattern, then apply it to the glass and paint over the voids.
Depending on the volume of the pattern on the stencil, different colors are chosen. For large ones, stained glass is used, and for small parts, an outline is used.
Self-painted wedding wine glasses bring joy during the holiday and from photographs, and with the correct application of paints, they can be placed as decoration in a future home. Sometimes the execution technique is so flawless that they are used on every marriage anniversary without losing their beauty.
Decorating glasses with twine
Another excellent option for decorating glasses for the New Year 2020 with your own hands is twine. Don’t look at its dullness and lack of colors; it will come in handy in a New Year’s decoration.
For the transformation you will need:
- wine glasses;
- thin thread of twine;
- glass glue;
- degreaser (alcohol);
- decorative decorations to suit your taste.
Manufacturing process:
- Before we start decorating the wine glass, we should degrease its surface with medical alcohol.
- We carefully and tightly wrap the prepared piece of thin twine with our own hands around the glass along with the stem and support, lubricated with special glue.
- We decorate the finished product with a simple bow made from the same material at hand. Our creative work is complete! For the New Year's holiday, it is possible to create a magnificent decor according to your own ideas or as in our next photo ideas.
One more instruction
There are some other cool things you can do with Mod Podge or glue solution. Namely, apply a pattern to the dishes and give the glass a matte finish.
We're using different shaped glass candle holders as an example, but the same technique can be applied to bottles, glasses and glasses, with the only caveat being that the edge you bring to your lips should be kept clean.
When starting this project, have the following supplies: Mod Podge or glue solution (approximately 2:1 school glue and water), tissue paper or napkins, and, if possible, a shape punch so you can easily cut out identical paper shapes. The last tool can easily be replaced by thin scissors, a stencil and a little of your patience.
First, decide on the colors and figures that you will use. This could be numerous small details or one larger picture. Whatever you decide on, cut out the image from the paper of your choice, place it on the glass in the desired location and apply a lightly watered Mod Podge or adhesive solution over it. The paper should be soaked through with this substance, so the thinner it is, the better. However, be careful, wet thin paper tears easily and too sweeping movements with a brush can ruin the design.
If your design has small details, such as confetti, you may want the space between them to be matte. In this case, cover it with Mod Podge or adhesive solution just like paper.
When working with a glass or glass, do not stick the designs too close to the edge, it should remain clean. To be on the safe side, cover the edges with a wide strip of masking tape.
When all the prepared applications are thoroughly glued to the glass, let them dry. If glue gets on the edges of the vessel or on those parts of the glass where, according to your idea, it should not be, carefully wipe it off with a cotton swab dipped in hot water.
Glasses decorated with paper and glue:
Vintage style bottles and glasses (note the edges):
Another option for decorating glasses, this time using paper and vinyl glue (it doesn’t spread like Mod Podge and doesn’t make the glass look dull):
Confetti made of gilded paper is simply glued to the glass, and a golden ribbon completes the composition.