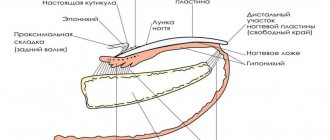
What is nail plate alignment?
Each of us has a different nail structure. Lucky are those girls whose hair is perfectly even and smooth. But some young ladies have a hypersensitive plate (irregularities, detachments, tubercles). In addition to everything, during manicure, nails are often subjected to various treatments: filing, polishing, removing gel polish with a machine, etc., which also has a bad effect on the condition of the nails.
Alignment and strengthening are necessary in order to give the nail the correct architecture. It will also get rid of varnish runs, waves at the end, various bumps and dents. The first layer is a primer, it hides all the irregularities. The second layer is evenly distributed over the nail, smoothly disappearing in the area of the side ridges and cuticle, forming an ideal surface.
This procedure is simply necessary and has a number of advantages:
- Leveling strengthens the nails, and the coating lasts for several weeks before correction.
- The ability to create the correct nail architecture. When adjusted, the nail will grow in the right direction.
- Simplicity and accessibility. In order to make strengthening, you do not need to buy additional products. A simple procedure takes about 10 minutes.
- It is important to do leveling when removing the coating with a device, so that when cutting, a base layer remains. A thin layer of the product will cover and protect the nail from mechanical stress.
- Static and beautiful. The smooth surface gives beautiful and even highlights from different light sources.
What is it for
The nail plate of different people has its own characteristics - some are lucky to have naturally smooth and strong nails, while others know first-hand what tubercles, peeling and other problems are. In addition, even on healthy and smooth nails, unevenness may appear over time, since frequent treatment with aggressive agents, physical impact and drying in a device negatively affect its condition.
Nails without waves and dents
Leveling your nails with gel polish allows you to remove waves, bumps and dents, which otherwise would become more noticeable after applying a colored coating. But this is not the only advantage of the procedure.
Alignment has a number of advantages:
- The nail plate becomes stronger;
- The quality of the manicure improves - it will delight its owner not for several days, but for more than two weeks;
- The procedure is quick and takes about 10 minutes;
- Protection of the nail from mechanical influences;
- Aesthetic beauty – gel polish applies to smooth nails without streaking, forming an ideal surface.
Aesthetic beauty of nails
In other words, leveling is a procedure that will help create a beautiful manicure for a long time and strengthen the nail plate, making it less sensitive to various external influences.
The creation of nail architecture is carried out using specialized means. On the shelves of cosmetic stores you can find three types of suitable products:
- Biogel;
- Base for gel polish;
- Gel for extensions.
The use of each substance has its own characteristics, but they are all united by one important rule: the product must be thick, otherwise it will not fill the recesses on the nails and it will be impossible to construct the desired shape.
Applying the base
Why do irregularities appear?
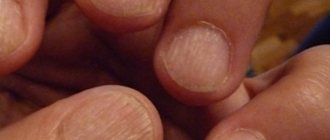
Ribbed, wavy and thin nails are always a problem. With such nails, any manicure does not look very neat. Most often we do not think about the true cause of our deplorable condition.
It is worth paying special attention to this issue, because nails are an indicator of our health. For example, if your nails are covered with a groove near the cuticle, then you should take a course of vitamins to saturate your body with useful microelements. Ribbed plates appear as a result of microtraumas, and also cause fungus, psoriasis or other problems in the body.
Leveling the nail plate with a base
The base should be thick, it is advisable to choose a rubber one. The thicker it is, the easier it will be to strengthen the nail. More liquid products run faster to the side rollers. You need to keep an eye on this.
What bases are suitable:
- Kodi;
- Komilfo;
- Lovely Base;
- NeoNail;
- Adore Professional.
Strengthening technique:
- Prepare your nails for work.
- It’s good to scoop up a drop of the desired size with a brush and apply a thin layer of base.
- Place a drop in the apex area (almost near the cuticle). Pull it to the cuticle and stretch it in 3 movements. The first is in the center, the second is on the right edge, the third is on the left edge. Don't be afraid to ruin something. The base brush is very soft, it will not be able to push through the drop, so movements can be bold.
- Use the corner of the brush to form the architecture of the nail.
- Turn the nail over, seal the end and dry thoroughly.
Video instruction: Base leveling technique
How to straighten a nail plate at home - life hacks for enterprising beauties
Regardless of whether the stated problem bothers you on your arms or legs, you need to start from the primary impact on its cause. If this is a lack of vitamins, then you need to carefully review your diet and enrich it with nutritional components. After consulting with your doctor, you can also determine the order in which you should take dietary supplements. In theory, these manipulations can strengthen the nail plate over time without additional action on your part.
There are cases when the unaesthetic appearance of marigolds is caused by a dermatological infection. As a rule, it is caused by hormonal imbalances or fungal bacteria. After visiting a dermatologist, you will be advised to purchase one or another ointment that will act locally on the problem. Most often, such preparations are applied after washing hands at intervals of every 3 hours.
You can strengthen and level the nail plate at home using exclusively natural ingredients. Experts in the field of nail health have developed a special product, Nailz, which smoothes the nail plate, strengthens it and enhances nail growth. The product is easy to use, and for visible results, just one course will be enough.
Another option that requires a little more effort is to use teak wood resin, which you can buy at a pharmacy or nail shop. Initially, thoroughly polish your nails, then push back the cuticles, after moisturizing them with oil. Then, using a thin brush, spread the resin over the plates, waiting for it to dry completely. It takes less than 2 minutes. After this, it is worth adding a layer of biogel. Then re-apply the resin and special fixative. Wrap each nail in foil for 5 minutes.
You can also try to strengthen and straighten your nails, guided by folk “transformation recipes.” Unfortunately, you should not expect a visual effect from them soon, since the use of medicinal baths has cumulative results. Here are some of the most popular mixtures for home SPA:
- With salt. 1 tablespoon of mineralized sea salt dissolved in 1 glass of warm boiled water can do wonders for your fingers;
- with vegetable oil. Strictly adhering to equal proportions, combine a quarter glass of apple cider vinegar with a quarter glass of high-quality vegetable oil (preferably olive oil). Place your hands there and enjoy doing nothing for 10 minutes;
- with orange juice. 2 teaspoons of regular table salt should be mixed with 5 drops of iodine, a third of a glass of freshly squeezed orange juice and the same amount of water. In addition to the pleasant aroma, the bath also helps to thicken the nail plates by accelerating the production of keratin;
- with iodine. Dissolve a teaspoon of 5% iodine in a glass of warm water. Then add 3 tablespoons of sea or table salt to the mixture and dip your fingers in the bath. Repeat the ritual every week for a cumulative strengthening effect.
If you have suffered a mechanical injury to your nails, as a result of which the undulation of the relief began to appear, then you can try primitive grinding. The main thing is to choose a high-quality buff that will cope with the task assigned to it. ProstoNail specialists have prepared a special cheat sheet with a gradient of abrasiveness.
| Buff abrasiveness | What can the tool be used for? |
| From 60 to 80 grit | Abrasiveness characteristic of pedicure files or tools that interact with artificial nails. Such accessories are quite hard and rough, so they must be used with extreme caution. |
| From 100 to 150 grit | These files are somewhat less rough than their predecessors, but are still unsuitable for polishing natural nails. Typically, artificial acrylic plates or toenails are polished with such buffs. |
| From 150 to 240 grit | Average abrasiveness and the most popular model among files in this segment. Such tools can be used for natural, dense nails and for artificial manicure. |
| From 300 grit and above | Exceptionally soft, moderately elastic sanders for natural, brittle nails. Young ladies with problematic nail plates will be able to appreciate them properly |
There are no more secrets left in front of you, so you can identify the original problem that provoked such an unpresentable appearance of the manicure and begin to solve it.
Leveling the nail plate with a gel polish base
Leveling the nail plate with gel polish is a doable task even for a beginner. The main thing is that in your personal collection there is not only the material itself, but also an ultraviolet lamp for its polymerization. This technique is the most common and popular among average girls due to its accessibility and ease.
Initially, pay close attention to purchasing a suitable base. It is advisable to purchase a bottle that is marked “rubber”. This component makes the base thicker and more viscous, less fluid and plastic. Due to this specific consistency, unevenness is eliminated, as well as the formation of a correct arch. The following brands have earned good reviews and appreciation from practicing craftsmen:
- Komilfo;
- Kodi;
- Lovely Base;
- NeoNail;
- Adore Professional.
Leveling the nail plate with a Kodi base is generally a service that is included in the price lists of even express manicure studios. So, what is the algorithm for your actions?
- First, prepare your nails for work by removing the cuticle or doing a European unedged manicure;
- now decide on the desired shape and length of the free edge of the nails;
- Use your brush to scoop up a drop of gel proportional to the size of the arch and place a dot at the root of the plate (apex area);
- pull it towards the cuticle and stretch it in 3 movements. The first is in the center, the second is on the right edge, the third is on the left edge. Don't be afraid to ruin something. The base brush is very soft, it will not be able to push through a drop, so movements can be bold, and pressure can be medium in strength;
- Use the graphic corner of the brush to form the architecture of the nail;
- Now turn over the freshly done manicure and seal the free edge, then polymerize the result under the lamp.
It should be noted that this method has both a number of undeniable advantages and a number of disadvantages. It would be fair for us to point out both the pros and cons.
Advantages:
- rubber bases have the property of self-leveling, so they are optimal for beginners in the field of manicure;
- gel varnish can not only visually fill furrows and remove waviness, but also eliminate natural defects and curvatures, which many other methods cannot do;
- After spending just a few minutes, you will become the owner of perfectly smooth nails. You don't need to take regular baths, spend precious hours on keratin straightening, etc.;
- simplicity and accessibility of the technique. Even a beginner can repeat such a simple algorithm of actions at home;
- uncompromising durability of manicure. No chips, tarnishing or any other defects on your fingers. The gel base perfectly increases the durability of even inexpensive coatings.
Flaws:
- Rubber coating is difficult to remove from nail plates without a special device. As a rule, a router attachment or a file with a high degree of abrasiveness is used for this;
- When you put your fingers under the curing lamp for the first time, you may experience a number of uncomfortable sensations, such as a burning sensation. You just have to endure this moment;
- When opening a bottle with a rubber base, a lot of air can get in there, causing the consistency to thicken and the base itself to bubble.
Leveling the nail plate with biogel
The nail industry is rich in various techniques and alignment techniques. But the second most popular, after gel manipulations, is leveling with biogel, because it not only masks the defect, but also has a therapeutic effect. This is due to the components of its composition, including proteins, teak resin, vitamins A and E. It is logical that such a material will have a number of advantages: naturalness and environmental friendliness; absence of chemical impurities; not just cosmetic, but also therapeutic effects; stimulation of nail plate growth; strengthening nails by activating keratin production; durability of the manicure, as well as the care of its alignment and ease of removal. The only fly in the ointment is its weak protective properties. Biogel will not be able to create a barrier strong enough to repel attacks from external irritants: household chemicals, ultraviolet radiation, chlorinated tap water, etc.
So that you don’t get confused when you go to a manicure store to buy the right product, ProstoNail has prepared a list declaring the varieties of this base:
- color. It already contains a bright, rich pigment, so it looks like gel polish. Does not require additional application of a tint, therefore, does not “overload” the nails and does not add volume to them;
- transparent. This varnish requires a coat of color on top. It lays down in a thin layer and dries instantly, its properties are similar to the classic rubber base;
- Royal Sealer. Ideal for those beauties who suffer from gray or yellow nails. This type of strengthening biomaterial has lightening properties;
- sculptural. It contains silk extract, which ensures a long-lasting smoothing and strengthening effect. It is characterized by a natural, opaque shade, so it is often used to form the free edge of the nail plate. The pronounced strengthening effect allows it to be used on long nails, making them strong and elastic. Often used in aquarium design techniques;
- UV biogel. Used in summer, when solar ultraviolet radiation is especially active. Levels solar differences and prevents brittleness of nail plates;
- S-coating. This product is used by craftsmen in case of extensions. Quite rigid, but at the same time elastic base of transparent color.
Now is the time to read the step-by-step instructions for applying freshly purchased biogel:
- pre-treatment of cuticles and nail plates remains standard and familiar to every girl;
- this is followed by degreasing of the nail plates in order to improve adhesive properties. Use an acid-free primer for this;
- After waiting for the primer to be completely absorbed, apply the biogel itself in a thin layer and polymerize it under the lamp for 3 minutes;
- repeat this action at least 3-5 times, gradually lengthening the drying time;
- cover your nails with topcoat and proceed to the usual decoration.
Leveling the nail plate with gel
Are you asking yourself a common question: how to restore the nail plate, restoring its integrity and perfectly smooth texture? Our answer is simple - use manicure gel from the brands Cosmoprofi, Kodi, CNI or Irisk. These manufacturers adhere to the required consistency of the preparations and preserve their original performance properties. By the way, remember that such gels cannot be dissolved, only cut off with a highly abrasive tool:
- disinfect your hands and go over the plates with a sanding buff;
- cover the nails with an acid-free primer that removes excess fat and moisture from the lipid barrier of the rough epidermis;
- Using a thin, flat brush, gently rub in the base layer;
- after polymerization, take a drop of manicure gel and place a dot in the center of the plate;
- carefully level the improvised blot, moving from the center to the periphery;
- carefully distribute the gel along the free edge, “sealing” it;
- dry the result of your efforts under the lamp and proceed to the subsequent transformation rituals.
Leveling the nail plate with acrylic powder
Acrylic is commonly used to extend and strengthen nails, but in fact this material is multifunctional. It is somewhat more difficult to use than all of the above liquid bases, but the final result will definitely please you:
- perform the usual preparatory work, adjusting the shape and length of the free edges;
- remove or push back the cuticle, and then sand the plates with an elastic buff;
- Apply an acid-free primer over the entire surface of the nails (paying special attention to the edges). Wait until it is completely absorbed;
- dip a thin brush in the liquid, squeeze out the excess and then pick up a small pea of powder;
- wait a few seconds, then spread the composition as thinly as possible over the surface of the nail at a distance of 1 millimeter from the cuticle. The procedure should be carried out clearly, without delay, since the mass hardens quickly;
- dry your nails and finally sand down any uneven areas;
- Feel free to start decorating your fingers, taking into account the manicure trends that are relevant this season.
And remember, even the Moon has spots, so don’t feel bad about small blemishes on your nails. Fortunately, the modern beauty industry easily masks or eliminates these minor defects.
Leveling the nail plate with biogel
The choice of most girls is biogel. It has a thick consistency and dissolves well. Many manufacturers produce special biogels for thin nails. This is a real salvation for problematic nails that suffer from detachments. You need to choose a soft brush with a rounded shape and long bristles. It should practically not touch the nail. The product should stretch only due to surface tension.
Which biogels are suitable:
- Bio Stretch Gel (BSG);
- Atica TM;
- Creator;
- Yoko;
- El Corazon.
Remember that to level with biogel, you also need to apply a base.
Strengthening technique:
- Apply a thin primer layer of basic biogel using a brush to prepared, fat-free and slightly buffed nails.
- Rub the base well, especially in the area of the side rollers, under the cuticle and seal the end.
- Dry the layer. In terms of time, the biogel dries like a regular gel polish: 30 seconds in an LED lamp and 2 minutes in a regular UV lamp.
- The second leveling layer must be applied to a well-dried primer layer. Saturate the brush with material gel and scoop a drop of a suitable size onto the tip.
- Place in the center of the nail about a millimeter from the cuticle.
- Push the brush forward a little towards the cuticle.
- When the drop lies along the cuticle, pull the material down to the tip. Without pressing, distribute the biogel over the nail, not reaching the end of the free edge, so as not to touch the dispersion layer and not violate its integrity. This will distribute the material more evenly.
- It is necessary to work on the side zones. You need to stretch the material from the droplet to the tip closer to the rollers.
- Turning the nail sideways, form a longitudinal line. Using the corner of the brush, lightly grab the layer of biogel and pull it down along the nail in long, even lines.
- Near the side rollers, the thickness of the gel should be minimal.
- The result will be a small volume along the center line of the nail from the cuticle to the tip with the highest point somewhere between the center and the cuticle at about 1/3.
- Turn the finger over and seal the end.
- Dry the layer in a lamp.
Before applying a colored layer, regardless of whether you need to cover your nails with colored gel polish or gel, you need to remove the sticky layer. This is necessary so that the color layer lays down well and evenly.
C-curve nail
It is necessary to ensure that the transverse bend has a beautiful rounded shape without excess materials on the sides. This is especially true when working with liquid materials. To avoid such an error and eliminate all irregularities, you need to turn your finger nail down.
How to level the surface
Nail alignment is carried out with a special base. As a rule, it contains rubber, which gives a thick texture and makes the procedure as effective as possible. Thanks to this component, the composition becomes thicker, more flexible, and acquires a characteristic “rubber” consistency. It is this effect that allows you to level the plate, fill in the depressions, and create a beautiful nail arch shape.
The optimal solution is camouflage bases. These are new generation products in the nail industry that not only straighten the nail, but also mask visual imperfections. They have a flesh-colored, pinkish or beige tint. This coating looks beautiful even without the use of colored gel polish - just apply the top coat and enjoy a neat nude manicure, which is right on trend.
Rubber bases have a self-leveling effect - you just need to give the nail the desired shape and place it in the lamp. During the polymerization process, the coating will level itself. Due to their thickness, they are available in a jar with or without a brush, which is not a disadvantage. In the second case, the master can choose the most convenient brush for himself.
Liquid products are not suitable for leveling - they are used for nails that do not require special preparation. In addition, this is rather the prerogative of experienced craftsmen, since it is more difficult to work with liquid transparent bases. If the technology is not followed, they can flow under the cuticle and side ridges. As a result, the nail will remain uneven, and the coating will not “live” for long. After just a few days, chips and detachments will appear on such a manicure - the situation can only be corrected by redoing it completely.
Leveling the nail plate with manicure gel
An ideal option for those whose nails begin to curl unevenly as the length of the free edge grows. Using the gel, you can strengthen and correct the nail plate.
What gels are suitable:
- Cosmoprofi;
- Kodi;
- CNI;
- Irisk.
If you are leveling your nails with extension gel, it is important to remember that it does not dissolve. It just needs to be cut down.
Strengthening technique:
- Disinfect your hands and file the surface with a buff.
- Coat your feet with an acid-free primer for better adhesion.
- Using a flat brush, rub in a thin layer of gel base.
- Leave the layer to dry in a lamp for a few minutes.
- Use a brush to take a drop of manicure gel and place it in the middle of the nail.
- Push it closer to the cuticle, to the side ridges and carefully level it.
- If most often deformations occur on the free edge, then you need to pay attention to it and carefully level the gel there.
- Dry the layer in a lamp.
- Using a medium-hard file, carefully file all the irregularities of the nail: the side ridges, at the cuticle and the free edge. It is also necessary to trim the end.
Now your nails are perfectly smooth, and the color coating will lie on them flawlessly!
When is it necessary to straighten the nail plate?
There are several situations when it is necessary to perform the alignment procedure:
- if there are defects in the nail after the previous manicure: strong cuts, improper formation of the shape;
- if the nail is thin after wearing shellac for a long time or for natural reasons;
- in the presence of natural irregularities and differences on the nail plate;
- if there is fragility and delamination of the plate, this is especially important if the nails suffer during professional activities and at home;
- after suffering nail diseases that provoke deformation of the plate;
- strengthening contributes to longer wearing of the colored coating that can be applied on top;
- the strengthening layer makes it possible, when correcting and removing the top coating, not to remove the material all the way to the nail;
- if you want to grow a longer length, the reinforcing material protects the plate, which grows to the desired length along with it.
Life hack: how to make perfect highlights
After we have learned how to level the nail plate, we should learn one more secret. You won't get the perfect highlight without a round lamp. Its appearance directly depends on the light source. With a regular lamp it will be anything: square, angular or oblong. But a beautiful round glare can only be obtained from a round lamp. In its absence, forming it will be very problematic.
In order to get it, a regular round table lamp will do. After applying the strengthening, the nails can be held under a regular lamp for 20-30 seconds, and then sent to polymerize.
Using biogel
Biogel is a special type of manicure product designed for thin nails. The advantages of using it are that leveling the nail plate with gel polish is accompanied by the application of a protective layer that prevents peeling and other problems.
Using biogel
The disadvantages of biogel include the difficulty of application - the brush should hardly touch the working surface. The coating of the plate occurs due to the tension of the thick composition. When choosing a product in a store, you need to pay attention to the brush - you should choose one that is very soft, round and with long bristles. The second disadvantage of using biogel lies in the need to purchase an additional manicure product, because it does not replace the base, but is applied on top of it.
Leveling with gel under gel polish is carried out as follows:
- First you need to prepare the nail - shape it and degrease it;
- The second stage is to apply the base over the entire surface and seal the end;
- After the coating has dried, a layer of biogel is applied.
- Dry it like a simple gel polish - 30 seconds in an LED lamp and 2 minutes in a simple ultraviolet lamp.
- Before applying the color coating, be sure to remove the sticky layer.
Since applying biogel requires some experience, it is not recommended for beginners, but if you want to learn, you need to prepare for the fact that this may take a lot of time. The correct application technique is presented in the video.