Benefits of gel polish
This coating is preferred if you do not want to injure your nails. When applying it, you do not need to cut down the nail plate much.
Gel polish is also chosen for the following advantages:
- long service life;
- beautiful appearance of nails;
- variety of color solutions;
- additional protection;
- ease of application and removal.
If all rules are followed, the coating will last for at least a month.
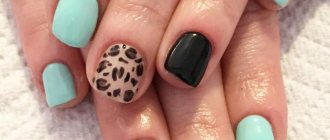
Red rich gel polish
What is a pedicure with gel polish
Gel polish is quite often used to cover toenails. It has become much more popular than regular varnish, gel or biogel. This is due to its gentle effect on the nail plate and long-lasting results.
The main advantages of this coating:
- If all rules are followed, the result will last for at least 3 weeks;
- its application, unlike conventional gel, does not require strong grinding of the nail plate;
- ease of use, it is easy to apply and remove;
- after removal, nails quickly recover;
- large selection of shades and effects;
- protects nails from the negative effects of the external environment.
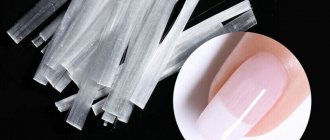
What you need to apply the coating
If you decide to do a pedicure on your feet with gel polish at home, you need to purchase special equipment and products.
The list of what will be needed in the process includes:
- UV lamp. It is intended for drying the coating. If your budget allows, opt for equipment with a power of at least 36 W. In such a lamp the gel will harden quickly. A more expensive option is an LED lamp that dries your nails in seconds.
UV lamp
- File. It is worth purchasing a professional buff with high abrasiveness. A regular sanding file will also work.
- Degreaser. Professional products have worked well, but you can use alcohol or nail polish remover. Instead of cotton wool, use synthetic napkins that will leave no lint.
- Bondex or primer. They are used after treatment with a degreaser to ensure that the coating lasts even longer. But at home you can do without them.
Bondex for pedicure
- Base. This is the first element of the future pedicure. It is worth purchasing a professional product that contains vitamins that prevent damage to the nail plate. There are also cheap bases, but when buying them, be prepared for the gel polish to peel off quickly.
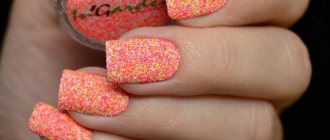
- Colored varnish. This is the main element of a pedicure. There is a huge selection of shades and manufacturers. You can purchase a set that includes the main colors. These are usually used by beginners.
- Finish (top). You can’t skimp on it, as well as on the base, because if you buy a low-quality product, you can quickly notice chips and scratches on the surface of the nail. The finish is available with and without a sticky layer, as well as glossy or matte.
How to do it at home
With the application of shellac on nails, you can perform both trimmed and hardware pedicures.
Sequence of classical processing
Stages of work:
- Start with foot hygiene, treat your heels with pumice stone, scrub over the entire surface of your feet, thereby cleansing the skin of dead cells.
- Next, polish your nails with buff, not forgetting the free edge.
- Take a cotton pad soaked in a small amount of rubbing alcohol or nail polish remover and degrease the nail plate.
- After the degreasing procedure, the base coat is applied in a thin layer, and the nails are kept under the lamp for 40 seconds to 2 minutes (the time depends on the power of the device).
- After the base, pigment (colored varnish) is applied, and the nails are also kept under the lamp for 2 minutes. Then the color is applied in a second layer and dried for the same amount of time. Proceed in the same way if you create a design on a finished surface.
- After the main color, a fixative is applied, also kept under the rays of a lamp for 2 minutes.
- The sticky layer is removed with an alcohol solution or varnish cleaner - moisten a cotton pad and rub it over the surface of the nail.
Useful video
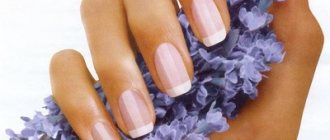
Step-by-step implementation of a classic French pedicure with shellac.
Stages of hardware pedicure
The algorithm of actions is as follows:
- Apply an emollient or make a foot bath by adding oil or sea salt.
- Remove rough skin and prepare nails. To do this, you need special attachments - pedicure cutters, which allow you to rid your nails of the cuticle and define the shape of the nail plate. The choice of attachments depends on the area of treatment and the purpose for which it is used.
- The nail must be degreased. Cotton pads soaked in alcohol or varnish cleaner can handle this.
- The nail plate is then coated with a base coat to allow the nail to adhere to the shellac. The base is dried in a lamp for about 2 minutes.
- When the base is dry, cover your nails with colored varnish. It is better to use two layers, which will make the coating beautiful and durable.
- The layers are dried in the same way as with a classic pedicure.
- The nail is coated with a top coat for shine.
Finally, you need to treat the legs with cream, and the cuticles and skin around the nails with special oil.
How to prepare for application
Before you do a nail pedicure with gel polish, you need to prepare for it. To do this, steam your legs, then remove the cuticle using tweezers or move it with a manicure spatula.
Steaming legs
Nails must be treated with a buff or file. This will ensure high-quality adhesion of the coating to the surface.
Finishing nails with a file
Preparing for a pedicure - what you shouldn't skip
Now it’s worth learning the rules of a real pedicure step by step. It is important to maintain order and take your time here. The preparatory procedures take the same amount of time as painting your nails, but they should never be skipped. After all, a crack in the heel will ruin the entire aesthetics of a beautiful nail.
ORDER AND BUY NOW for 70 rubles.
Bath. First, prepare a foot bath with the addition of sea salt. Keep your feet in it for 10 minutes, you can stand in the bath while showering. After the salt bath, it is advisable to take a contrast shower, or at least just pour cool water over your legs, especially your feet.
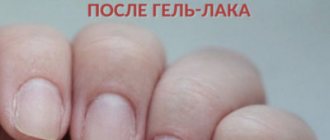
Removing the old varnish layer. The second stage of preparation is the removal of old varnish. If you painted your nails with an acrylic component, I think you will not have any difficulty removing it, and if you had a pedicure done with gel polish at home, then here are all the details on how to properly remove gel polish...
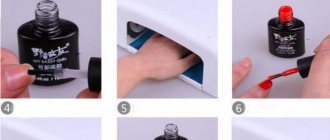
Applying gel polish in stages
After preparing the nail plate, it is necessary to degrease the surface. This will prevent peeling.
Pedicure is done in several stages:
- if you purchased bondex or primer, treat your nails with them;
- Apply the base, trying to do it so that it does not come into contact with the skin. If the product gets on the cuticle, carefully remove it with a wooden stick. Dry the base in a lamp;
- Apply colored gel polish using the same technique. Dry in a lamp. If several layers are needed to obtain an even tone, each is dried separately;
- a topcoat completes the pedicure. The top is also dried in a lamp. If you are using a finish with a sticky layer, remove it with a degreaser;
- After that, you can apply a little base oil to the cuticle.
Applying gel polish
How to do a pedicure with gel polish: tips
To make the pedicure procedure easier on your nails, you can use special spacers. This prevents the nails from coming into contact with the skin and with each other. Try to choose dense flower beds that can be applied to all the toes on each foot at once. This will reduce the time and also minimize the impact of ultraviolet rays on the skin. Ideas for fashionable pedicure 2021 can be found here .
How to do a pedicure with gel polish, tips:
- Try to choose a nail shape that suits you perfectly and does not cause discomfort. Nowadays, most women are in pursuit of beauty, so they strive to change their physiological characteristics, including changing the shape of their toenails.
- Yes, indeed, long rectangular nails look much more beautiful, but for ladies with short nail beds it is not recommended to grow nails too long.
- When wearing closed shoes, the nails can rest against the shoes, thereby causing pain and pressure on the matrix. In the future, such nails may curl, or the fingers may become deformed.
- Never cut deep into all corners, as this may cause bleeding or ingrown nails. If during the pedicure you see a lot of scales and dry skin at the points of the growth line, this means that strong pressure is being applied in this area.
- Buy loose shoes, and try to trim your nails a little in these places. In addition, reduce the amount of material applied; perhaps it is the gel polish that puts pressure on the nail, causing the formation of calluses.
Pedicure gel polish
Main mistakes
Beginning masters often violate pedicure technology. Because of this, the gel polish quickly begins to peel off. Most often, people forget to treat the nail plate with a buff or apply a degreaser. Another common mistake is using a thick layer of gel polish. It must be distributed evenly. A thick layer does not dry well and often forms uneven surfaces.
Important! Do not shake the bottle of cosmetic product, otherwise the risk of small bubbles will increase. Sometimes beginners do not seal the nail from the end. This threatens the formation of chips. It is also prohibited to remove the sticky layer from the colored coating.
To properly do a pedicure at home, we recommend watching a training video.
How to remove gel polish
To remove the product, you need foil, a removing solution, cotton pads and a manicure spatula.
- To begin with, the surface is lightly treated with an abrasive file to ensure better penetration of the liquid.
- Cotton pads are cut into several small pieces. Each one is blotted in a special professional solution. You can use plain nail polish remover, but it should contain acetone for best results.
- Pieces of cotton pads are placed on the nails and tightly wrapped with foil. You need to keep the product for 15 minutes. After this, the discs are removed and the remaining coating is removed with a manicure spatula.
Removing gel polish from nails