12/17/2014 Category: Do it yourself Author: Natalya Ivantsova
A jewelry stand is essential for any fashionista who has a large number of earrings and beads, and who often changes them depending on her outfit and mood.
- Household items as decoration stands
- Holder for rings and bracelets made of plaster
- Tree for decorations
- Detailed master class: tree made of wire and papier-mâché for storing jewelry (video)
- Jewelry storage frame
- Frame for jewelry with mosquito net (video master class)
DIY jewelry stand
The jewelry organizer has a number of undeniable advantages:
- All jewelry is always in sight.
This is a very important feature, understandable only to the owners of a bottomless chest, in which every now and then something is lost or forgotten at the very bottom.
- Chains and beads do not get confused with each other and hang separately from rings and bracelets.
- A jewelry organizer is not only a functional item, but also an unusual interior detail, an art object that emphasizes the style and taste of the owner of the house.
In order to make an interesting holder for jewelry with your own hands, you do not need to have any special skills or tools; you just need to choose a suitable idea and bring it to life.
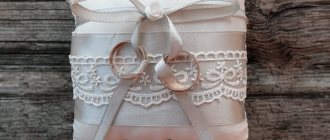
We create a plate for wedding rings with our own hands
Any newlywed couple wants their wedding rings to be beautifully presented during their wedding ceremony, as a symbol of their endless love and fidelity. I suggest you choose the option of a plate for rings with decor in the style and theme of your unforgettable celebration.
How to create an exquisite and original wedding accessory with your own hands using simple improvised means and materials?
My master class will be devoted to this topic.
To work on decorating a plate, we will not need to purchase special tools and materials that professionals use (modeling stacks, silicone molds and molds, texture sheets, acrylic rolling pins and much more). Let's try to make do with low-budget expenses and replace them with everyday goods that we most likely have at home or are sold in the hardware department of the nearest supermarket. The only thing we will need in our work as the main material, which we will have to purchase on purpose, is white polymer clay ClayCraft by DECO.
Materials and tools:
- a small ceramic plate or saucer;
— white polymer clay ClayCraft by DECO;
- thick PVA glue and superglue (I prefer superglue gel);
- toothpick or wooden skewer (skewer);
— a polyester napkin with a pronounced pattern;
- a smooth glass vase (glass) in the shape of a cylinder;
- artificial greenery, artificial decorative berries and fruits, beads, etc.
This is the shape of the plate I chose for decoration.
Household items as decoration stands
Sometimes you don’t have to go far to find a jewelry stand, but you just need to take a fresh look at familiar things.
Earrings and beads can be conveniently placed on/in the following household items:
- Hooks for towels or clothes.
There is nothing easier than reclassifying coat hooks into jewelry holders. You can use ordinary store-bought ones made of wood, plastic or metal, without making any special efforts to decorate, because beads and bracelets will successfully complete this task.
- Clothes hanger.
An ordinary hanger can, indeed, perform the function of storing jewelry with great success: earrings should be placed on additional hooks under the hangers, bracelets should be placed on a metal rod, and beads should be tied in a loop on the crossbar. A wooden hanger hung with jewelry looks the most aesthetically pleasing. If desired, it can be painted in some neutral color or decorated using the decoupage technique.
- Grater.
The graters with their small holes along the entire perimeter seemed to be created just for this purpose - so that girls could insert the hooks and clasps of their earrings into them.
In fact, the grater is a rather old invention, which during its existence has rightfully deserved to be the main theme for entire museums and the most interesting private collections. The first grater was invented in the mid-16th century by the Frenchman Francois Bouillet specifically to grind dried cheese, and then began to be used for all other products.
Thanks to four sides (or even more in modern models), you can easily place a huge number of decorations on the grater and, by turning the pyramid, see and select what you need for your current situation.
Oddly enough, it is best to use a Soviet grandmother’s grater for decoration, even if it is bent or rusted in places . By spray painting it with any color that matches the interior, you can get not only an excellent holder for jewelry, but also a really interesting art object.
- Cups and saucers.
An elegant tea set of coffee cups and saucers, one of those that everyone has received at least once as a gift and for some reason hardly ever uses, will be a wonderful way to store jewelry. Filled with chains and rings, as well as earrings and beads, it can be placed right next to the mirror, or you can put it in a chest of drawers or a dressing table drawer, and open it every morning before going out, like a real treasury.
- Desk drawers.
The drawers of an old kitchen or desk, especially if they have partitions inside, will become an excellent shelf for any small items, including earrings and bracelets.
Among other things, they are notable for the fact that it is easy to hook earrings onto a wooden base, as well as attach push pins or nail small nails and hang beads and chains on them . And the bracelets fit perfectly on any stable cylinder, such as an empty soda bottle or toilet paper roll.
In addition to a wooden box, you can use an old Soviet first aid kit in exactly the same way, if you remove the door - don’t hide such beauty!
Holder for rings and bracelets made of plaster
The needlewomen certainly borrowed the idea of making a stand for jewelry from plaster from shops and showrooms, where mannequins are displayed at every turn, demonstrating not only clothes, but also all kinds of accessories in the best possible light.
Mannequin literally means “little man” and is considered one of the most ancient inventions of mankind, because already in the tomb of Tutankhamun a male torso with a set of clothes was discovered. Papier-mâché mannequins were only used for display and tailoring in the 18th century, and wax mannequins were used in shops in 19th-century Paris. This was extremely inconvenient and impractical, and only the advent of plastic finally solved this problem.
In order to make such a stand for jewelry, you will need:
- gypsum - 1 kg (gypsum in dry form is sold in construction stores and art salons);
- thick rubber glove of the smallest size;
- a smooth wooden board and a simple pencil;
- sandpaper;
- construction stapler;
- drill and jigsaw or hand saw.
How to make a plaster jewelry holder:
- It is necessary to measure the diameter of the wrist of the rubber glove and draw a corresponding circle on a wooden surface, and then cut it out using tools. Next, sand the edges of the wooden board with sandpaper and attach the glove to this hole with a staple gun, as shown in the photo below.
- Next, you need to mix the plaster with water so as to obtain the consistency of sour cream, and carefully pour the resulting mixture into a glove attached to the board. It is important to ensure that the plaster fills the glove evenly without leaving any air bubbles. In this form, you need to let the plaster dry for two days.
- After two days, the glove is carefully removed, and the plaster hand for rings and bracelets is ready.
A holder for rings and bracelets made of plaster in the shape of a hand can become a non-trivial decoration for an elegant interior and will successfully fulfill the task of a beautiful and convenient device for storing jewelry.
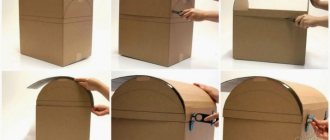
Master class: making a pincushion shoe
We cut out templates for the sole of our shoes from not very thick cardboard.
2 pcs. Length 14 cm. For the heel we need a sushi stick and cut off the bottom from the egg cell.
Glue the wire to one sole with a glue gun (any glue can be used)
Glue the two soles together, the wire inside.
Using this wire we give our sole the shape of a shoe. After folding, cut off excess cardboard if it comes out at the heel.
Now we make the platform. I came up with the idea of making a platform out of cardboard when I couldn’t find polystyrene foam at home.
We outline part of our shoe (toe) on cardboard.
Made from cardboard 2 mm thick. got 12 pieces.
It is important that each subsequent part is 0.5 mm shorter than the previous one. Approximately.
Glue all 12 pieces to the sole. It’s better to do this with PVA glue. It will be very strong and reliable. The inner side seemed to be cut off a little. That's how it should be.
We glue our shoe with white paper using the same PVA glue
We cut off all the excess.
We also seal the platform.
I covered the inside with red glossy paper. If the paper is thick like mine (I took a magazine cover), then it is better to do this with a glue gun. If it’s thin, then you can use pva.
We cut off all excess. And we need to paint our blank for the heel (the bottom of the egg cell) red. I painted it because I didn’t intend to decorate it, but it didn’t turn out very well and I still did it a little differently later. You'll see everything later.
Using a glue gun, we glue our super shoe with material. I have red jersey.
Seal all joints with a suitable ribbon or rope.
For the heel, we connect our blank and a sushi stick. Pre-cut it to the desired size. We fasten with glue.
I also decorated the upper part of the heel with the same material. It looks better this way, and I also glued a mesh inside. Then I regretted it.
Next we make the pincushion itself. We take a piece of material to match and make a mark in the shape of our toe.
We tighten it a little, put the padding polyester inside and tighten it tighter. We make sure that the shape of the triangle (our toe) is not lost, at least approximately.
This is what should happen. Or so it seems.
Glue this cute little pillow to our shoe. The joints between the toe and the pad are not very neat. We will decorate them. I will have roses.
Now let's make a stand. We need alabaster.
Find a shape for the stand. I had a plate like this. We dilute the alabaster with cool water until it becomes a thin sour cream and pour it in. When the plaster hardens, take out our work of art and coat it with glue. We make a hole for the heel and also coat it with PVA glue.
Can be decorated. If your surface is smooth and beautiful, you can leave it that way. I sealed it with material and walked in a circle with the same rope.
Carefully make a hole in the fabric and coat the sole of our already finished beautiful shoe with glue. We drip glue into the hole for the heel and glue it.
We decorate with whatever we want. I decorated the joints on the heel with a bow, but it could also be beads, flowers or rhinestones. And this is what we got.
I think they are very nice and neat. I hope my master class helped you. Give your loved ones only handmade items. They have soul. Thanks to all! See you again!
Source
Tree for decorations
Making a stand for jewelry in the form of a branchy fruit-bearing tree is a great idea, suggested by nature itself, especially since it is not so difficult to implement.
Trees for storing earrings can be made of several types:
- Made from real tree branches.
This is the simplest and most obvious option, for which you just need to choose a suitable strong branch and a stand for it, or simply nail the branch to the wall and hang your jewelry on it.
- Wire tree.
A tree made from twisted wire, placed in a decorative vase or framed, can look very unusual and conceptual. The main condition is to choose the right wire. It should curl well, keep its shape and not be brittle. Copper wire is best suited for these purposes.
Frame plus plugs
Have you collected corks from wine bottles with the thought “everything will come in handy”? It's time to use the plugs. Take an empty picture frame and fill it with wine corks . Great place to store jewelry. Earrings can be attached directly to the corks. To store the chains, you need to drive small nails into the corks.
Interesting! You can use the empty frame to create other coasters. Stretch canvas, mesh, and lace onto the wooden structure. Hang your favorite earrings.
DIY: DIY jewelry stand (1 video)
Related article: The most suitable ceilings for a small apartment
Stylish stands for jewelry that you can make yourself (12 photos)
Detailed master class: tree made of wire and papier-mâché for storing jewelry (video)
- A tree made of wooden or cardboard modules.
A tree made of two modules can be openwork, as in the photo, or primitive in shape , as in the master class on its manufacture, which can be seen below. One way or another, a large number of edges of such a tree provide excellent opportunities for beautiful and convenient placement of jewelry.
What is needed to make such a tree:
- cardboard and scissors or fiberboard sheet, jigsaw and drill;
- liquid Nails;
- dye.
Regardless of the material chosen for making wood for decorations, the procedure will be the same:
- Using the template presented below, draw two identical trees on a sheet of cardboard or fiberboard, cut or saw the trees along the contour and make slits at the top and bottom, as shown on the template, as well as small round holes (holes) where they are shown in the picture.
- Insert the templates into each other along the slots and glue them on top with glue for reliability.
- Paint the tree any color and hang your favorite earrings on it.
Such a tree can be complicated as much as you like, making it more openwork or increasing the number of edges, depending on the concept of the interior in which it will be located and the desires of the future owner.
Window to the world of fashion
You can use an old window frame as a stand. You need to paint, attach hooks (hammer nails) on top and bottom of the frame, stretch fishing line, wire, etc. in the openings where there used to be glass. The stand is suitable for all types of jewelry. The updated frame can be hung on the wall. Place it on the floor or chest of drawers. The only disadvantage of this original stand is its bulkiness.
Related article: How to clean upholstered furniture made of velvet, suede, corduroy?
Advice! Make sure there is enough space in the room for such a stand. It will come out quite large and may get in the way.
Jewelry storage frame
Frames or entire frames for jewelry are another popular and very beautiful way to store your earrings and beads while decorating your interior.
The basis for a jewelry holder can be:
- Photo frame;
- a picture frame or from an old mirror;
- hoop.
The appearance of picture frames is associated with the designation of easel painting, when people wanted to see works of fine art not only on the wall on which they appeared thanks to the efforts of ancient artists, but also to transport them from place to place, view them in a museum, or even have them in their own living room. This was in the 14th century and since then frames in various designs and variations have not lost their relevance and functionality.
You can fill frames and frames with any material with a large number of holes, so you can easily attach earrings to it:
- lace;
- mosquito net;
- tulle;
- plastic or metal grill.
A frame filled with lace and all kinds of earrings will adequately decorate any room, attract the attention of guests and help forever forget about the problem of lost or forgotten jewelry in a huge jewelry chest.