Types of photo zones
Before you make a photo zone with your own hands, you need to decide what type to make it. There are several main directions:
- press wall;
- window;
- relaxation corner;
- board with chalk
- banner on a frame.
Press wall is the most popular and simplest type of photo zone. The main material for it is considered to be paper, foil or some kind of fabric.
Window - characterized by the fact that you can look out of it while creating the most fun photos. This design is well suited for photo shoots both indoors and outdoors.
A relaxation corner is one of the most popular types of background for a photo studio; it can be created on any theme and using various materials. As a rule, a significant amount of materials and objects are used in a photo zone of this type.
A blackboard with chalk is the most original type of background for photography. You can make such a board in various shapes and install it outdoors or indoors.
Also, during the photography process, you can create any inscriptions on it or leave wishes from guests if it is placed at a wedding or anniversary.
A banner on a frame is one of the simplest options for a photo backdrop. It is best to place it indoors, as it should not be exposed to wind.
Materials for the photo zone
You can make a photozone with your own hands from a wide variety of materials:
- Balloons;
- fresh or artificial flowers;
- paper;
- various garlands;
- decorative ribbons.
You can also use various available materials: pieces of furniture, dishes, lighting, living plants, toys... The choice of basic materials depends on the type of creation of the photo zone and its theme.
What events should I have a photo zone for?
Most often, a photo zone is set up for some kind of thematic photography or for some kind of celebration. Do-it-yourself photo zones for photo sessions are often made for the following events:
- birthday;
- New Year;
- wedding;
- christening;
- company anniversary;
- hen-party;
- high school graduation;
- themed photo shoots in different styles: retro, disco, family, spring…
New Year's wall decorations made of paper
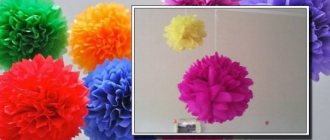
Such fans decorated for the New Year can be created together with children, and snowflakes, bells or other New Year's tinsel can be used as additional decoration.
Wall decor made from paper fans
To make fans, you can take any paper - plain or with a pattern. You can also take 2 layers of paper, different colors and textures. You can also use paper napkins, which make great decor.
You can attach paper decorations to the wall with pins or special double-sided tape that does not leave marks.
And if you want to attach paper decor to the ceiling, then you need to attach a paper loop to the fan and use this loop to attach it to the ceiling with tape.
Interesting video for clarity.
Nuances when creating a frame
The frame for a photo zone with your own hands needs to be made as strong and stable as possible, especially if it is installed outdoors. There are various techniques and options for creating a frame, but most often they use:
- metal;
- natural wood;
- plywood;
- Styrofoam.
Depending on what the background itself will be made of, the material for the frame is also selected. You can make it in the usual geometric shape: rectangle, oval, or in the form of numbers, inscriptions, corners, screens...
The metal frame is the most popular and is considered very reliable and at the same time safe as a base. One of the main advantages is that in case of breakdown it can be easily repaired.
If you think about it, you can make a metal frame that can be quickly assembled and disassembled. In this case, it is very profitable for transportation.
A frame made of natural wood is more difficult to assemble than one made of metal. The main advantage is that the wooden frame can withstand heavy loads and lends itself to any materials: glue, nails, stapler...
A plywood frame is the most budget option. Plywood is considered a fairly durable material and can be used a significant number of times, creating new backgrounds. The only thing is that a frame made of this material requires special conditions for transportation.
Polystyrene foam is one of the most affordable materials that can be used for the frame of a photo zone. It is best to make a design for indoor installation and not too large in size.
This material is very fragile and not durable in use. As a rule, it is chosen as the basis for small decor, such as numbers, an image of a heart, snowflakes...
Features of placing decorations
Handmade decor will look great on the wall above the sofa or bed. It is actively used as a decoration for a children's room. Cozy garlands or paper lampshades can decorate a terrace or balcony. It is especially beneficial to decorate areas for receiving guests or relaxing on a personal plot outside the city. Paper lanterns will be organically woven into the ambiance of a beach party. Such a light and original product can be used in any home. It looks stylish and is inexpensive.
Colored paper fan
When placing crafts in the apartment, try not to overload the space with them so that the room does not look like a school labor room. It is appropriate to place paper flowers in a large vase on a table in the living room or hallway. A large fan will decorate a bedroom or recreation area. You can also give your crafts to friends and relatives. Enjoy the process and involve each family member in such pleasant leisure time. The most important thing is that you can always do something new and please your eye with little things that create your mood.
Source
Tips for creating a photo zone.
Before you start creating a photo zone with your own hands, you should read the recommendations of experts. So, for simpler and easier work, it is worth considering the following points:
- All materials should look good with each other in color and shape.
- It is best to use live plants rather than artificial ones.
- If you have the opportunity to do a photo shoot in the evening, you should definitely think about lighting.
- The frame of the base for the photo zone should be as strong and stable as possible.
- If fabric is used, it should not be wrinkled in appearance.
- The photo zone should be designed to match the style of the entire thematic event.
- It’s best to start making a photo zone out of balloons with your own hands from simple elements and shapes.
Banner with balloons
A banner with balloons is a great idea for a DIY birthday photo booth. It can be made in different colors and designs, both for a child and an adult. The size of this type of photo zone can be chosen at will or according to the location of the event.
Action plan for this attribute:
- Create a frame structure according to the desired dimensions.
- Depending on the size of the frame, print a banner with a thematic design or inscription.
- Attach the banner to the base of the structure.
- Select balloons according to the color scheme, inflate them and secure them around the perimeter of the banner.
- As additional elements, you can add a large number made of balls or various shapes.
Before you decorate a photo zone with your own hands, you should decide on the color scheme and general style and design. If it’s a child’s birthday, then you can choose cartoon characters, animals, dolls, cars as the image for the banner.
If it’s an adult’s birthday, then you can print out a banner with wishes, with initials... You can also replace the banner with a rain curtain.
How to make wall decorations from paper fans
If you want to quickly decorate your room for the holiday, all you need is some colored paper, scissors, glue and desire at home. You can see in detail how to make decorations from paper fans on the wall with your own hands in these photos.
- Depending on the chosen diameter, cut the paper into equal rectangles. A round fan can consist of several parts.
- Fold the paper in a zigzag pattern like a fan.
- The outer edges can be trimmed at an angle or rounded.
- Glue the pieces of paper into a circle.
The center of the round fan can be covered with a circle of contrasting paper or any other decoration.
As a fastening material, you can use not only glue, but staples secured with a stapler or regular tape.
If you use two sheets of paper of different sizes and colors, you will get an original multi-colored decoration.
Mounting paper fans on the wall
Paper fan decorations can be attached to the wall with buttons or pins. Or you can attach bright ribbons to them and hang them on a cornice, a picture or a mirror.
To create decorations of different types and styles, you can use several colors of plain or patterned paper. The ends of the accordion-folded paper can also be trimmed to your liking. And depending on the pruning pattern, the decorations will have a different appearance.
Children will be happy to make such simple decorative elements. They can be changed depending on the time of year or mood. I hope you like the idea of decorating your holiday rooms with paper fans.
I have already written about what beautiful and festive decor you can make from paper fans. And if you decorate such fans with winter symbols, you will get magnificent New Year decorations.
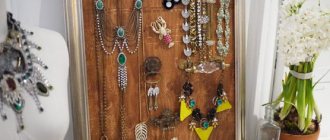
Photo zone “Frame”
One of the most popular do-it-yourself photo zones for a birthday or wedding photo shoot is a frame. The easiest way to make it is from wood or buy it ready-made in a store and decorate it with decorative elements.
As decoration you can use flowers and plants, decorative ribbons, bows, floral butterflies, dried flowers... Photos using this attribute turn out to be very original and stylish, both indoors and outdoors.
Paper circular fans for decoration
These decorations are associated with the east. In the culture of Japan and China, this element is part of the national tradition. That’s why you will always see a fan on the walls of minimalistic and restrained Japanese houses. Typically, it depicts scenes from books, beautiful landscapes and panoramic views. Paper fans completely replace the wall paintings we are used to. They stand out from other items, attract attention and create a romantic mood.
Mosaic of fans
Fans in room design
Pink fans in the interior
It is especially beneficial to use this decor in a room that is not overloaded with furniture. Walls without a distinct pattern will look advantageous against the background of a fan. You have two options - make a composition from small circular fans, or make a classic large fan for the wall with your own hands. Quite often, such decorations are also used to decorate a holiday. This is a universal idea that will captivate you during your leisure time and allow you to acquire additional skills.
Multi-colored fans
Round beautiful fan
Mosaic of fans
To make fans we will need:
- colored corrugated paper of any size, scrap paper is suitable;
- scissors for shaping the workpiece;
- glue;
- satin fabric ribbon;
- small accessories (buttons, bows, sequins, tassels, beads, etc.);
- wooden skewers.
Prepare a wide table or any other place so that you can work comfortably. The process does not like to be rushed, so it is worth freeing up time in advance to implement your creative ideas.
Beautiful fan for the room
Hanging fans in room design
Fan option
See also: DIY: New Year's decorations for windows made of paper.