- July 29, 2018
- Nail care
- Ekaterina Kulagina
Girls and women always try to be irresistible in everything, even though sometimes it seems to them that this is completely impossible! Everything must always be in perfect condition... Clothes, hairstyle, hair itself, skin, makeup and, of course, manicure! It’s about manicure that will be discussed in this article.
After reading this article to the end, you will learn about how to properly care for your nails in order to constantly maintain their health and well-groomed appearance, what manicure tools you will need for this, and how to properly care for these manicure tools. We will also tell you how you can create a beautiful and interesting “Russian flag” manicure. So let's get started already. Happy reading!
Proper care for the health of your nails
Before moving on to the cherished point of how to do a “Russian flag” manicure on your nails, you should talk about the health of the nails themselves and how to properly care for them. Otherwise, no matter how you cover up or paint your unhealthy nails, they will not become beautiful. Don't deceive yourself. Therefore, before doing a Russian flag manicure, make your nails healthy.
To do this, you need to stock up on nourishing and moisturizing oils for nail care. These can be purchased at almost any cosmetic supermarket, and can also be ordered online. In addition to oil, purchase hand moisturizer. They need to lubricate the area around the nail and the cuticle.
How to do an American or British flag manicure?
There are many options for manicure designs based on country flags. The most popular of them are American and British manicure. Every woman wants to be confident and always look good. One of the factors that gives confidence and femininity is manicure.
Today there are many popular “country flags” manicure design options that are universal and in great demand. The modern trend is to focus on other countries, including the use of various accessories of these states (English on clothes, flags of countries, etc.).
Preparing nails for manicure
To make your hands look beautiful and well-groomed, it is not enough just to create a manicure. To do this, you still need to monitor their appearance, health, shape and condition of the cuticle. All this is done in fifteen minutes.
How to make your nails look beautiful:
- Remove old nail polish with a special product (it is advisable to use one that has a positive effect on the condition of the nails and will not cause them to become brittle).
- Align the length of the nails on all fingers with several types of manicure files and scissors, giving them the desired shape.
- Soften the cuticle in water together with a special product before proceeding with removal, this will ensure that cutting the cuticle will not be such an unpleasant process.
- Wipe your hands dry, apply cream and begin removing the cuticle.
Only after all these procedures proceed to work on nail design.
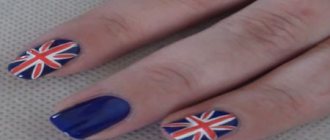
How to create a British flag manicure?
British flag manicure is very popular now. It is very easy to make, and it always looks beautiful and fashionable.
What you will need for the design:
- transparent varnish (will serve as a fixative base);
- rich blue varnish;
- white coating with a long brush;
- scarlet acrylic paint;
- a piece of foil where we will stir the paint;
- container with water;
- long bristled brush;
- a cloth to clean the brush from moisture.
First, a base coat is applied to all nails - a clear varnish, then dried. After this, all nails are covered with blue varnish.
When the first layer has dried, you need to coat your nails again with blue so that the tone is more saturated and lasts better. Dry the second layer. Several fingers of the hand are selected on which the British flag will be depicted.
On the selected fingers, vertical white stripes are drawn in the middle of the nail using a long-bristled brush.
Then, when the first line is dry, draw another one, only this time in the middle, across the width of the nail, to create a kind of white cross.
When they are dry, four more white stripes are drawn, which go from the center of the cross (like on the British flag). A little red acrylic paint is poured onto the foil.
There is no need to cover the polish layer by layer, because as a result the manicure may smear and lose its attractiveness.
Wipe the brush, previously soaked in water, on a napkin to remove moisture. Take acrylic paint on a brush and complement the design with a red line on all the whites (it should be much thinner than the main white). Dry the paint and apply fixative to all nails.
The result should be a very beautiful, bright and stylish manicure. It looks especially good in the summer, when the skin is tanned and there are more brightly colored items in the wardrobe.
How to do an American flag manicure?
For this type of manicure you will need:
- clear nail polish;
- fixative;
- red varnish with a long brush;
- blue and white varnishes with a long brush;
- thin brush for applying varnish.
Option 1. First, apply a base coat (can be transparent). Be sure to treat the end area, because this is where chipping may appear. Wait for the base to dry and then apply any red polish to the entire surface of the nails.
There is nothing wrong with the fact that some unevenness may appear, since with the 2nd overlap everything can be corrected and leveled, so special attention should be paid to the 2nd layer of white varnish. When 2 layers are dry (one after the other), take white varnish and a thin needle to draw lines. Using a special brush, make 3 thin white vertical stripes on the red.
Then apply bright blue polish to the tips of your nails, then apply white dots on the blue surface using a brush. The final accent is a sealer for durability.
Option 2. Do the same thing, only apply stars on the blue surface on several fingers. For example, put the US flag on the big, ring and little fingers, and make stars on the rest.
Option 3. Everything is the same as in option 1 (apply red, make white stripes), but paint only half of the tip of the nails blue and make small white dots (or stars) on the same half.
Option 4. Paint several fingers red with a white stripe, and the rest blue, on which you will need to apply white stars.
Option 5. Paint all fingers, except the ring finger, dark blue twice under the base. On the ring finger, do an American manicure: paint the finger red, cover it with a white line and make a blue square on top of half the nail, which is filled with white dots.
Option 6. Paint all your nails scarlet. Select 1 finger on which the US flag will be depicted (for example, the middle one). On the red layer of this finger, white lines are applied along the length of the nail and a blue square is drawn on top in the right corner, which is filled with either dots or stars.
You can also improvise with the shape, position and placement of all design components.
So, nail designs depicting country flags can be done in any way you like and approach it creatively, without limiting yourself to just one option. In any case, such a manicure will look very impressive and fashionable. Well, being creative during the manicure process will bring great pleasure and only positive emotions.
Source: https://dekornogtei.ru/vidy/manikyur-britanskij-flag.html
Vitamins necessary for the health and growth of nails
If your nails become too fragile, brittle, small white spots begin to appear on them more and more often and they peel off, then these are all the surest and main signs that your body lacks some vitamins. Almost every woman begins to complain about the deterioration of the condition of her nails in winter. After all, it is in winter that our body stops receiving half of the vitamins that have always accompanied it throughout the summer. In this case, it is advised to improve the quality of nutrition, as well as take baths with salt for nails for ten days. If after all this their condition does not improve (or an urgent need is felt), then they should consult a doctor and follow the treatment already prescribed by a professional.
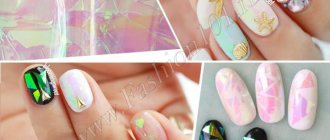
Until we move on to the main point of our article, below we provide a photo of the “Russian flag” manicure on the nails.
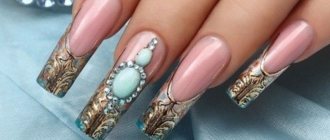
nail design with ornament and flag of Greece
Manicure design
Classic monochromatic manicure is no longer the main trend, although it is successfully used to create a strict image. It has been replaced by surprisingly diverse options for hand-drawn nail designs, which help not only to successfully complement any outfit, but also to emphasize a bright individuality.
Description
A huge number of design ideas can be grouped into areas. Current this season are:
- ornament;
- graphic arts;
- flora and fauna theme;
- drawings of buildings;
- images of country flags.
Each of these types is good in its own way. However, in order to personalize your manicure as much as possible, you need to choose a more specific theme.
Since pastel colors remain fashionable this season, Greek manicure can be called one of the know-how of nail service masters.
This type of nail design has many options. Greek manicure includes not only the design of the country’s flag, but also characteristic patterns. Historically, light colors were used for decor and decorations in Greece, but if desired, they can be diluted with a bright shade suitable for the image.
Ornament
The typical pattern of the country is a geometric repeating pattern. These are square curls smoothly connected to each other. This design looks good on a white background and can be drawn on any part of the nail.
If you want to emphasize the pattern, it is placed in the middle in a vertical direction. The range of colors that can be used is extensive. This includes blue, yellow, and any contrasting dark color, even black.
The ornament decorated with silver or golden varnish looks especially expensive.
In order to create just a small hint of the Greek theme, it is enough to apply part of the ornament with a narrow ribbon vertically along one or more nails. An excellent solution would be a strip of ornament separating the tip of the nail and its main part, made in the lunar style.
Graphic arts
The graphic style fits perfectly with the idea of Greek manicure. To do this, you need to draw two stripes on both sides of the ornament. This composition can be placed either directly or diagonally on one or several nails.
This manicure option can be combined with blurred outlines. To do this, the finished drawing must be coated with a translucent varnish, without waiting for it to dry completely. You can also shade the pattern with a brush.
Drawings of flora and fauna
Images of Greek animals can become a real work of art if you turn to national myths and legends.
The most famous representatives of Greek mythical creatures are the centaur and the Gorgon jellyfish.
The design with the latter can be “supported” by images of several snakes on adjacent nails. Don't forget about Pegasus and the Sphinx.
To create a simpler design, it is worth remembering the branches of grapes and olives. These are the most characteristic plants of Greece, which, in the presence of a thin golden border, will look no less impressive on the nails.
Drawings of buildings
To create an unusual look in a business style, a small schematic drawing of a building in the Greek style (triangular roof and columns), made on a light background, is perfect.
It is best to place such a decoration on one nail of the hand, since the presence of such a pattern on each finger will create the impression of clutter and will be difficult to perceive.
This option looks good on short nails.
Flag image
I would especially like to highlight the manicure option in the form of the Greek flag. This is a fashionable blue and white combination of pastel shades. The entire surface is an alternation of white and blue stripes with a white cross in the upper left corner.
This type of manicure is universal.
The color scheme and geometric pattern will suit both a classic, strict look and a casual outfit for relaxing on the beach or in a club.
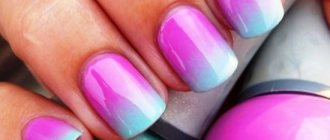
A wide variety of techniques are applicable to this drawing. The gradual intensification of blue in ombre looks simple and modern. In addition, you can make the flag matte using a special varnish or create a graffiti-style design with small smudges and splashes. A manicure using blue or white foil also looks unusual and stylish.
Greek manicure is an excellent addition to any look with the right choice of colors and design.
Daytime looks are best accentuated by a manicure in soft pastel colors. And, on the contrary, for evening fun, a bright accent on the nails will be a spectacular option.
For a master class on how to make a beautiful Greek manicure with ornaments, watch the following video.
Necessary products for creating a manicure and caring for them
Before you start doing a manicure, covering the work plate with varnish and everything else, you need to carefully prepare for applying the “Russian flag” manicure. To do this, you will need a nail file, a buff, tweezers or nail scissors, and a cuticle remover.
Note: if you do not have experience in removing cuticles yourself, then it is better not to experiment. Otherwise, the nail may become infected. Before using these materials to create a manicure, they must be disinfected. This can be done using cotton pads, an alcohol-containing product (even using the same perfume or cologne) or hydrogen peroxide. Rub your manicure products thoroughly with these substances and let dry. Now let's move on to the point about preparing to create your manicure.
Below is a photo of a manicure with the Russian flag.
British flag in manicure
The British Flag print has not gone out of fashion for several years. It can be assumed that in the 2010s it replaced the American flag, which was popular in the 00s. Nowadays, everything is decorated with the British flag - T-shirts, bags, covers and cases for smartphones. This trend was not spared by manicures, which also began to often decorate the British flag.
Total information
British flag on nails
The British flag has a fairly catchy and bright combination of colors. On a blue background there is a red and white cross, the straight lines of which stretch across the entire area of the flag. Red and white diagonals also stretch from the corners to the center of the cross.
Often such a print can be found in other colors, when the British flag on the nails is done either in completely different shades, or the three main shades are swapped.
Thanks to the great popularity of the print, even if done in other colors, this manicure remains recognizable.
To achieve this design, it is very important to choose the right varnishes. All coatings must have good density, especially for white varnish, which is supposed to be applied over a darker blue. In addition, this manicure is usually performed with matte varnishes, since the lack of gloss dictates the grunge style from which this print came into mainstream fashion.
There are other ways to implement this design. It is not necessary to draw it by hand at all. Thanks to the simple shapes and outlines, the British flag on the nails, as in the photo, can be created using, for example, manicure tape. In addition, the most complicated design, supplemented by any elements, can be obtained by placing stickers - films - on the nails.
Britain flag nail design
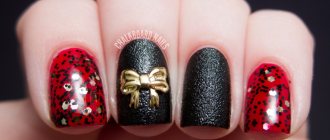
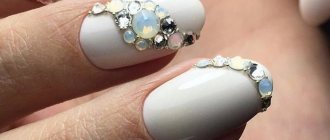
Decorating such a manicure can be called quite complicated, since traditional sparkles in its decor may not be entirely appropriate.
As mentioned above, the grunge style does not imply glamor and shine, and therefore this manicure can be complemented, for example, with small opaque rhinestones imitating rivets, etc. A variety of blots, letters of the English alphabet, etc. look good.
This manicure, in principle, is much more suitable for young girls and teenagers who prefer a casual style.
Application
UK flag on nails
An English flag manicure is easy to draw by hand. This can be done using a dots or a thin “one” brush. It looks more impressive on short nails, but it is more difficult to do on them due to the small area to work with. The print is applied as follows:
- The nail is covered with a protective base for varnish, which is dried;
- A layer of blue varnish is applied and also dried. If the coating is not too dense, you can apply another layer;
- After this layer has dried, two white diagonals are applied to the nail, intersecting in the center of the plate. When applying a print, pay close attention to the width of the lines, as it varies depending on the area of the design, and therefore such a manicure is not as easy to perform as, for example, a Russian flag nail design. This can be done with a thin brush;
- After the white varnish has dried, a thin red stripe is applied on top of it, for example, using a dots. Wait for the red coating to dry;
- We proceed to drawing a central cross, which should overlap the diagonals. First, draw a cross with white varnish and wait for it to dry;
- Now we apply a red cross on top of the white one, dry it and the manicure is ready.
It seems that to obtain such a design you have to purchase quite a lot of varnishes, and therefore it is easier to buy, for example, stickers. However, these shades can be used to create many prints, including manicures with the flag of the USA, Russia, Serbia, Japan and many other countries. The combination of red and white looks good in New Year’s nail art, and white and blue looks good in nautical nail art.
Other implementation options
If it is difficult for you to draw a flag by hand, then you can make it using manicure tape. This method is only suitable for the British flag; you cannot create a Russian or American flag manicure with it.
The first - due to the large width of the stripes, the second - due to the great complexity of the design and the presence of stars. This is not to say that this method is easier than drawing by hand, but for many it is easier to stick tape than to draw a straight line.
The design is made using tape as follows:
- As in the previous version, a protective base is applied to the nail and dried. After which blue varnish is applied as the first layer and also dried;
- Then the differences begin. Apply a second coat of blue polish and let it dry for a few seconds;
- Cut two strips of red and white tape and place one of them on the sticky polish. The length of the strip should be sufficient so that you can stretch it by pressing it on both sides of the nail;
- Immediately place a stripe of the second color next to it, forming one of the diagonals. The strips should be adjacent to each other closely, but without overlaps, since it is in these areas that peeling usually begins. The order in which the color bars are applied is also not important, since they are of equal width;
- Ideally, you need to have time to form a second diagonal before the varnish dries, but if this does not work out, then apply a thin layer of transparent varnish to the nail and form a second one. If you are lucky enough to purchase manicure tape with a sticky base, then all work should be done on a dry coating;
- After this, form the central cross in the same way;
- After the flag is formed, cut off the excess parts and cover the nail with a top coat.
This design has a significant disadvantage - all the strips turn out to be almost the same width, because it will not be possible to overlap them. Therefore, such a flag will not look realistic enough. However, it will remain quite recognizable due to the high popularity of the print and color combination.
British flag on nails
In addition, the flag of Russia or Britain on nails, like almost any other, can be created using stickers - films.
When ordering online, you can find a fairly large selection of flags from a variety of countries, as well as flags of communities and subcultures, for example, the rainbow one.
Their application cannot be called simple, since they are heated under a lamp, and then placed on the nail and, as they cool, they shrink, adjacent to the plate. The difficulty is that they often produce bubbles and detachments, and cutting them to size is not very easy.
Stencils are only good for creating a Russian flag manicure, like in the photo, on your nails. The complex pattern of the British flag in this case involves the use of a huge number of stencils and their constant re-gluing. So it will not speed up the process at all.
Source: https://LifeNail.ru/dizajn/britanskij-flag-v-manikyure.html
Preparing to create a manicure
To begin, nourish your nails with oil and apply moisturizer to your hands. Remember to pay attention to the areas around your work area. Now give the oil and cream time for the substances to be absorbed. When you're done with that, decide on the shape of your claws. They can be short, repeating the shape of a finger, medium length or slightly longer with an oval pointed shape, or square. Don't go overboard with the length of your nails. Remember that everything is good in moderation.
Now that your nails have the shape you want, let's work on the cuticles. If you know how to do this, then cut it. If you do not have such skills, then it is better to simply move the cuticle to the base of the nail. Now coat the work area with a clear strengthening agent. With its help, you can maintain the beautiful appearance of your natural “claw”, and also nourish the nail plate with the microelements it needs.
Manicure “Russian flag”
You can perform this manicure in completely different ways. Now it all depends on your imagination and skills. You can simply paint the nail with three colors, in accordance with the flag. Sometimes a manicure with flags is done like a French manicure, only the flag is placed in the place where a white stripe is placed in a classic French manicure. You can do a single-color manicure, but alternate colors in accordance with the Russian flag.
You can use a sponge and make a gradient transition between colors. Don't forget to use tassels of different sizes and the three main colors of the flag: white, blue and red.
Good luck in creating a beautiful manicure and healthy nails!
British flag manicure | British flag on nails
Modern nail art possibilities are simply endless. The picturesque paintings created on the nail, this tiny canvas, the more they look like real masterpieces. Flowers, stars, ornate patterns, rhinestones, gold inclusions... And now more exclusive ones have been added to the usual themes, for example, the British flag on nails.
The British flag design on nails has been very fashionable lately. No wonder, bright colors, ease of execution, stylish jewelry and you are the queen of the mainstream
It is not necessary to paint every nail in Union Jack, you can just add an accent
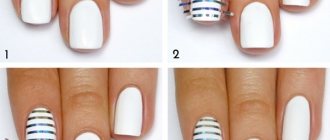
Drawing the British flag step by step. Learn, girls!
- British flag on nails
- Design Features
- Photo
British flag on nails
The flag of Great Britain is a bright symbol that has long been successfully used in the decoration of clothing, interiors and accessories. It can be seen on a handbag, a T-shirt, jeans, shorts and even panties.
It is clear that flags and basic attributes of other countries are used in a similar way, but England was able to export its national symbols abroad. Therefore, today not only the British and other inhabitants of Foggy Albion, but even our compatriots wear outfits with the British flag.
It is logical that with the development of nail art techniques, the fashionable British flag was relocated to nails.
The peculiarity of creating a manicure with this flag is the simple technique of applying an image to the nail, although the completed design ultimately looks quite stylish and impressive. It also looks good even on short nail plates and on nails complicated by French.
The basic rule of nail art in creating such a complex multi-colored pattern is the sequence of applying the image on all nails. There is no need to decorate one nail separately until complete: it would be more correct to perform each of the stages sequentially, but on all nails at the same time.
When creating which is the main and only image, you must first apply a blue coating to the nails, then draw lines of crosses, straight and oblique, using white varnish. At the end of the stage of drawing white lines, you will need to draw red lines.
True, in the original, the red oblique cross, which bears the name of St. Patrick, is located under a white border framing a red straight cross, called the cross of St. George.
But miniature nail art designs allow you to neglect such a detail in order to save the time needed to wash the gun in an airbrush or change brushes.
You can hand draw the British flag...
...or you can use heart stickers...
... or ready-made stickers for the entire nail!
The image of the British flag on nails is not only done with an airbrush or hand brushes. For this purpose, prepared stencils for decorating nails are used in advance.
Based on the precision of execution you need, a combination of either three or five separate stencils depicting the details of oblique and straight crosses is used.
This method of drawing allows you to do a manicure with the British flag much faster than with intuitive nail painting.
Design Features
The British flag on nails has become a very popular subject when creating a manicure, and therefore, if you contact beauty salons with a request to do similar nail art, you can get a high-quality, quick execution of the procedure (one would like to say – painting).
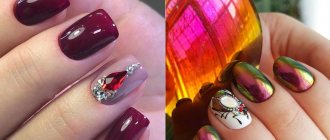
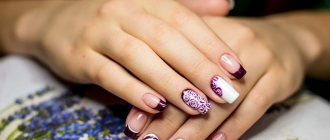
The British flag on nails can go well with rhinestones
The British flag looks cool with white, blue, red and silver varnish
In order to make a manicure with the image of the British flag, you need to purchase varnish in blue, red and white colors or water-acrylic paints if applied using an artistic airbrush. You also need to prepare a fixing liquid.
The blue color is used to draw the base - that is, the panel, and the other two colors are used to draw straight lines of oblique and straight crosses. A clear straight line of the cross is applied using a hard brush or airbrush.
The lines of the Irish flag with an oblique red cross are depicted with a small brush or the weakest flow of paint with an airbrush.
Many people liked this symbol that has confidently become fashionable - the British flag. The design on the nails with his image looks especially stylish on small nails, which is very practical for young people.
After all, young people, due to their very active lifestyle, often cannot afford a fragile long manicure that can break with any careless movement. In this case, there is no time for motorcycles, diving, mountaineering and other extreme activities. But short nails, on the contrary, are very practical, durable and convenient for the most stunning activities.
And not all types of manicure on small nails look as good as this flag. True, such a catchy design in itself is not always appropriate according to the rules of good taste. Especially if your workplace is in a strict establishment with a clearly established classic style and a mandatory dress code.
But if you really can’t refuse this nail design, then you can do it using a color scheme in calmer tones. In any case, it is important that such a manicure harmoniously complements your style and combines well with clothing items, accessories and jewelry.
Although just jeans and a stylish T-shirt are enough and you will become stylish and simply inimitable in a modern way.
True, such a catchy design in itself is not always appropriate according to the rules of good taste. Especially if your workplace is in a strict establishment with a clearly established classic style and a mandatory dress code
The peculiarity of creating a manicure with this flag is the simple technique of applying an image to the nail, although the completed design ultimately looks quite stylish and impressive
In order to make a manicure with the image of the British flag, you need to purchase nail polish in blue, red and white colors
By mastering the British flag nail design, you can add a touch of sass to any outfit and still look great at all your festive events.
By mastering the British flag nail design, you can add a touch of sass to any outfit and still look great at all your festive events. This will shed more bright light into your life, everything in it will become much more interesting and original.
And perhaps the stiffness of the British, who adore the flag of their native kingdom, will awaken patriotism in you, teach you to respect traditions, and not just pay tribute to fashion. By the way, the solemn “union guis” was created by superimposing the flag of the British Kingdom (blessed by St. George) and the diagonal crosses of Ireland and Scotland (St. Patrick and Andrew).
This global brand expresses primarily the cultural rather than the political aspect of life in Foggy Albion.
You can choose the most optimal method on the Internet, in master classes, step-by-step instructions, and video tutorials offered by nail art designers.
But any master will advise you to first tidy up your nails: remove any remaining polish, remove excess cuticle skin, and use files of different sizes to give your nails the correct shape - square or round. For the classic version, the traditional color scheme of blue, red and white is used.
But this does not oblige you to adhere to such combinations. Fans of experiments can use other colors, preserving the plot of the symbolism of Britain. And rhinestones and sparkles will add chic and shine to your nails.
Photo
For the classic version, the traditional color scheme of blue, red and white is used. But this does not oblige you to adhere to such combinations
As noted earlier, we draw the British flag on the nails in stages: after covering the plate with a transparent base, we apply blue varnish, and you can cover not the entire area of the nail, but only part of it, like a French manicure. Then we apply red lines, and outline their edges with blue varnish. Varnishes can be replaced with acrylic paints and fixative.
For greater clarity of the design, you should wait for each layer of varnish to dry and only then apply the next element of the design. You can give preference to other variations: for example, a combination of blue, orange and white. This pattern will look even more tender and feminine.
Step-by-step instructions convince you that doing this manicure is not so difficult
French with the British flag: step-by-step master class
To make a high-quality manicure in the form of a British flag, you can choose stencils for such nail art, manicure sticks, base coats, an airbrush, different-sized brushes, varnishes, fixatives, and cuticle oils in a specialized store. You can even make a flag of another country, or you can paint different flags on all your nails - such a mix will look simply enchanting! In general, don’t be afraid, experiment and delight! Inspiration to you!
Views: 9336
Source: https://LadyZest.com/manikyur-britanskij-flag-britanskij-flag-na-nogtyax/