What is a gradient in manicure, features in preparing the design and choosing colors
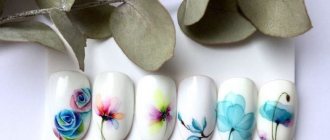
Ombre or gradient is a manicure built on smooth horizontal, vertical, diagonal transitions of several shades of varnish or paint on the nail plate.
Gradient with mirror rubbing
Rubbing: what it is, how to use it and all application methods with step-by-step instructions
The most popular option is a combination of two or three colors. The darkest or densest color always “works” in a set. It will be required the least, and it is it that affects the saturation and coloring of other colors.
So, when creating a manicure, a gradient of red and pink colors - darker red must be introduced with a brush into pink, smoothly painting over the intermediate zone and creating a third, coral color at the junction.
The most complex combination of shades is the black-red gradient. Masters say that once you master black and red ombre, all other combinations will seem easy to perform. This is due to the fact that black is the dirtiest color in the palette. Even the smallest uneven strokes or an extra drop of black can ruin the entire transition. Especially if you work with a brush.
Nude ombre with mirror rub
Nude manicure ideas
It is better to choose shades for a gradient based on the color wheel. Neighboring colors of the same group go well together, cold with cold, and warm with warm. Contrasting tones look original.
The easiest way for beginners is to work with neon gel polishes when drawing a gradient in a manicure. Neon colors blend perfectly on the blending line, and ombre always results in an almost imperceptible transition.
- For the base it is recommended to use white varnish. This is more true if you use loose, soft shades for the gradient. White makes light and pastel colors brighter and more expressive.
- The second option is to use the lightest shade of varnish from those selected for the composition for the base. If the colors are well pigmented, you can work without a base coat, applying the shades directly to the varnish base.
It is recommended to apply two or more layers of gradient, be it varnish or paint. Beginners can use self-leveling gel polish to get a perfectly even coating even at the stage of mastering the technique.
Gradient manicure design
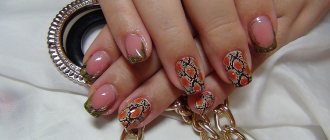
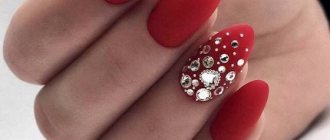
On a gradient manicure you can make various designs: from full compositions to monograms. In the latter case, you should think about choosing a color to match the gradient. Classic white and black will almost always be relevant.
In my version, I chose black gel paint for the design of the web or chain. This abstraction is created very simply and looks original on a gradient manicure.
Here I have everything, further on the blog you will find a whole series of publications featuring Vogue Nails gel polishes, so stay tuned!
The KrasotkaPro online store thanks blogger Tatyana Samal (Blog: Tanya Samal) for her review and photos.
Materials needed to make the gradient
Depending on the chosen method of applying the gradient, you may need different materials and tools. We will provide a list of everything you need, and all you have to do is choose what you need for each specific design from the methods listed below.
- Gel polish in 2, 3 shades or shellac
- Acrylic paint when working with an airbrush or sponge (optional)
- Gel paint
- White gel polish or shellac for base/base
- Base, top for gel polish
- Degreaser, dehydrator
- Brush: flat, comb, fan
- Acrylic powder of different shades (for design with gradient powder)
- Pigments (for ombre manicure with pigments)
- Cuticle protector: cream, tape, liquid cuticle tape, cuticle stickers
- Final cuticle oil
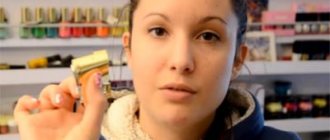
On the Internet you can find many instructions and life hacks on how to make a comb brush yourself. You can take any flat brush for watercolor or acrylic paints and trim it with scissors.
Comb brush for ombre manicure
In order not to wash off the paint or varnish from the cuticle with all available means, it is better to protect it before starting work. You can carefully apply the nourishing cream, but if it gets into the gel polish when working with a sponge, the polish will swell with bubbles.
Manicure brushes - types, purpose, how to choose and care
At home, regular tape or PVA glue for cuticles is often used. In salons, professionals use Skin Defender - this is a liquid product that resembles the action of PVA glue. We apply it to the cuticle, it hardens, forming a thin elastic film. After applying the gradient, simply remove the film and the skin remains clean.
Matte
Eliminating glossy shine is what you need for a gradient. Thanks to this technique, you can use bright colors while leaving the manicure calm.
Summer juicy manicure using bright shades No. 96 and No. 66 of Essence varnishes in combination with a matte top to create a coating that imitates the skin of a ripe peach.
Subdued manicure ideas
Make your matte manicure bright with stickers and designs. An impressive selection of stickers is available on Aliexpress and online nail art stores.
The drawings can be brilliant. Cupcake Polish varnishes are suitable for these purposes. This brand produces dozens of glitter products in various shades.
Manicure ideas with glitter for all occasions - 22 designs with descriptions
Gradient with a sponge: how to make gel polish
A popular, simple and proven way to create a gradient. You can work either with a special sponge for ombre or use a regular kitchen sponge with small pores. An alternative is a car wash sponge. Usually these are finely porous large sponges; this supply will last for a long time.
A new sponge can be washed and dried, or taped over the work surface to remove fine dust and particles. They will definitely get stuck in the varnish layer and may cause bubbles.
- Apply a base or white base.
- Place 2 drops of varnish shades on a piece of foil and mix them with a stick to create a transition of shades.
- Dip the sponge into the colors and apply it to the nail so that the stripes are positioned horizontally. If desired, you can do this vertically or diagonally. To avoid “bubbles”, you can press the sponge against the foil once or twice, removing the air, and then move on to the nail.
- Using patting movements, transfer the design to the nail. You can’t pull the shades so as not to blur the transition. Make 2-3 layers.
- Dry in a lamp and cover with top.
- Remove the dispersion layer and process the cuticle.
Second method with a sponge:
- Cover your nails with a white base or base coat.
- Paint the nail with stripes of the varnish chosen for the gradient.
- Use a sponge to mix the layers on the nail using patting movements, without pulling.
- Repeat in 2 or three layers. It is recommended to take a few minutes break between them so that the varnish “settles down”. Remove the excess with a brush and wait for the bubbles to settle.
- Only then dry it in a lamp.
- Cover with top coat, dry, remove the sticky layer.
- We process the cuticle.
Stickers and drawings
Graphic elements allow you to add personality, use it on nails of any length. Size, quantity and color - choose as you wish.
Natural motifs are the trend of 2021. The trend is reflected in clothing, accessories and, of course, manicure.
The already mentioned Essie brand with their impressive palette is used not only for coating, but also for design. The photo shows a manicure made exclusively with products from this manufacturer. Gradient of shades “Off topic”, “Beauty nap” and “Mojito madness”. Drawing – “Daring damsel”.
A beautiful manicure is obtained with a graphic gradient. This design is created using stencils or drawing each row of diamonds. For this design you will need only two varnishes - color and white. Pictured is Opi shade “Scores a Goal”.
In general, the drawing can be anything - colored or monochromatic, bright or barely noticeable, clear or abstract.
Gradient is a bright and stylish nail design option. Combine any shades and different design elements. Get inspired by these photos and create a trendy design on your nails. Do you like gradient manicure?
3.9 / 5 ( 58 votes)
Gradient flat or comb brush with gel polish
- Cover the nails with a base layer of gel polish. It can be a white or pink shade, as it is lighter in the chosen combination of pink and blue.
- On the base layer we apply the shades selected for the gradient - pink in the upper part and blue in the lower part. Varnishes can be applied at the joint or left a small gap if they are dark, contrasting tones, so as not to smear the brush.
- Wet the brush in a cleanser to achieve the effect of light moisture. Then it is convenient to wipe it on a cotton pad, also soaked in cleanser. Some craftsmen use wet baby wipes for their work. The brush is initially blotted with a napkin, and then all remaining varnish is also removed from the brush with a damp napkin while working.
- Holding the brush almost parallel to the nail, we begin to “pull” the pink color down from the cuticle with light touches, moving from side to side. It is important to immediately outline to what area you will “pull” the top color, and more intensively remove the color from the brush in the final transition zone.
- We do a light ombre in two or three layers. We dry each one in a lamp.
- We start the new layer by applying shades along the old transition lines, then tighten it again with a brush.
- It is important to constantly remove excess varnish from the brush. In the area of the free edge, the layer should be thin and neat.
- We seal the resulting layers with an ombre top coat and dry them in a lamp.
- Remove the sticky layer, remove the protection from the cuticle and treat it with oil.
Vertical gradient
The most important thing in any type of gradient is choosing the right shades. They should not be very different from each other, unless of course you want to create a brighter and catchier image. For bright ideas, use bright and acidic gel polishes.
Don't miss: Red pedicure for fatal beauties (51 photos)
For a more subdued variation, you can choose delicate shades of purple, green, blue and other colors that complement each other beautifully.
Gradient fan brush
We do not get such an even and smooth transition as other methods, but the technique allows you to work quickly and get good results even for beginners.
- Apply the base pink color in two layers.
- Mix pink and red 1:1 on foil, and apply the resulting color to the transition zone on the nail with a brush.
- Apply red color to the tip of the nail.
- Wet the fan brush by pressing it against a napkin soaked in clinser.
- We place the brush perpendicular to the nail and “sweep” the layers of varnish from left to right again and again until we get the desired intensity of the transition.
- Dry it in a lamp.
- We repeat everything with the second layer, dry it in a lamp.
- We fix the result with a top coat and process the cuticle.
Gradient pigments
For the base, use white gel polish or just a base. If pigments are used to create the entire gradient in two shades, and not half of the nail, then a silver layer of varnish or just a base will be enough. The sticky layer does not come off.
- We cover the nail with two layers of colored blue or turquoise varnish.
- Using a flat or round brush, select the pigment and place it on the sticky layer using small strokes and lightly patting movements.
- We move from the zone of maximum color intensity to the transition zone, depending on how you arrange the shades.
- We make the layer of pigment thin but dense.
- If you combine two pigments, then start applying it in the same way from the edge to the middle of the nail. In the middle, where two pigments meet, carefully mix them with a brush, drawing one into the other. We get the pigment and put it where the bald spots form.
- We seal the result with topcoat.
- We process the cuticle.
Options for applying a “cat eye”, what 3D gel polishes and pigments are available and how to work with them
Fashionable gradient ideas on nails with gel polish
Vertical gradient on nails with multi-colored gel polishes
The history of gradient manicure does not stand still, and now fashionistas are trying a new option - vertical flow of color. The color in this manicure is distributed not from the hole to the tip of the nail, but parallel to the axis of the nail . The techniques of horizontal and vertical ombre on nails are similar, but the effect is completely new, which is what nail art innovators are striving for.
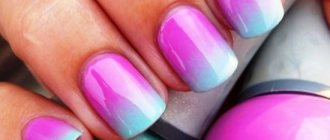
Bright color transition on nails with gel polish
Bright colors are always a field of activity for bold and creative people . And with a gradient on the nails there is room to roam. The combination of color diversity and imagination when mixing several colors are perfectly combined in the ombre technique.
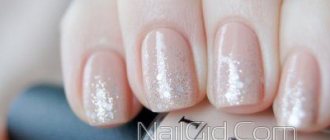
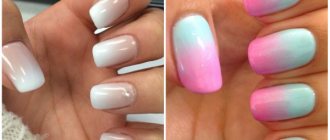
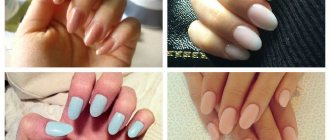
Nude color transition on nails with gel polish
Discreet, calm color combinations never go out of fashion and are highly respected among women . A beautiful transition between colors from the layout of one palette will significantly diversify the options for beige, coral and amethyst manicure. An excellent office option, masterfully performed by a nail design master.
Geometric color transition on nails with gel polish
Geometry today is popular not only in school textbooks. Drawings of triangles, squares and clear straight lines are now depicted on nails, in jewelry and in prints on clothes. Geometric play on nails is also a combination of straight lines and color transitions. Only the color does not transition smoothly, but gradually changes from figure to figure. A unique effect of facets on the gemstone .
Radial color transition on nails with gel polish
Restless manicurists have come up with a design whose name you won’t even immediately understand – radial gradient. Apparently, inspired by the same geometry and remembering that in addition to angles, it also contains figures with a radius. Radial manicure is performed only on rounded nails , and the color changes from the middle to the edges of the nail. Just like that.
Festive design and color transition on nails with gel polish
Any version of a manicure can be turned into an extraordinary one if you add rhinestones or sparkles to it. And also, you can combine different techniques on different nails, and you will have several options for a beautiful ombre shimmer with gold, patterns and floral patterns.
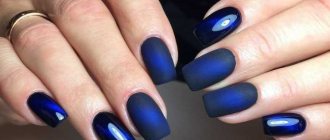
Color transition with matte finish on nails with gel polish
Another intrigue in mixing several techniques in manicure and again hitting the mark is the combination of ombre and matte top coat. The soft transition of color in a muted design looks even more mysterious . But in a matte manicure you cannot create a gradient that is too contrasting - in this case, combining colors and textures will not be beneficial. A layout of colors from the same palette is ideal.
Transitioning the same color on different nails with gel polish
If you are not satisfied with multi-colored nails, manicurists offer a different technique - multi-colored fingers. In this manicure, the gradient is not displayed on the surface of one nail, but moves from finger to finger . For example, sapphire blue gel polish on the thumb, denim blue on the index finger, and so on to cornflower blue on the little finger. Here's some interesting arithmetic and a fairly simple technique using gel polish and a gradient of the same color on different nails.
Degrade with acrylic powder
A simple method suitable for beginners. The fine, free-flowing texture gives a transition effect with a minimum number of strokes.
- We paint our nails with white varnish and dry them in a lamp.
- We cover the nails with top, leaving a dispersion layer.
- Place one shade of powder on a fan brush and sprinkle it onto half of the nail with small movements. We start from the zone of the most intense color location and move towards the transition zone as the amount of powder on the brush decreases. The higher the brush is above the working surface of the nail, the wider, thinner and blurrier the layer is, so closer to the shade mixing area we raise the brush higher.
- Shake off excess powder periodically to ensure even coverage.
- We do the same with the second shade of powder.
- Dry it in a lamp.
- Brush off any remaining powder with a brush.
- Use a soft buff to remove rough bumps to achieve a uniform coating.
- We process the cuticle.
Shellac gradient: how to do it with an airbrush
Time- and effort-efficient gradient. You will need an airbrush and paint for it. With the help of airbrushing, a very smooth and gentle transition is obtained, especially in the case of white and beige shades. Airbrush is popular for creating French manicures and wedding manicures. Read more about the possibilities and techniques of airbrushing in nail design.
- We cover the nails with shellac using the base color.
- Let's dry it.
- We fix the shellac with a top coat.
- Remove the dispersion layer.
- Fill the airbrush with white pigment.
- Spray the paint in a thin layer, wait 2 minutes for it to dry.
- We secure the result with a top coat.
- Remove the dispersion layer.
- We process the cuticle.
Airbrush in nail design: how to choose and use