Nail patterns for beginners are a great way to add variety to a regular manicure. Drawing them is not at all as difficult as it seems. Moreover, simple and neat patterns on nails are trending. There are many techniques for applying designs to nails; with perseverance and accuracy, they are available to any beauty who loves to take care of her hands and loves manicure.
Constant training in drawing will help you gain experience and get better at it.
Multi-colored dots - a simple version of nail art
After practicing with simple patterns, you can move on to more complex ones.
Constant training in drawing will help you gain experience and get better at it, and over time you will be able to decorate the nails not only of yourself, but also of your friends. And if you wish, you can turn this activity into a profitable profession.
Advice! For beginners, it is not necessary to immediately buy the most expensive devices and materials. At first, you can even practice using simple watercolor paints that are easily washed off.
There are several basic techniques for creating simple nail designs. But first you need to prepare a workplace, tools and auxiliary materials.
- Preliminary preparation
- Scotch tape will help us
- Patterns on nails using dot technique
- Decorating nails with a gradient
- Drawing with a needle
- Drawing patterns with a brush
- Decoration with decor
- Drawing with tulle
- Acrylic paints will decorate your fingers
- Nail trends 2021
- Styles and trends of nail design in 2016
- No need to be afraid of experiments
Set of accessories for painting on nails
Simple patterns on nails for beginners can be drawn using available materials. To apply drawings you will need:
- scotch;
- needle;
- foil;
- glitter sprinkles;
- thin brushes;
- varnishes of various colors;
- toothpicks;
- cotton swabs;
- nailfile;
- nail polish remover, etc.
Simple patterns on nails for beginners can be drawn using available materials.
If you are not confident in your artistic abilities, you can use stencils
The pattern decorates only one nail
Advice! The workplace should be well lit; it is better to use a table lamp with a regular incandescent lamp (not fluorescent), since it does not distort colors.
Simple nail designs for beginners.
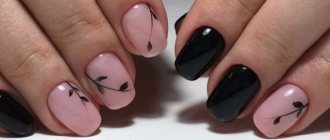
The first simple drawing on nails for beginners, with which we will begin the course of mastering the art of nail design, is ordinary lines. It would seem that everything is easy and simple, but in the end we have a beautiful manicure.
You will need red, black, white and silver varnishes, a thin long brush (preferably several). There are also special painting varnishes on sale with a long brush in a tube, so if you are seriously interested in nail design, purchase them, it will be much more convenient. Next, follow the instructions in the pictures, which clearly show all the stages.
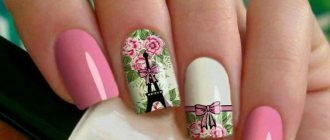
For the following simple design you will need pink polish for the base, white for the stripes and rhinestones for the design.
Preliminary preparation
Before you start painting patterns on your nails for beginners, it is important to know that your hands must be manicured. Immediately before the painting process, it is necessary to: disinfect your hands, process the cuticles, give your nails the desired shape, apply a base in the form of a transparent varnish to your nails.
Before you start painting patterns on your nails for beginners, it is important to know that your hands must be manicured
Immediately before the painting process, it is necessary to: disinfect your hands, process the cuticles, give your nails the desired shape, apply a base in the form of a transparent varnish to your nails
These lines are best done using a needle or toothpick.
Now you need to be patient, persevering and careful.
Advice! You can practice applying patterns on paper blanks made in the shape of a nail and having the same dimensions.
https://youtu.be/https://youtu.be/g4_VqtZEzBg
_
What is a monogram
First of all, it is a beautiful pattern with interlocking semi-circular strokes. Usually used to design nails with a single-color coating. A manicure with curls vaguely resembles a monogram created from interconnected, side-by-side or intertwined strokes.
The advantage of a monogram on nails is that it can easily and imperceptibly disappear into the design or become the main accent with the right color combination.
Symmetrical curls today are used not only in manicure, but also in the interior, in the production of upholstery material for furniture. The drawing easily and naturally fits into any composition using a variety of techniques.
Materials for creating curls
Any design of marigolds occurs due to decorative components. The gradient or French technique includes not only a color scheme, but also a set of materials for work. Since we are talking about artistic painting, the tool used is a brush, dots or a thin pointed object, for example, a needle or toothpick.
Monograms on short nails are painted in most cases with a brush with soft bristles 7 mm long. A little later we will touch on all the elements suitable for painting, but in addition to this set there are also auxiliary tools.
How to create an amazing drawing with directional exposure? Stencils or practice cards can help you create your monogram. Acrylic paint will be an ideal assistant when modeling decor. But it is not considered the only component that can display a curl.
Training cards
Creating symmetrical curls with meaningful repetition is not easy. Of course, if there is no practice and accumulated experience. Only masters can arrange the ornament correctly, and even combine it with various techniques and decor.
For beginners, there are cards for sale for painting nails with an existing design. From a distance, the learning process is reminiscent of writing letters in the first grade with the repetition of the same lines and curves.
Stencils are intended for daily training so that the hand can move freely and naturally when drawing rounded lines.
Almost always, symmetrical painting has a direction: damask oriental chic, floral motif, classic or modern. Each manufacturer independently chooses the location of the ornate ornament on the card to hone the skill and direction of the design.
Scotch tape will help us
Drawing with tape
Scotch tape is used as a stencil.
To create patterns on nails for beginners, it is important to consider step by step the basic popular techniques, for example, using tape. You can also buy special self-adhesive strips for manicure; they are sold in nail art stores.
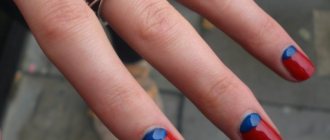
A very easy manicure using tape - stripes on the nails or color blocks
To begin with, the first layer of varnish of one color is applied to the nail plate, after drying, tape is glued to this layer, and the nail is painted with varnish of a different color.
You can also do a French manicure using tape.
A very easy manicure using tape is stripes on the nails or color blocks.
To begin with, the first layer of varnish of one color is applied to the nail plate, after drying, tape is glued to this layer, and the nail is painted with varnish of a different color.
Here you have a simple, but at the same time original and neat manicure in two colors! Now, using this technique, you can create patterns in the form of triangles, diamonds and multi-colored stripes.
Moon manicure can also be easily done using tape.
Using this method you can also do a French manicure.
Advice! You can get a very beautiful manicure, for example, if you cut out a pattern in the form of stripes and circles from tape.
What do you use to paint on your nails?
Thanks to the rapid development of the modern nail industry, bringing to life any most unusual and impressive design will not be difficult, because for this there are many special devices and tools, as well as available step-by-step photo lessons and master classes for beginners.
Simple designs on nails can be done using available tools - needles, toothpicks, a thin brush or regular tape.
Very simple patterns on nails are made directly with special varnishes, which manufacturers initially supply with a long brush.
Advice! Even with varnishes intended for artistic painting, novice nail art masters may find the brush not very convenient, so it would be a good idea to first work out the design on paper or plastic tips.
The technology of painting with varnish itself, even for novice craftsmen, is quite simple and does not require any special equipment: the brush should be dipped in the product and you can start applying the pattern. This method is best suited for depicting hearts, flowers and leaves, stripes and flirty polka dots.
When starting to paint on your nails, you should prepare your workspace in advance - cover the table with cloth, paper or cling film so as not to spoil the tabletop with paints and acetone. It is better to print out interesting ideas for fashionable nail art in advance - this way the patterns will be before your eyes, and the technique is guaranteed not to suffer.
Attention! Before you start bringing your imagined drawings to life, it’s worth practicing on paper or plastic blanks how to create a harmonious composition of dots, straight lines, geometric shapes and smooth curls.
Masking tape
A simple manicure pattern can be created using paper-based masking tape - it will be an excellent alternative to ready-made nail stencils. Drawings consisting of several shades look especially advantageous, but restrained minimalism is still in trend. Well, you can’t do without a base and topcoat either. All you need to do is follow the step-by-step recommendations:
- immediately apply a transparent base to the nails;
- the next layer is a colored base;
- strips of adhesive tape are glued onto the completely dry varnish according to the intended image;
- the free space is painted over with contrasting varnish;
- the tape is carefully removed from the nail when the manicure is completely dry; depending on the complexity of the pattern, strips of tape can be glued to the nail plate several times;
- Finally, a top coat is applied to each nail.
Using tape on your nails, it is very convenient to draw light geometric patterns, as well as paint over the edges of the plate in moon and French manicures with a straight line or a smile line drawn at an angle.
Toothpick
When creating fashionable nail designs for beginners in 2021, a toothpick can be no less effective a device than professional tools. Its use also has its own nuances: since the toothpick is made of wood and not metal, more varnish is collected on it, but it rolls off unevenly. It is not suitable for drawing thin lines, but for plant motifs, monograms and abstractions it will be just right. It will be convenient for beginners.
Needle
The simplest nail design for beginners can be created using a thin needle - for this you will need several polishes of different shades. Manicure needles are sold in specialized stores - unlike sewing needles, they do not have an eye, but do have a comfortable handle. The patterns made on the nails with a needle turn out to be very elegant, openwork, it is ideal for working out the small details of the design. You can make a similar tool yourself by sticking a sharp needle into the eraser of a regular pencil.
Comment! To apply patterns and designs on your nails, you should choose the most contrasting colors - this will make the design bright and expressive.
It’s not at all difficult to cover your nails with elegant painting – just follow the step-by-step instructions:
- First, cover the plate with a colorless base, the task of which is to protect the nail from damage with a sharp instrument and the penetration of bright coloring pigments;
- after the base has dried, the color that will become the basis of the entire design is applied to the nail in a continuous layer;
- then dots are placed on the not yet dried varnish in different places and stripes of contrasting color are drawn;
- then the dots and lines are carefully pulled out with a needle, and abstract curls or clearer geometric patterns are formed from them;
- The final touch is applying a transparent top.
Dots
Dots belong to the category of professional tools used by beginners and experienced artists to create fantasy nail art. At first, when drawing easy nail designs for beginners, you can get by with a needle or toothpick. Having mastered simple elements, it will not be difficult to complicate the composition of the drawing - and here dots will come in handy: it is much more convenient for them to achieve stunning effects by drawing abstract patterns, exotic flowers and graceful silhouettes of animals on the nail plate.
Brushes
Of all the tools that help even beginners create beautiful and simple designs on nails, brushes require the most skill, which means you will have to master working with them gradually. Today, cosmetic stores can boast of an excellent assortment of brushes for applying designs to nails: thin, thick, wide, flat, rounded and square - they can easily realize any of your wildest artistic ideas and fantasies. Thus, using a thin liner brush, craftsmen can easily perform exquisite openwork painting; a wide flat brush is convenient for drawing plant elements (leaves, flowers, petals), and to apply glitter, sand and acrylic powder to nails, it is better to take a fan-shaped brush.
Stencils
The easiest way for beginners to create unique nail art is to use ready-made nail stencils. Convenient stickers amaze the imagination with a variety of patterns, designs and textures; moreover, such a design does not require special skills for beginners, and the result is simply stunning.
Patterns on nails using dot technique
By drawing neat dots on your nails, you can get original patterns that will look really good for beginners. You can buy special tools for dot painting, or you can make do with improvised means:
- toothpicks;
- stiletto heels;
- thin rods.
By drawing neat dots on your nails, you can get original patterns that will look really good for beginners
An excellent option for an original manicure that even a beginner can handle
You can buy special tools for dot painting, or you can make do with improvised means.
Using different devices, you can get dots of different diameters, for example, small dots are obtained if you use toothpicks, and large dots if you use the opposite end of a pencil, you can even leave imprints with an eraser on its tip . A drawing is created from dots, these are flowers, patterns, animals, figures. You can simply decorate the nail from the base to the edge of the plate with a series of dots.
A variant of dot painting is drop painting. A larger drop is placed in the center of the nail, and smaller drops are placed around it.
Using different devices, you can get dots of different diameters, for example, small dots are obtained if you use toothpicks, and large dots are obtained if you use the back end of a pencil
Dots can be combined with stripes, which can be easily made using tape
You can simply decorate the nail from the base to the edge of the plate with a series of dots
Advice! Once you master this technique, you can buy professional tools for dot painting. They are called dots.
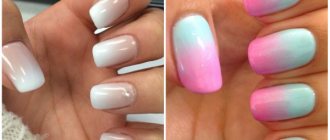
Decorating nails with a gradient
Another pattern for beginners is presented step by step. It looks very impressive, and is created easily and simply with the help of eye shadow and a sponge. To do this, varnish of the main color is applied to the nail, after drying, eye shadow is applied to it using a sponge, and now the resulting colored enamel is covered with colorless varnish.
Gradient coloring with a stencil - step by step
Gradient coloring with a stencil - step by step
Gradient coloring with a stencil - step by step
Advice! It is better to first check the interaction of the transparent varnish and the shadows planned for application in order to eliminate their unsightly spreading or unnecessary reaction.
Drawing with a needle
Applying patterns with a needle is quite suitable for beginners
According to the technique of execution, it is somewhat reminiscent of dot painting, but has its own characteristics
All you need to create a pattern is a regular needle and 2-3 multi-colored varnishes.
Applying patterns with a needle is quite suitable for beginners. In terms of technique, it is somewhat reminiscent of dot painting, but has its own characteristics. All you need to create a design is a regular needle and 2-3 multi-colored varnishes. There are no restrictions on color, the only thing is that the colors do not merge with each other. Varnishes of contrasting colors will look very beautiful. So, a step-by-step technology for applying a pattern with a needle:
- Nails are covered with colorless varnish. This is necessary to protect against possible scratches caused by the needle if you press too hard on the plate.
- After the varnish has dried, the base varnish of the selected color is applied on top.
- A drop of another varnish is applied on top, and while it is still wet, you need to make a drawing with a needle. By carefully plunging the needle directly into a drop of contrasting varnish and moving it in different directions, a pattern or design is formed.
- After the resulting design has dried, transparent varnish is again applied on top to secure it. Thus, you can either mix varnishes with each other, or get thin lines - it all depends on your imagination! You can get an abstraction, an ornate pattern, or the petals of a tropical flower.
Rainbow patterns
Delicate designs for delicate fingers
You can also create a specific design. To do this, for example, a large red dot is placed in the center. This will be the core of the flower. Now the outline of the petals is drawn with a needle from the center. The lines can be painted over with varnish of a different color and shaded with a needle. After complete drying, a fixing base is applied.
Advice! It is better to practice on a paper blank first.
Drawing patterns with a brush
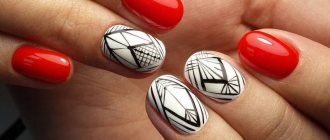
How to draw patterns on nails for beginners using a brush? In fact, it is not as difficult as it seems. For example, to create a geometric pattern you will need: a base, a base coat, varnishes of two colors, a thin brush. This technique is comparable in complexity to needle drawing, and is quite suitable for beginners:
- nails are covered with a base coat;
- mentally draw a line across the nail, dividing it into two equal parts.
It is best to take hold of the brush when you are sure that your hand will not tremble at the most inopportune moment
You can create real art with a brush
Abstractions and curlicues
One of the parts is painted over, for example, with blue varnish; Using black varnish and a thin brush, apply a black stripe, separating the painted blue part. The result is a manicure with a clear outline of varnishes in contrasting colors.
The finished pattern, as usual, is covered with a base base. With a thin brush you can paint “leopard patterns”; for this, brown spots are first drawn, then they are outlined with black varnish.
Drawings with a brush - step by step
Drawings with a brush - step by step
Drawings with a brush - step by step
Drawings with a brush - step by step
Advice! If it is difficult and inconvenient to draw on the fingers of your right hand using your left, you can choose only one nail to apply the pattern, and cover the rest with varnishes of contrasting colors.
Decoration with decor
Using decorative elements, you can easily decorate your nails for the holiday; for this you will need glitter sprinkles, rhinestones, sparkles, etc. You will also need a clear varnish and a base varnish. The technique of applying patterns using decorative elements is very simple:
- Nails are covered with a colorless base.
- If desired, a coating of a different color of varnish is applied.
- After drying, decorative elements are laid out on the surface in the desired order.
- The base varnish is applied again on top.
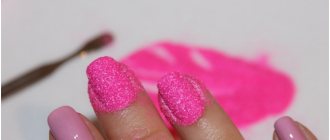
Using decorative elements, you can easily decorate your nails for the holiday; for this you will need glitter sprinkles, rhinestones, and sparkles.
Glitter sprinkles applied on top of white polish
Each nail is individual
Advice! To prevent the decor from crumbling prematurely, you should try to choose elements that fit as closely as possible to the nail.
Simple patterns for beginners
Simple designs on nails that even a beginner can do at home should not have complex designs.
To get started, you should try options such as:
- heart (at the tip of the nail plate or in the middle);
- flower;
- water drop;
- snowflake.
The simplest option is a heart. To apply the design, you will first need to completely cover the nail plate with white varnish. To continue working, the base must be completely dry. Then, using red, pink or another bright shade, you can begin to apply the pattern.
Using a toothpick, apply 2 dots, which are then carefully connected, giving the shape of a heart. If desired, it can be completely painted over or left as an outline.
Options for drawing a heart. Photo:
Drawing with tulle
Using this method, the nail acquires an interesting openwork pattern. To do this you need a piece of tulle with a beautiful small openwork. Nails are prepared as with other techniques (base varnish, main color), without allowing the second layer of varnish of the main color to dry completely, a piece of tulle is applied to the nail plate, pressed for a while and removed. You get an imprint of openwork tulle on the enamel, and now you just need to cover it with transparent varnish to fix it.
Having mastered several nail art techniques, you will be able to change the design of your nails several times a month.
Drawings can be done on both long and short nails
A combination of dots, stripes and moon manicure
Advice! The pattern can be selected individually for each finger. Instead of tulle, take knitted fabric or velvet.
Hardware manicure at home
How to do a hardware manicure step by step? To do this you will need the following components;
Note!
Beautiful pedicure - the best ideas and trends for decorating feet for the summer season 2021 (105 photos + video)Beautiful manicure with rhinestones - beautiful ideas for short and long nails. Review of current manicure decoration ideas for 2019-2020
Lunar manicure: trends and trends for 2021. Beautiful solutions and stylish combinations of the season (100 photos)
- Special equipment for hardware manicure;
- Antiseptic compounds;
- Files;
- Transparent varnish for covering the nail plate;
- Hand cream.
Look: Manicure with rhinestones - beautiful ideas and the best combinations of the 2019-2020 season. TOP ideas and best trends of the season (125 photos)
We present to your attention step-by-step instructions for creating a manicure at home. It includes:
- First of all, it is recommended to thoroughly clean your hands and nails;
- We remove the length of the nail plate;
- Next, we form the shape;
- Now we use the cone attachment. It helps get rid of old cuticle and growths of horny epithelium;
- Next you will need an oval nozzle. This variety is designed to remove hangnails and rough skin around the nails;
- Now you can cover your nails with clear varnish. Apply 2 layers;
- The final step will be to moisturize your hands and cuticles with a nourishing cream. The video of the step-by-step creation of a manicure shows the entire sequence of actions.
Acrylic paints will decorate your fingers
This method of applying patterns is also suitable for beginners; in terms of complexity, it is equivalent to painting with varnish using a thin brush. Some beginners may find it even easier to do. For example, you can draw a branch. For this you will need yellow and green paints. It is carried out in the following stages:
- A varnish of some dull color is applied.
- From the left to the top, two curved lines are drawn with a brush - these will be branches. The lines are drawn with bright yellow acrylic paint.
- Using the same brush, small leaves are drawn on the branch.
- The middle of the leaf is tinted with lighter paint.
- Everything is coated with colorless varnish to secure it.
Feng Shui manicure - when the design of the ring finger is different from the others
Black and white manicure
Multi-colored dots resemble confectionery powder
Advice! Don't forget to apply clear varnish as a sealer. Without it, the paints will quickly be washed off with water.
Nail designs for beginners step by step.
Let's look at some more nail designs for beginners step by step. To complete them you will need acrylic paints and brushes of different thicknesses.
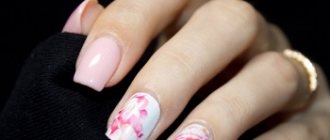
Step 1: Paint the background with pink nail polish. Paint the middle petal of the flower with white paint. Just lightly fade the inside
Step 2. Draw the remaining petals in the same way.
Step 3. Take a thin brush and draw out the petal a little, moving the brush along its center.
Step 4: Paint the core with yellow acrylic paint
Step 5: Seal your nail art with clear polish for a shiny, wet look.
And one more step-by-step drawing on the nails, follow the photo instructions.
Nail trends 2021
Neat and well-groomed nails never go out of style. Short nails are trending this year. The almond shape of nails does not lose popularity, giving harmony to the image.
The color scheme is distinguished by non-standard colors, for example, turquoise shades will suit red-haired beauties, and denim style will be interesting for young girls. Shades of coral are already classics for the feminine and elegant.
Short nails are trending this year. The almond shape of nails does not lose popularity, giving harmony to the image
The color scheme is distinguished by non-standard colors, for example, turquoise shades will suit red-haired beauties, and denim style will be interesting for young girls
Shades of coral color are already classics for the feminine and elegant.
This season's fashionable mint color will not disappear in the fall. Flesh-colored nail polish is also popular, and the bravest girls are already using yellow vinyl, dark lavender and hot coral. The pink color, which has also become a classic, does not leave the scene. The confetti varnish is interesting. It contains an unusual combination of coral and violet particles, and there are also calm pink particles of various sizes.
Nail design styles and trends in 2021
Patterns and decorative elements on nails have already become a nail art tradition. Geometric shapes, as well as designs in the form of squares, cells or triangles, are in demand this season.
Patterns and decorative elements on nails have already become a nail art tradition.
Themed decor
Interesting “frameworks” also appeared. The main color is framed along the contour with varnish of a contrasting color. The tradition of monolacquer in nail design never gets old.
You can dilute the image by decorating a couple of fingers, simply highlighting them with varnish of a different color. Summer passed under the sign of brightness and luxury. Combinations of bright manicures with decorative elements in the form of massive jewelry are in fashion. Striped nails are still popular. At its peak there is a blue base with a white stripe, to match the currently fashionable nautical outfits.
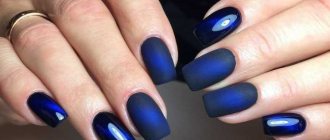
Lunar manicure does not lose its position. Its most popular type is a black matte finish with a silver and shiny lunula.
To create a geometric design, you need to use at least 3 types of varnish. New combination: beige – black – white. For several seasons now, the theme of geometry has remained relevant. The side French is also interesting; this is when a strip of white is drawn on the side of the nail.
So-called unusual varnish blots are also in demand. In fashion there is also a trend towards a natural look for nails, as a result flesh-colored varnishes are popular. Clear nail polish is also on trend.
You can dilute the image by decorating a couple of fingers, simply highlighting them with varnish of a different color
Design for the more experienced
Complex patterns are suitable for those who have experience in creating nail art.
Before starting the main work, you will need to prepare the nail plates. For this purpose, you can apply a stencil with the desired image option on them or cover them with a base color and let it dry completely.
Depending on what you have in mind, you can apply up to 2-3 different colors and shades, but each of them must be dried until completely hardened. Then, if stencils were used, you need to carefully peel them off, then paint over the empty spaces with varnish of a different shade; if not, apply the desired pattern with a toothpick.
In any case, the final stage will be the application of a fixing layer. It is recommended to use regular clear varnish for this purpose.
Drawing monograms. Master class on video:
Gel polish
The technique of working with gel polish requires attention and accuracy. This coating option will allow you to create designs of any complexity, suitable for summer or winter manicure.
If you don’t have enough experience or you have chosen a complex pattern, you can use glitter - they will correct mistakes and make your nails attractive.
It is important to apply them no less carefully than the main coating, since a mistake at this stage can ruin everything.
Techniques for working with gel polish for beginners. Video:
Some manicure options with a pattern can be done simply and easily.
For painting you will need:
- gel of desired shades;
- glitter (optional);
- lamp (UV);
- base coat;
- protective covering.
You will also need a toothpick or a thin needle for application, a tool that allows you to remove the sticky layer. At the initial stage, you need to prepare the nail plates - the work involves removing the cuticle and polishing.
Then a base coat is applied to the prepared plates (it must dry completely before further work; there is a special UV lamp for this purpose). Then a colored gel is applied - the shade is selected as desired or to match clothes and accessories.
It is important to remember that it does not need to be dried. Using a needle or toothpick, collect the required amount of glitter. They need to be carefully distributed over the surface, but not pressed against it. Excess glitter must be carefully removed so as not to visually spoil the manicure.
The next step is to dry your nails under a UV lamp. To complete the work, you will need to apply a final protective coating, which also needs to be completely dry. You can then use a stick remover.
This option is suitable for any season. It can be used for both daily and holiday use.
Acrylic paints
An excellent design and manicure option is delicate pink and white.
Stages of work:
- Cover the plate with a colorless coating (you can use a beige base, which is used for French manicure).
- You need to drop a little varnish onto the sponge and then press it onto the nail for 5-7 seconds.
- Using a thin brush, you need to apply white acrylic paint and draw any designs along the edges (this could be waves, curls).
Then you need to apply the finishing coat. Additionally, you can use a small amount of glitter.
Painting with acrylic paints. Video:
No need to be afraid of experiments
Women always dream of having beautiful and well-groomed nails. There is no point in chasing fashion trends; instead, you can become the creator of your own design, only starting from fashion trends as a starting point.
It is quite possible to independently create a pattern and decorate your nails, especially since, as it turned out, it is not so difficult - the main thing is to follow the rules and know the secrets of performing the techniques. There is no need to be afraid to use your imagination and design capabilities, there is no need to be afraid to experiment.
Who knows, maybe next season the design that you came up with yourself will be used as a basis?