A popular way to create a beautiful manicure is acrylic extensions. To do high-quality acrylic nail extensions, step-by-step instructions for beginners will help you.
There are three ways to do an acrylic manicure:
- on the nail plate;
- on forms;
- for tips.
For beginners, any of these methods will do.
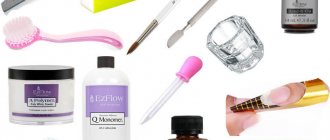
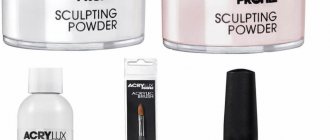
To create an artificial acrylic manicure, you cannot do without special tools and materials. You can purchase them in specialized stores. You must have:
- acrylic powder for nail modeling;
- liquid (monomer) - a special solution for mixing with acrylic powder;
- set of grinding and polishing files;
- a set of manicure brushes for applying modeling composition and designs;
- acrylic remover, also used for cleaning brushes;
- dehydrate used to degrease the surface of the nail plate;
- primer used to ensure strong adhesion of acrylic to the surface of the nail plate;
- oil for softening and removing cuticles;
- paper forms for modeling marigolds;
- When modeling nails using artificial plates fixed with glue and secured with acrylic, you will need tips, glue, scissors and forceps.
The step-by-step process includes preparation, application of modeling composition and decoration of the finished manicure.
Acrylic nail extensions: step-by-step preparation instructions
Preparation includes:
- Disinfection of hands using any disinfectant and antibacterial agent to prevent infection and the development of fungal disease on the skin.
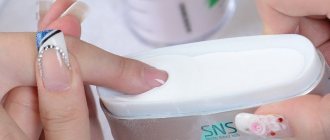
- Preparing the base for extensions or the so-called “dry manicure”. For this, files of medium hardness (150-180 grit) are used for grinding and polishing natural nails. Buffs are suitable for polishing them, which not only remove the natural shine from the treated nail surface, but also part of its top layer, which has absorbed substances that are constantly in contact with the hands.
- Cleaning nail plates from dust with an antistatic brush made of natural bristles.
- Degreasing the surface of the nail plate with a dehydrator. Thanks to the special properties of this substance, its surface is cleaned of natural fats and dried. This is necessary to ensure high-quality adhesion of acrylic nails to the surface of natural nails.
At the end of work, all tools must be disinfected.
There are also disposable nail files on sale, and some craftsmen prefer to work with them.
Return to contents
Self-treatment of nails after acrylic nail extensions
To understand whether the acrylic has completely hardened, you should tap the nail with a hard object - the sound should be characteristic, plastic. Is the acrylic cured? So now all you have left is:
- Treat the surface of the nail with files in the sequence - 150, 180 and 240 grit, until a perfectly smooth, shiny plate.
- Go over it with a polishing block.
- And apply a clear topcoat to protect your manicure.
If in the future you want to apply colored varnish, then before it, be sure to apply transparent . This way you will avoid yellowing of the acrylic. It is better to immediately exclude acetone-containing nail polish removers - they spoil acrylic.
Extended manicure: application of modeling compound
Extensions are carried out using dry acrylic powder, which, when mixed with a special solution, liquid, forms a viscous mass, which allows modeling of nails. The liquid modeling mixture hardens very quickly, within a few minutes.
For acrylic nail extensions, step-by-step instructions, regardless of which extension method you choose, are as follows:
- Wet the brush in liquid and touch it with the tip of acrylic powder. After a plastic, viscous droplet forms at the tip of the brush, quickly apply it to the nail plate. If you are extending your nails using tips, then first you need to apply acrylic to the base of the nail, 2 mm away from the cuticle. If you use a form, then first you need to form the tip of the nail, and only then its main part.
- The mixture must be applied so that the central part of the nail plate is thicker than its side parts. The surface of the nail plate is smoothed with a brush.
- After the acrylic mass has completely hardened, you can process the nails.
Nail extensions are a great alternative to growing your own plates. Most girls fail to grow healthy nails, as mechanical damage, insufficient care and lack of vitamins hinder this process. However, in the modern world, there have been two types of extensions for many years: acrylic and gel, which can be done either on forms or on tips. Masters who practice acrylic nail extensions on forms consider it more advantageous. You can perform this type of plate modeling at home; for this you need to have special tools and materials, as well as know the technology of their use.
Removing acrylic and gel
Acrylic is removed quite easily and quickly - the nails must be dipped in a special solution, the composition will become soft, after which it can be easily removed with a spatula. You can carry out this procedure yourself by purchasing the necessary components.
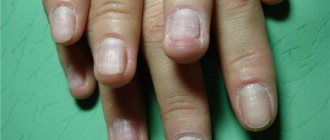
When removing extended nails, you need to file away the gel for a long time and tediously, which is a significant disadvantage of the coating. During the removal process, a lot of dust is generated. It is strictly not recommended to remove the composition at home - there is a very high risk of ruining the natural plates.
In both cases, having done nail extensions using tips, the nails need time to recover after removal.
What is acrylic
Acrylate contains liquid monomer and acrylic powder. The combination of these two elements is a mass that hardens under the influence of heat treatment, in other words, polymerization occurs.
Acrylic hardens in 5-7 minutes, but it gains full strength only after 24 hours of heating. Therefore, all kinds of mechanical impacts on the nails negatively affect the condition of the manicure.
The shrinkage of acrylic components occurs gradually, so the natural nail is less susceptible to negative effects. High-quality acrylic does not contain toxic methyl methacrylate, which thins the plate and makes it brittle.
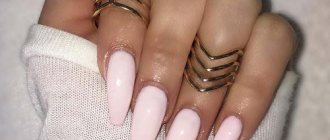
Acrylic nails do not change their appearance for several months if high-quality correction is carried out in a timely manner. This extension material has increased strength and resistance to external influences. This extension technology allows you to wash dishes without gloves, do hand washing and do other household chores.
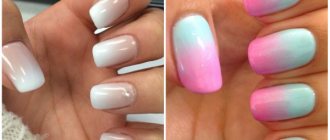
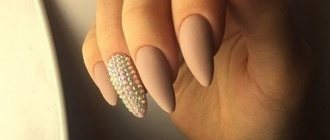
What do acrylic nails look like?
Photo of acrylic nails
The photo allows you to understand that acrylic nails on forms look almost like natural ones; they have the following characteristics:
- elastic;
- thin;
- durable;
- neat.
Acrylic does not change the shape of the nail, but leaves it the same without deforming it. A distinctive feature of acrylic plates is their high resistance to temperature changes. Their advantage is that to remove the material, you only need a special liquid that dissolves it.
I often use acrylic for those who want volumetric extensions, since only with it this type of manicure is possible.
What you need to do nail extensions with acrylic
The first question for girls who want to do this manicure at home is: “What materials are needed for acrylic nail extensions?” Tools and supplies can be purchased at a specialty professional supply store. These should include the following elements:
- acrylic powder of any color;
- liquid;
- and nail files;
- bond;
- disinfectant;
- liquid for dissolving acrylic;
- cuticle oil;
- orange stick;
- special paper forms.
Extending acrylic nails at home involves the use of brushes if the desired manicure includes drawings or patterns.
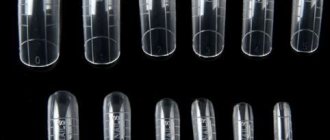
What are tips?
Tips are overhead plastic molds that are used as templates. The cost of the product depends on the number of them in the package. The minimum is fixed at 10 rubles, but there are products from 400 rubles and above. The shapes of popular templates have a pointed or rectangular appearance, but fancy and more original specimens are possible.
Extending nails using tips at home is a fairly simple technology. It is necessary to select the required template size based on the dimensions of the natural plate. When the plastic mold is glued, it needs to be given the desired appearance. After this, you can choose the technology: acrylic or gel. Nail extensions using tips are an easy way to give your fingers a unique look.
Home extensions: step-by-step instructions
All acrylic nail extension lessons for beginners come down to a single technology for performing certain actions. The distinctive features of each lesson can only be the implementation of a special design.
Instructions for acrylic nail extension step by step:
- The materials of the previous manicure are removed, the edges of the plates are filed, and their surface is . Then, using a disinfectant, your hands are completely cleansed of bacteria. Nails are treated with bond.
- Oil is applied to the cuticle, after 2-3 minutes it is moved away with an orange stick.
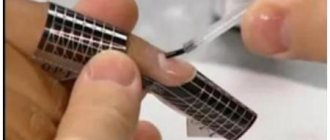
- Then put the paper form on your finger and bend it. The form must be placed strictly under the corners of the nail plate, otherwise the extended plate may subsequently break quickly. Then press the form tightly to the nail and connect its ends.
- Take the primer and apply it in a thin, but not thick layer on the surface of the plate.
- White acrylic powder is mixed with liquid to a thick consistency.
- You need to act quickly, as acrylic hardens within a minute. The resulting ball is applied with a brush to the form and distributed over it, forming a “smile line”.
- Repeat steps five and six with pink acrylic. Acrylic must be applied extremely carefully, as this directly affects the evenness of the surface. If the coating is almost perfect, then filing off the excess will be much easier. Wait 3 minutes.
- The paper form is removed and the free edge of the plate is processed using. The sides of the nail are filed down and the surface is polished with a fine-grained file, moving from the cuticle towards the sides. The surface of the nail is smooth and neat.
- Apply cuticle oil again.
- A clear varnish is used and patterns or shapes are drawn using a brush and paints if necessary. You can continue working with acrylic, painstakingly creating three-dimensional elements.
- All steps are repeated for each nail.
Transparent varnish is applied so that the acrylic does not turn yellow and the surface of the plate acquires a well-groomed appearance.
A broken nail can always be easily repaired by quickly removing the old layer with acrylic liquid and repeating all the steps again.
From the instructions described above, you can understand how to extend nails with acrylic at home. This process is labor-intensive and time-consuming, but not difficult if you follow all the steps carefully. Using high-quality tools and materials is the key to a long-lasting manicure.
Step-by-step instruction
Acrylic nail extensions with tips begin with cutting them quite short. The technology involves treating the surface with a fine file or buff to roughen it in order to ensure better adhesion to other materials and further degreasing. Using an orange stick, you need to remove the cuticle and also remove the pterygium (the lower layer of the cuticle). Having chosen the appropriate size and length of the tips, matching the width and convexity of the natural keratin, you need to smear the tip of one of them with glue from the inside and press it to the nail for 20 seconds. Before doing this, it is correct to additionally degrease the surface using a special alcohol product.
Having processed both hands, you need to trim off the excess, clean off the excess shine to a white matte color and try to make the border invisible. If dust appears at this moment, it should be brushed off with a special brush. Next, each nail is degreased, coated with primer and left to dry completely. Using a brush, acrylic and monomer, the gradual processing of the hands begins. The instrument is dipped in a strengthening solution and then in acrylic so that a ball is formed, after which a coating is formed on the little finger from its end to the hole.
It will be more convenient to lay out three balls along the length of the entire nail: the smallest one at the hole, the largest one in the middle and the intermediate one at the edge, after which you need to shape the nail with a brush. When the nails are dry, you can eliminate any irregularities that have arisen, form the nail shape you like and cover the surface with oil.
In the case when the extension is to be done on the lower forms, the process is a little different. Hands must be disinfected, after which the surface of the nails is smoothed with a nail file. After removing the emerging dust with a special brush, you need to push back the cuticle with the pterygium and cover the nail with primer. After it dries, the form is put on the finger, bent and fixed in the middle part. The ends of the substrate should be connected, but not closed.
Types of nail extensions
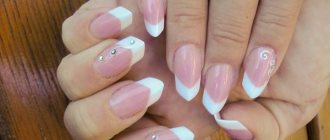
Now you can extend your nails using gel or acrylic. Gel is considered a safer material; in addition, there is no unpleasant odor during the modeling procedure. Regardless of the material, it can be extended onto tips or forms. When using a tip, an artificial free edge is glued to the tip of the nail, and the nail bed is covered with acrylic or gel. This method of modeling reduces time, but, unfortunately, you won’t wear these nails for very long. Therefore, if you are going to show off your perfect manicure for months, choose extensions on forms.
Gel nail extension
In the gel method for nail extensions, a biogel made from pine tree resin is used. Natural and semi-synthetic components are also used. Thanks to the ingredients used, the manicure has a natural look, and the nail plates become shinier and smoother. The big disadvantage of this technique is the fragility of the material after final processing. When breakage or cracks occur, new nail extensions with gel on tips are required.
Acrylic nail extensions
When building up, a substance is used that consists of powder and monomer (liquid). When liquid is added to the powder, it acquires a mushy consistency. Thus, the resulting mixture can be applied to the nails with a brush. After 30-90 seconds the mixture hardens.
Advantages of acrylic extensions
This extension method is suitable for beginners, as it is easier to work with acrylic than with gel. But first you will have to spend a decent amount of money on purchasing materials and tools. Acrylic is used to decorate nails using sculpting. Thanks to the plasticity of some substances, it is possible to create relief figures and beautiful designs.
What you need for acrylic nail extensions
You will need the following materials:
- primer;
- subprimer (degreaser);
- brushliner (brush cleaner);
- acrylic Powder;
- monomer (liquid);
- paper forms;
- brushes;
- sanding files (180 grit);
- buffs (soft polishing);
- decor
Watch a video about acrylic nail extensions at home:
Acrylic nail extensions at home
If you carefully follow all the instructions, you will be able to grow your nails yourself. Of course, it is inconvenient to work with your left hand, but over time you will get used to it. The main thing is patience and accuracy. The easiest way to add extensions is under varnish. For this, transparent or camouflage acrylic is used.
How to do acrylic nails: step by step instructions
Let's take a closer look at the step-by-step instructions for acrylic nail extensions at home:
- Before the procedure, it is advisable to do a trim manicure 2-3 days before. This prevents the acrylic from peeling off the nails. It is necessary to carefully remove the cuticle and pterygium, since as the nail gradually grows, the acrylic will peel off precisely in the places of contact with the cuticle and thin film (pterygium). It is not advisable to take a bath or do a manicure immediately before the extension procedure. The nail plate will become very wet, so it will be difficult to remove water with a primer.
- Next you need to remove the glitter from the nail. This is done using a 180 grit file. There is no need to “scrape” the surface. You should remove the shine and roughen the plate. Be sure to thoroughly treat the cuticle areas. After this, secure the paper form. Apply a layer of degreaser (subprimer) to each nail. Next, treat your nails with primer. You can take an acidic one, but it can burn because it contains acid. This product prevents the growth of bacteria under acrylic. When the primer is completely dry, you can begin extensions. If this is your first time doing nail extensions, pour a little liquid into a glass and pour a teaspoon of powder into a glass container. Soak the brush in monomer and remove excess. Rotate the brush in the powder using circular motions. This way you will get a ball of the required size. A thick blob will appear on your cyst. Rather, transfer it to your nail. Using patting movements, press the plastic mixture into the mold.
- You need to start working from the free edge. There are corresponding marks on the forms. Select the required length and from this mark apply acrylic from top to bottom all the way to the nail. Do not apply too much acrylic, carefully level the plastic balls. After applying each drop, wipe the brush on a paper towel. After forming the free edge, proceed to laying out the nail bed. At the very end, treat the cuticle areas. Do not allow acrylic to flow into the cuticle and side ridge areas. There should be a small distance (0.3-05 mm) between the artificial material and the side rollers.
- The more carefully you apply the acrylic, the less time you will spend filing. Before it completely hardens, you need to give the nail a natural curve. This is done using tweezers. You can use tubes when installing forms. After the acrylic has completely hardened, remove the molds and start filing. This can be done using a router or manually. Typically, a file with a large grain size is used first. At the final stage, a buff is used. Oil the cuticles and apply the coating. For decoration you can use glitter, foil or acrylic paints.
Step by step instructions
So, you decided to do it yourself, and now it’s time to learn how to extend your nails with acrylic at home. At the very end of our article there will be videos posted for the most curious, but for now it’s time to take on practical lessons.
- A trimmed manicure (thorough - with complete removal of cuticles and pterygium) should be done strictly in a few days and manipulated with acrylic. Acrylic should not come into contact with the cuticles, otherwise it threatens peeling. You should also not take a bath, but here it’s not a few days before, but right before the procedure - a moistened nail will not accept the powder well.
- Using a 180 grit file, remove the glossy layer from the nail. Don’t be too zealous; the moment when the nail plate stops shining and becomes rough to the touch is enough.
- Secure the tips (paper forms).
- Degrease your nails and apply a primer (acrylic base) to them. Wait until completely dry.
- Next, for beginners: pour a little monomer (liquid) into a separate container, and about a teaspoon of powder into a glass container.
- First, dip the brush into the monomer (without fanaticism, so that it does not drip), then into the powder - in a circular motion! to collect a thick drop, which is immediately transferred to the part that simultaneously covers the tip of the nail and the tip - that is, at the splice site. You choose the length of the extended nail yourself. It should be compacted using patting and pressing movements of the brush.
- Then it’s time to lay out the nail bed itself: you should go horizontally from one side of the nail to the other (leaving a free area of 0.3 mm at the dips so that the mass does not flow there), right up to the cuticle growth zone (without reaching them by approximately 0.5 mm) .
- Do not forget to wipe the brush on a paper napkin after each drop of acrylic.
- Before the nail hardens, you need to give it a natural shape using tweezers. Or, at the very beginning, when installing tips, use tubes of the required diameter.
- The acrylic has completely hardened - it’s time to start filing. This is where a coarse file or, if available, a router comes in handy.
- And at the very last, final stage, go through the buff.
Video selection on the topic:
join the discussion
Share with your friends
Having decided to grow their nails, many women begin to choose between acrylic and gel polish. Both methods have their pros and cons, but acrylic is still more convenient for use at home. In addition, it is easier to remove, and simple adjustments can be made without the involvement of a specialist.
Gel nail extensions
Gel is a ready-made substance for extensions. It comes in jars and resembles jelly. Once applied to the nail, the gel does not harden on its own. To polymerize it you need to use UV rays.
Using nail gel at home
For extensions you need the following materials:
- primer;
- subprimer (degreaser);
- gel;
- base;
- finish;
- paper forms;
- alcohol;
- brushes;
- sanding files (180 grit);
- buffs (soft polishing);
- decor
Working with gel is more difficult than with acrylic, since you need to apply the viscous mass very carefully.
Each drop must be carefully stretched, forming a smooth surface. You must use a brush to create a perfectly smooth nail, which will only need to be placed in a lamp for polymerization. The procedure for shaping a nail with gel differs from acrylic:
- At the initial stage, you need to do everything as in the first case - prepare the nail and treat it with a primer.
- Next you must apply the base. It is laid out in a thin layer and provides excellent adhesion of the natural nail and the subsequent layer of gel.
- After applying the base, dry it in a lamp and remove the sticky layer with alcohol.
- Set the shapes and sculpt the nail using gel.
- It is applied in two stages. At first the substrate is the base, and after drying it is the final layer.
- After this, remove the molds and remove any irregularities using a sanding file.
- Apply finish and cure in a lamp.
The best gel for nail extensions
At home, it is easier to use a single-phase rather than a three-phase system.
This is a universal gel that does not require the use of base and top coats. It already contains all the necessary substances that give the artificial nail strength and hardness. The use of a single-phase gel reduces the extension time. Among the most popular manufacturers of single-phase gels are the following:
- KODI. The price of a small jar of 15 ml is 800 rubles;
- Global. Cost for 15 ml - 400 rubles;
- NFU. Price for 14 g - 500 rubles;
- YRE. Price per jar - 400 rubles;
- Salon. Price for 15 ml - 600 rubles;
- Lina. The cost of the jar is 200 rubles.
As you can see, prices vary widely, but it is impossible to say for sure that the cost directly depends on the quality.
There are craftsmen who do excellent work using inexpensive materials. First of all, pay attention to the consistency of the gel; usually single-phase systems are liquid, so they are more difficult to work with. Below is a video about gel nail extensions at home:
Don’t think that extensions are a salon procedure. A similar manipulation can be done at home, all you need is to purchase the necessary materials and have a little patience.
Many fashionistas try to do nail extensions at home. Acrylic nails have a number of advantages over gel nails, which is why girls often choose this material. However, the technology for modeling a free edge with acrylic is much more complicated than with gel. This procedure requires some skills, as well as taking into account a large number of nuances.
Extension methods
There are two main methods on how to do acrylic nails at home. This is a traditional extension on tips, as well as on forms. When extensions are made using tips, the plate becomes thicker and the nail looks less natural. Extension onto forms is more difficult, but the free edge seems natural.
Acrylic is characterized by the fact that it allows you to create very thin and durable plates. Unlike gel, when used, plates of similar strength are much thicker. Thus, when extensions are made using tips, the main positive property of acrylic is lost.
Another advantage of the material is that it does not require any special lamps to harden (polymerize). Acrylic hardens in light and air. However, when working on forms, this can be a negative quality for a novice master, who simply will not have time to create a nail before the material hardens. In this sense, it is much easier to work with tips.
Another advantage of acrylic extensions on tips is that nails made from such material cannot be repaired. If a chip or crack occurs, all material must be removed and the free edge re-grown. Nails with tips are more durable, and therefore the likelihood of damage to such a manicure is much lower.
How does acrylic powder work?
Acrylic powder is a porous polymer powder, which, in turn, means that when it is on our nails, it gives them full access to oxygen. We emphasized the last point specifically for opponents of such technologies. But the point here is that nails do not need to breathe, they are “dead”, that is, keratinized tissue. The living part of the nail is hidden under the cuticle, from where it actually grows and breathes through microcapillaries. But let's not argue, but let's continue about acrylic.
This plastic, quickly and firmly hardening material is intended and used not only for nail extensions, but also for strengthening them, creating voluminous decorative elements and shapes. And with the advent of a varied color palette in acrylic, it is possible to create the most delightful nail designs that can last on the nails for a long time without losing their brightness.
IMPORTANT TO KNOW: Nail polish - for strengthening: how to choose the most effective one?
Agree, in our age of enormous speeds this is an important bonus. Plus, among the types of acrylic powders there are camouflage ones - they will help hide defects and imperfections of the nail plate; shiny and neon.
The same option for working with gel polish and acrylic powder has long been tested and approved by millions of grateful users. But today we are interested in acrylic for nail extensions, and we’ll talk about it.
Materials
The list of materials for acrylic nail extensions includes everything you need to create beautiful and natural nails. Depending on whether the nail is being painted or not, what design is chosen, etc., the list of materials may vary slightly. There are two main components:
- Acrylic powder is a dry powder from which the future plate is formed;
- Monomer is a special liquid for working with acrylic, which, when mixed, turns the powder into a plastic substance.
Depending on the type of design, powders can be used in different colors. So, for example, for a French manicure you will need not only camouflage and sculpting powders, but also white ones.
Auxiliary materials are also of no small importance, since the quality and sustainability of the future manicure depends on them. These materials include a degreaser and a primer, which will help the coating adhere as firmly as possible to its own nail plate. Cuticle oil should not be neglected, since well-groomed cuticles make the manicure more professional and neat. You will need it to wash your brushes and easily remove the remnants of a failed design or modeling.
Before you start extending your nails with acrylic at home, also check that you have all the necessary tools. You will need flat brushes suitable for working with acrylic, tips or molds, sanding files and polishers, simple files for extended nails, nippers, glue for tips (if necessary). With this set, the extension process will not take you too much time.
Extensions with tips
First of all, before properly extending your nails with acrylic, you need to wash your hands thoroughly. After this, it is better to additionally treat them with alcohol. The fact is that under the layer of extension material ideal conditions are created for the development of infection, and therefore its occurrence should be prevented. Dry your hands thoroughly.
Push back the cuticle as usual. Cut it off or dissolve it with a remover. Pay attention to how carefully it is removed, since otherwise detachments will appear in the places where it is preserved. File the plate with a sander until the shine disappears, carefully leveling it. In this case, make movements in one direction to cause minimal damage to the nail. There is no need to file down the plate as much as with gel extensions.
Select a tip of the appropriate size and try it on your nail. Adjust the length of the tip, its width and shape using clippers and files for extended nails. Glue the tips to the bottom of the nail using a special gel. Make sure that the bond is tight and there are no bubbles. Apply degreaser to the nail. After it dries, apply primer and wait a few seconds until the nail turns white, that is, its scales open.
Dip the brush into the monomer and then into the powder. You will see that a ball of plastic mass has formed at the end of the brush, which you need to place on the nail and tip. The distribution of the material occurs in such a way that the minimum is in the area near the cuticle and the maximum is at the edge of the nail. All procedures should be done quickly, since acrylic dries quickly enough. The material should be distributed using pressing movements.
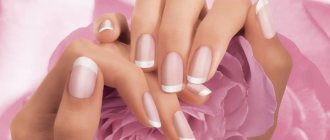
If you plan to create a French manicure, then at this stage you need to start working with white powder. Draw the free edge with it and fill it with white. Smooth out the plate and dry it. After the material has dried, polish the nail and file it to give the ideal shape to the free edge. If the design is complete, then you need to cover your nails with a transparent gel, which you also need to dry.
If a design will be made on the nail, then the gel must be applied both under the future design and after it has been completed and dried. This will give the manicure high stability, as well as an aesthetic shine. In addition, the gel will protect the acrylic from sunlight, which can cause yellowing or darkening of the material, which is especially noticeable when performing a French manicure.
Form extensions
This method is more suitable for those who have at least a minimum length of their own nails. Therefore, it is necessary that the free edge of the natural nail protrudes just enough to allow the form to be applied underneath. If the nail is much longer, then it is better to cut it to the required minimum in order to speed up and simplify the extension procedure. Nails on forms look more natural, since this method involves selecting an individual plate shape for each finger. However, working in such a technique is much more difficult and without some experience and skills, such an extension will not be possible.
Prepare your nails in the same way as in the previous type of extension. Wash your hands with soap and disinfect them, remove cuticles. Sand your nails until the shine disappears, but do not thin the plate too much; it is only permissible to significantly thin the protruding free edge. Glue forms under your nails, which can be plastic, metal or paper.
Apply a degreaser to your nails, and after it dries, apply a primer. Wait a few seconds. Start modeling your nails. Dip the brush into the monomer. And then into nail modeling powder. Apply the material to the nail in small strokes, moving from the cuticle to the edge, and then moving onto the forms. Pay special attention to the area where the free edge meets the acrylic part of the nail. As in the previous case, the acrylic film should be thinner on the natural nail and thicker in the area of the forms.
Gradually increase the layer of acrylic on the future free edge, forming a nail of sufficient strength. After the acrylic has dried, the nail can be filed and sanded. If necessary, apply colored powder to create a French look. Then apply clear gel both under and over the polish and dry.
The same principle applies to strengthening nails with acrylic at home. In this case, an acrylic film is formed on the nail so that your own nail becomes thicker and denser. This way it will break less and the manicure will remain natural and flawless longer.
Prices for the service:
| Nail extension (acrylic gel) | |
| Extensions under varnish | 1700rub |
| Correction for varnish | 1200 rub. |
| French extensions without lengthening the nail bed | 1800 rub. |
| French correction without lengthening the nail bed | 1200 rub. |
| French extensions with nail bed extension | 2000rub |
| French correction with nail bed lengthening | 1500 rub. |
| Millennium extensions (colored tip, glitter) | 2200 rub. |
| Millennium correction | 1600 rub. |
| Aquarium design | from 2500 RUR |
| Correction of aquarium design | from 2000 rub |
| Design 1 nail | from 50 RUR |
| Acrylic modeling | from 100 rub |
| Removing nails before extensions | 300 rub |
| Removing nails | 500 rub |
Unfortunately, not every girl is naturally blessed with beautiful and strong nails. Therefore, today the nail extension procedure is very popular and in demand among the fair sex. There are many different extension technologies, but one of the most famous and safest is acrylic nail extension.
What is acrylic and what is its advantage over other materials?
For acrylic nail extensions, a special material is used – acrylate. This is one of the most gentle products for the natural nail plate, which is a transparent polymethyl methacrylate plastic.
Advantages of acrylic:
- Much stronger than natural nail;
- When the natural nail grows, it does not deform the plate;
- Looks natural;
- Easy to work with because it is elastic and soft;
- Performs a protective function for natural nails;
- Can be easily dismantled and removed without difficulty;
- Can be varnished.