The image of a beautiful, well-groomed woman consists of many details - hairstyle, makeup, well-chosen handbag and shoes, and, of course, well-groomed hands with a fresh manicure - neat nails, not necessarily long, with an even varnish coating. What to do if, due to various circumstances, you cannot turn to professionals for help? There is only one way out: learn how to do beautiful nails at home. Today, a recognized expert in this field is the owner of the Wax&Nails chain of manicure salons. Anna Shevchuk — will tell you how to make extended nails at home, including for beginners.
How difficult is it to grow your nails at home yourself?
Our expert admits that this is not an easy matter.
“I’ll say right away that doing nails at home is a painstaking and long task; you’ll have to be patient. First, you need to acquire certain tools for this procedure, as well as a drying lamp, if you choose a gel coating,” warns Anna Shevchuk.
Today, online stores offer a wide variety of sets designed for extensions with different materials - acrylic, gel. It all depends on your choice. If you decide to do acrylic nails, then a lamp is not needed.
Nail tips - what are they? Is it difficult to extend nails with tips at home?
Tips are special artificial overlays for nails (from the English word “tip” - “tip”). They are needed to give the nail plates the required length and shape. Such tips must be strong and elastic at the same time, because a large load falls on them. They are usually made from polymers and stay on the nail plate for 3-4 weeks.
There are two types of nail extensions: tips and forms. Molds are made from paper, foil or flexible plastic. To create an artificial nail coating in both cases, gel or acrylic is used, which is applied either to tips or to forms. It is better not to use forms at home, since the likelihood that the nails will turn out the same is very small.
“Extensions to tips will guarantee that they will be the same, and the kit always contains glue for applying them. The glued tips are coated with your choice of gel or acrylic,” says Anna Shevchuk.
Nail gel
When choosing what to use for extensions, special attention should be paid to the gel, because this is the main material in this technology.
Under the influence of an ultraviolet lamp, the gel tends to harden. This base is often called a living polymer, due to the fact that it does not suppress normal biological processes in natural nails, giving them the opportunity to breathe.
Such materials for nail extensions have many advantages:
- the gel is not capable of causing skin irritation;
- due to the gel, the nail surface is leveled, the nails acquire a natural appearance and begin to shine;
- The gel applied to the surface of the nail is able to level itself, spreading in the desired direction along the nail plate.
How to extend gel nails at home: step-by-step instructions
“One of the essential products for creating a gel manicure is a degreaser. Acetone and alcohol will not work. The nail plate contains moisture and particles of fat that need to be gotten rid of, this will allow the coating to last longer,” the expert advises.
Before degreasing, make the nail matte, take a soft file - buff, and carefully remove the shine, without much pressure. Then we take the dehydrator or primer that is included in the kits. The primer lifts the scales on the nail and allows the gel to “stick.” After the preparatory stage, you can begin to “lay out” the gel.
“Here the result depends on the flight of your imagination; you decide what nails will be in length, width and design,” says Anna Shevchuk.
You will also need a file, preferably hard and hard, to level the top layer, as well as a brush for applying the gel.
“Gels come in different thicknesses and colors; sets usually come with a medium one and the most optimal one for home use. I also recommend taking a beige or pinkish shade, since you won’t have to paint it. It is better to adjust the thickness along the length; if you want it longer, you can make it thicker where the free edge begins. It is believed that this is a “stressful” zone, where nails break more often,” continues Anna Shevchuk.
Then the lamp comes into play, because each layer of gel and top needs to be thoroughly dried, and there may be several layers. Each layer must be dried. After the last layer, remove the stickiness, degrease and remove all the tubercles with a hard file. We make the shape and length we need, and after that we degrease and remove dust again. The main thing is not to get your hands wet all this time. We apply the top coat, which is also included in the set. We remove the sticky layer again - and our nails are ready! Now they can be painted with varnish or gel polish as desired, or left as is, because “nude” is always in fashion.
How to extend nails with acrylic at home?
In the case of acrylic, the preparatory stage is the same. First, remove the shine, degrease it with a dehydrator, and glue the mold. But acrylic in its composition, unlike gel, is a powder, which makes working with it more painstaking. There is a polymer - a liquid that, when interacting with powder, becomes like clay; it is evenly applied to the nail with patting movements. Drying in a lamp is not required, we lay out any shape and length, and do not degrease the top layer, but immediately apply the top coat. However, some tops still require drying in a lamp; this is indicated in the accompanying instructions. Acrylic also comes in different colors, the choice is yours.
Benefits of the procedure
Nail extension with fabric has a number of advantages, thanks to which it can be used as an independent method of nail extension. The main advantages of the technique include the following points.
- Nails extended using the fabric method are quite impact-resistant and elastic.
- It is very easy to repair a damaged nail - a new layer of tissue is simply attached to the crack.
- The procedure can be carried out using various fabrics - extensions with fiberglass, linen, silk, depending on the client’s wishes.
- Thanks to the presence of a variety of colors and textures of fabrics, you can get different designs on your nails, which allows you to eliminate the need to constantly use a coating.
- Nail extensions using fabric covering are as hypoallergenic as possible and are almost incapable of causing an allergic reaction.
Nail extensions with fabric allow you to extend nails of various shapes and lengths with flax, silk or fiberglass (fabric that looks like silk and is made from fiberglass). The principle of the technique lies in the fact that a tip (plastic nail) is glued onto your own nails, onto which layers of fabric are glued.
What is the difference between acrylic and gel polish?
Gel and acrylic differ in their composition and polymerization process, or in other words, drying. The gel must be dried in a lamp, and acrylic dries when in contact with oxygen. Acrylic is an even harder material, unlike gel; it is more problematic to use it at home because it requires dilution with polymer, which is very difficult for a non-professional to do.
“The choice between acrylic and gel must be made taking into account the characteristics of the nails. There is an opinion that acrylic lasts better on some people, and gel on others. But this is a myth: if the master has a good command of the material, then any coating will hold up perfectly,” comments Anna Shevchuk.
Benefits of the procedure
Nail extension with fabric has a number of advantages, thanks to which it can be used as an independent method of nail extension. The main advantages of the technique include the following points.
- Nails extended using the fabric method are quite impact-resistant and elastic.
- It is very easy to repair a damaged nail - a new layer of tissue is simply attached to the crack.
- The procedure can be carried out using various fabrics - extensions with fiberglass, linen, silk, depending on the client’s wishes.
- Thanks to the presence of a variety of colors and textures of fabrics, you can get different designs on your nails, which allows you to eliminate the need to constantly use a coating.
- Nail extensions using fabric covering are as hypoallergenic as possible and are almost incapable of causing an allergic reaction.
Is it acceptable to combine acrylic and gel when doing nail extensions?
Most clients are afraid of this type of mixing of materials. However, in reality there is nothing wrong with this - it will not affect the quality of the extended nails at all.
Covering nails with gel polish at home
Gel polish differs from traditional gel in composition and density. Also, gel polish is a more elastic material and, when applied, lays down in a thinner layer. Therefore, the choice in favor of gel polishes becomes more obvious.
To cover nails with gel polish, we will need: • degreaser, • lamp for drying gel polish, • buff, • top base, • color coating - gel polish.
It is better to take all the “ingredients” from one company. First, we shape the future nail, then use a buff to make it matte, remove the shine, degrease and thinly apply a layer of base: you can apply it to all nails at once or one at a time so that it does not have time to flow under the cuticle. Then we apply the color and dry each layer for 30-60 seconds, depending on the manufacturer’s recommendations. It is very likely that you will have to do two coats of color and then cover the nail with topcoat. After all the nails have been dried in the lamp again, remove the sticky layer with a degreaser and apply oil or cream as desired.
Gel polishes do not differ much in composition, and even Chinese manufacturers make fairly high-quality material. There are, of course, more premium brands, they may even be hypoallergenic, but such a product is much more expensive. Chinese gel can be bought for 300 rubles, while a premium brand will cost you about 1,500 rubles per jar. Lamps for drying gel polish are also different, but for home use you shouldn’t buy too expensive one; you can opt for an LED lamp, it will dry the gel polish in 30 seconds.
Application of upper forms
The technology of extension using upper forms differs significantly from that described above and is as follows:
- Primary treatment is the same: antiseptic, cuticle treatment, filing and polishing of the nail;
- Then the material for modeling is laid out in pre-selected silicone molds, which is evenly distributed over the form and applied to the nail;
- 15-20 seconds are needed for the material to spread over the nail and harden;
- The excess is processed with a nail file and buff.
The approximate cost of such forms varies from 300-450 rubles for a set of 100 pieces; they are quite similar to nail tips, but have a different function.
Video on the topic of the article:
Hi all! At one time I became interested in nail extensions, although my own were growing, but something pulled me to experiment. After watching enough video tutorials on YouTube and purchasing everything I needed, I got down to business.
And when choosing forms for extensions, I decided, in addition to disposable forms, to also purchase reusable ones. It’s the latter that I would like to talk about in today’s review.
Price
today 70 rubles
Quantity
5 items
There is no point in taking a set of 10 pieces, because even if you do extensions for someone, you won’t be able to do it on 10 fingers at once. I generally do this to myself with one finger at a time.
Method of making molds
most primitive. The wire is wrapped in a special material similar to soft plastic, and everything is held in place with regular tape. The wire helps to secure the shape on the nails as needed and takes the desired shape.
I use forms only for repairing broken nails; I didn’t bother with extensions, as it takes a lot of time.
Usage:
It often happens that it is a pity to cut your nails because of one broken one. That’s when these forms and a rubber base come to my aid; instead of a base, you can use a gel for extensions. I won’t describe the technology, since I learned it myself from video lessons.
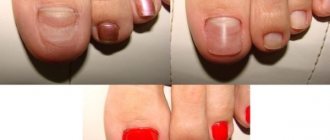
I'll just show you the Before and After photos.
After applying and fixing the form, I begin to cover the nail with a base, and apply several layers of base to the extension site.
After drying the nail in the lamp, I file and shape it. This is a work in progress, the length needs to be adjusted. But I think the meaning is clear.
This is how I save my broken nails. Under gel polish, no one will notice that some part of the nail is missing. It all lasts until the gel polish is washed off.
As for the shapes themselves, they are not entirely comfortable and will not suit all nails. We'll have to adapt to them. It’s more convenient to do extensions using disposable forms, but even these will do for home use. I took them, so to speak, for testing, they suited me, it’s convenient for me to do minor nail repairs with them.
The gel easily comes off the mold after drying, adheres well to the nails, does not fly off during use, and holds well.
The price is not high, you can try it out of curiosity!
You can read about my manicure at home! I share the information received at special manicure courses! Here you will learn what it means to paint your nails subcuticularly or butt to the cuticle, as well as how to properly do a manicure at home!
Nail extensions have become incredibly popular. And this is not surprising: after all, hands are a kind of business card of every woman, and without beautiful nails this business card will not be completely complete. But not everyone is blessed with beautiful nails. So we have to correct this oversight by building up...
Sooner or later, every newcomer to the nail service is faced with the question - how to choose the right forms for extensions? Each website offering nail products and materials has several types of paper forms in its assortment, but how to choose exactly those that will be convenient to work with? How to understand this diversity? We will try to help you.
There are molds created specifically for gel or acrylic. Transparent plastic forms will be ideal for gel, since the transparent form allows ultraviolet light to pass through, and there is no need to dry the gel nails in a lamp on the reverse side as well. But these forms are not suitable for acrylic nails. They do not have a paper backing and will be too soft for acrylic material.
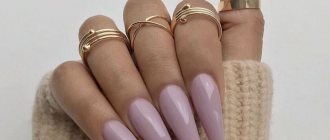
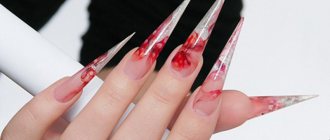
The shape of the intended nail plays an important role in the choice of forms. As you know, nails come in different shapes - square, almond, oval, stiletto.
Markings will help you decide on the shapes - special divisions on the forms that will help you lay out the material according to the shape of the intended nail extension.
If you are planning to do this, then forms that have clear markings with lines intersecting at right angles, like JT-02 and JT-00, are ideal for you. But at the same time, the JT-02 shapes are designed for wider fingers.
To slightly soften the square shape of your nails, you can use the forms JT-06, JT-09 and JT-07. They have slightly rounded markings to create shaped nails. This type of shape is distinguished by slightly curved transverse lines on the template. Considering these types, JT-06 is more suitable for working with wide fingers compared to others.
Shapes with strongly curved transverse lines will help create ideal almond-shaped and oval nails.
Not every woman can boast of strong, beautifully shaped nails. However, it is possible to get the perfect manicure using nail extensions. Many resort to the services of nail specialists for this, but with the advent of the gel system, which is easier to use than acrylic, it has become possible to lengthen nails or restore broken ones at home.
The most common mistakes when doing nail extensions at home
Our expert once again emphasizes: for those who want to grow their nails quickly and well, there is only one effective way - to do it in a salon with an experienced specialist. If, nevertheless, the situation forces you to do your nails yourself, you need to take into account a number of common mistakes.
One of the “dangerous” moments when doing nail extensions at home is the desire to make very long nails for the first time. It's best to start with a short length. Girls also try to make their nails thicker, in the hope that this will add strength to them, but this is wrong.
It is not recommended to do a very deep manicure before extensions, because you will have to polish the nail a little and you can damage the cuticle. The next common mistake in home extensions is insufficiently dried layers of material. Each layer should be allowed to dry thoroughly. It is better to do several layers with a long drying period than to apply one thick layer.
The material you use to extend your nails should not flow onto the skin, as this will lead to premature peeling. Also make sure that it evenly covers the surface of the nail. If there is not enough building material on the sides, the nail will quickly break. And, of course, a common reason for artificial coating peeling off a natural nail is a poorly sealed end.
Types of nail gel
Step-by-step extension includes several phases that you need to know before applying gel nail extensions. The three-phase variety includes three components that differ in their functionality. The materials used for the first layer are responsible for the safety of contact between the nail plate and the artificial coating, creating maximum adhesion. The second one models the body of the nail. The third layer creates strength, protecting the nail from the negative effects of external factors, providing a smooth and shiny surface.
Gel nail extensions, step-by-step instructions with photos using a two-phase system, happen differently. One of the components is necessary for modeling and adhesion, the second is responsible for the final strength of the nail. The single-phase system uses a universal material, like acrylic, it is distinguished by the presence of all the necessary properties, while providing strength, modeling and adhesion.