Hardware manicure and its advantages
Hardware manicure is a type of manicure in which manipulations such as removing the cuticle, treating the side ridges and sinuses of the nail are done using an electric machine (apparatus) and replaceable attachments (cutters) of various shapes. This method of treating nails and the skin around them is now the most common among masters.
And this is easy to explain by its obvious advantages:
1. Security. Unlike classic manicure, where cutting tools are used, the likelihood of injury is virtually eliminated.
2. Long lasting effect. Nails look well-groomed and tidy for two weeks. And by regularly moisturizing the cuticle, this period can be extended.
3. Cost-effectiveness in the long term. Of course, you will first have to spend money purchasing the necessary tools, but in the end it turns out to be a very profitable investment.
However, with all the advantages, it is worth noting that you will first have to carefully study the theory, watch a single video lesson, or even take specialized courses on performing hardware manicure. Because first you should learn how to select the right attachments for the required manipulations, set the required speed for this in order to avoid injury to the nail plate.
Cutters for hardware manicure for beginners
Milling cutters vary in material, shape, diameter and hardness.
For beginners, it is recommended to use ceramic tips. They are quite soft, which means they are safer. But there is also a drawback - such cutters quickly become unusable.
Experienced craftsmen use diamond bits. With their help, you can treat the free edge of the nail, side ridges and cuticles, and remove rough skin.
Milling cutters come in various shapes. Each of them is intended for a specific area of work, but many can replace each other:
- “olive”, “bud”, “oval” - used to remove cuticles and treat side ridges;
- “ball” and “flame” also cope with this task;
- a “needle” is needed for treating cracks and side ridges, for rounding the corners of the nail, as well as for removing gel polish;
- a straight and truncated cone helps remove detachments and smears of gel polish, and also polishes and grinds well;
- a reverse cone, in addition to the above, creates a smooth edge of the nail;
- rounded cylinder - designed for processing side ridges and polishing the nail before extensions;
- straight cylinder - for modeling the free edge of an artificial nail, treating calluses and corns.
The hardness of the nozzles is determined by the colored notches that the manufacturer applies to the base. The classification principle is simple: the darker the color, the higher the hardness. It is not difficult to guess that the black and blue stripes will mean a high degree, and the red and yellow ones will mean a low degree.
During the procedure, we recommend using hard attachments first, gradually moving to medium and soft ones.
The small diameter of the attachments is intended for manicure, and the large diameter is intended for use during the pedicure procedure: with the help of such cutters it is easy to remove calluses, corns and other aesthetic imperfections on the feet.
Planet Nails, Manicure and pedicure device Orbita Smart
Manicure and pedicure device for treating nails.
(154)
RUB 11,050
RUB 11,050 Buy
Milv, Watermelon Nail Oil, 15 ml
Strengthening nail oil with mastic tree resin.
(17)
200 rub
200 RUR Buy
What tools are used for hardware manicure?
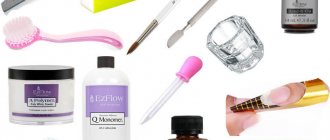
The necessary tools can be divided into basic and additional.
The main things you will need to purchase are: • A machine or milling cutter for hardware manicure,
• Nozzles or cutters (often as accessories with the device).
Below we will talk about each of them in more detail. Additionally, it is recommended to have:
• An exhaust hood for collecting small particles that fly during operation of the device,
• Disinfector and sterilizer,
• Consumables (orange sticks, cuticle oil, brush, personal protective equipment, etc.)
How to choose a machine?
The quality of your manicure will depend not only on your actions, but also on the right equipment. We would like to give you some small tips that will help you avoid making mistakes when purchasing.
- When choosing a device for home use, choose models with low power, making from 1500 to 5000 rpm. This is quite enough to remove cuticles, polish your nails and give them an ideal shape with minimal risk of damage. Such devices are small in size and very convenient for personal use.
- There is no need to chase after a large number of attachments. Practice shows that even masters usually use only the most necessary set.
- Give preference to trusted manufacturers. Such equipment will last you much longer and guarantees good results.
Cuticle removal using hardware manicure is a modern solution for those who take care of their nails. The information provided in this article is sufficient for choosing the right device and acquiring initial knowledge. We invite you to watch another step-by-step video that will introduce you a little closer to this technique.
How to choose a manicure machine
The choice of devices is now especially diverse.
But this tool is not cheap, so you should approach its purchase responsibly. • Firstly, you probably already know where you will use it - only for yourself or to work with clients on-line. Devices used for home use are smaller in size, power and speed of rotation of the nozzles - 20 thousand revolutions and 35-50 W of power are enough. For salon manicure, choose machines from 25 thousand revolutions per minute and a power of 100 W.
• If you need to go to a client’s home, then pay attention to a device with a built-in battery, or one that runs on batteries. It is usually lightweight and quite compact to carry.
• If you are a beginner, then first take a machine with a set of cutters selected for it, which are not so easy to understand given their huge variety.
• The machine must have a reverse function (rotation of the attachments in both one and the other direction).
• Clamping of attachments on the handle can be manual (you need to tighten it), semi-automatic or automatic. For the interior, it is better to take the latter option - it will save time on replacing cutters, but will also cost more.
• The strength of the noise it makes depends on the engine the machine is equipped with. In expensive models it is almost inaudible.
One of the most determining factors when purchasing a device is its price. Know that a high-quality device will not be cheap. If you are looking for a balance between price and reliability of a router, then pay attention to this model.
How to perform a combined manicure
Combined nail treatment requires sufficient training of the artist and equipment.
When performing a combi manicure, the following tools are used:
- orange stick or pusher;
- nippers or nail scissors;
- a router with at least the main types of cutters;
- files that come in different abrasiveness.
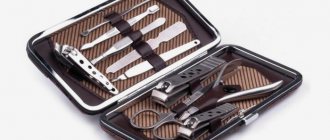
1. Orange stick, 2. Nail clippers/scissors, 3. Nail cutter, 4. Nail files
Step-by-step technology:
- The main condition for a combined manicure is dry treatment. The nail should be damp, preferably free of grease. This is done in order to prevent the skin from being torn when processed with a milling cutter.
- First, the length of the nail is adjusted and the desired shape is cut out. To do this, use a file with an abrasiveness of 180 - 240 grit, suitable for natural nails. You can use buff to polish the free edge.
- Getting started begins with pushing back the cuticle using an orange stick or pusher. This procedure is done as carefully as possible, since many people have thin and torn cuticles. Next, you need to start processing using a router. To begin with, the cuticle is finally raised using a needle cutter. And also at this stage it is possible to get rid of the pterygium with the same needle and move the side ridges.
- Machining side rollers with a rectangular elongated cutter. Pay attention to the driest areas that need to be removed.
- Further processing with a spherical nozzle. It is also used to polish the side of the leather.
- The edges under the cuticle must be worked with a bullet cutter. It is deeper and therefore fits better into the side pockets.
- Cuticle removal. This is done by careful cutting with wire cutters or nail scissors, which must be perfectly sharpened. If sharpening has not been carried out, then there is a risk of getting a torn and sloppy surface.
- If there is still pterygium left, a narrow rectangular cutter will help get rid of it. It should be kept as parallel to the nail as possible to avoid cuts and injury to the matrix.
- You need to polish the skin around it using a soft cutter with a blue notch.
- Then you should polish the nail with a file of more than 240 grit.
- Manicure is ready. To care for your fingers, apply caring oil.
This processing can be used as an independent measure. It is also great as a preparatory step before applying a coating under the cuticle, but the use of oil is prohibited. It is applied after applying polish, gel polish or gel.
Master class on performing manicure with a machine
1. The first step is to prepare your hands. They need to be washed with the product, dried and disinfected with an antiseptic.
2. If there is an old coating on the nails, then we proceed to remove it. To do this, select a cone-shaped nozzle from the set. We hold it sideways in relation to the nail and, without strong pressure, remove the gel polish layer by layer. We work on the sides of the nail and at the cuticle with the tip of the cutter.
3. Correct the shape of the free edge. Here you can work with either a milling cutter or a file that is more familiar to you.
4. Let's start processing the cuticle.
a. We lift the cuticle. The keratinized skin can be lifted either with a cutter (for example, a rounded cylinder) or with an orange stick. The movements are smooth and do not put pressure on the skin. The cutter constantly moves parallel to the nail and does not stay in one place so as not to make a cut. Use reverse in your work: the hand moves to the left, and the router rotates to the right and vice versa. First, the nail is processed in one direction, then the reverse is switched and we work in the other.
b. To get deeper into the sinuses of the nail and remove the pterygium, change the cutter to a needle-shaped one.
c. At the same time, we grind the side rollers.
d. We cut off the raised cuticle with a finely abrasive ball-shaped nozzle. The movements are performed in the shape of a smile from one side roller to the second.
e. We complete the cuticle treatment by polishing the skin with a soft conical nozzle with a rounded end.
5. Shake off excess dust with a brush.
6. To complete the hardware manicure, apply oil to the cuticle area and rub it in in a circular motion.
Combined manicure technique
Combined manicure is a complex technique. The method combines the technique of edged and hardware manicure. Thanks to this, nails look cleaner and the coating lasts longer.
Peculiarities
A combined manicure allows you to achieve an even cut. After which the cuticle will be clean and barely noticeable.
Growths and rough skin are trimmed using scissors or nippers
Tools
The most important item in a combined manicure is the milling machine. His choice should be taken seriously. Since the result of the procedure depends on the power and other details.
Eliminate cheap Chinese devices from your choice. Give preference to the Strong or Marathon models. Their cost starts from 10 thousand rubles.
Key aspects of the device:
- Do not drive through the same place more than twice. When touched for a long time, the cutter heats up. This can cause discomfort for both the master and the client.
- The hand should be held in the “student wants to go to the board” position. The elbow lies on the table, the handle of the device is held like a pencil.
- You need to choose your intensity of action. Slow movements, as well as fast ones, can damage the nail plate.
- Don't be afraid of high vibrations. The speed must be at least 17 thousand revolutions. Accordingly, this should not be the maximum power.
Milling cutters for the machine
The cutter for the machine is the blade of the router. The main work happens with the flame cutter. There are cutters with different notches. Each of which has its own rigidity.
- Yellow – soft
- Red – soft
- Blue – medium
- Green – rough
- Black – very rough
For processing and lifting the cuticle, a red notch is optimal. The flame lifts the cuticle and prepares it for further cutting.
Pusher
A pusher is a kind of shovel. You can use orange sticks instead. It is more convenient to work with a shortened spatula and not too wide. One of these is from the Mertz brand.
Nippers or scissors
Scissors or wire cutters are a matter of habit. However, with scissors the cut will be smoother. You need to choose thin scissors with a curved tip.
Precautionary measures:
- As with any hygiene procedure, take precautions.
- Use antiseptic on the client's hands and arms if you are a master.
- It is better to perform a manicure on healthy nails. To avoid viruses.
- Don't neglect sterilization. Health is more important than beauty.
Working with the cuticle
- Push back the cuticles with a pusher or an orange stick
- Lift the cuticle so that a “cave” is formed.
- Using a flame cutter, clean the nail from pterygium and other growths.
- Mentally divide the nail into two parts.
- From the middle of the base, move the handle of the device to the side rollers.
- Hold the handle of the device parallel to your nail.
- Lead from the middle of the base towards the side ridge, repeating the architecture of the nail.
- The device switches to reverse when you work on the right side.
- The device must operate at a speed of at least 17 thousand revolutions. However, this should not be the maximum speed.
- Remove the resulting dust from your hands using a brush.
cuticle cut
There are two ways to trim the cuticle. But with scissors it will be cleaner and smoother.
- Hold the scissors with your index finger and thumb.
- Start trimming the cuticle from the side ridges.
- Pass the scissors along the entire matrix without stopping.
- The cut should look like one “sausage”
- Then we repeat the procedure with hardware manicure, using a flame cutter.
Processing side rollers
- We treat this area in order to remove dead skin. First set the device to reverse mode.
- Change the flame cutter to a grinder. It can be either a diamond cutter or a silicone cutter. The second option is more effective.
- The rougher your skin, the harder the cutter.
- It is necessary to mill the side bolsters on both sides.
Common mistakes
It is contraindicated to press on the nail plate and change the angle of movement as you work. This may cause the nail to be cut. Restoring the nail due to this injury will be problematic.
Pay attention to removing the entire pterygium. After all, this can cause unevenness and bumps in the coating.
If at the grinding stage any piece is not cut off, then it is better to cut it off with scissors. The device may cause burns or cuts.
Choose a quality device. A common mistake with cheap models is the handle heating up. What prevents the master from doing his job efficiently, and causes discomfort to the client.
A combined manicure is not as complicated as it might seem. The main thing is to choose your tools, establish the mode and intensity of movements. If you follow these instructions, your manicure will be clean and durable.
Errors when working with the device
Errors during training are not excluded, but they can be minimized if you know many of the nuances in advance.
• When working with the device, your hands must be dry; you do not need to apply any products or oils.
• When learning to use the device, do not set the machine to high speeds, as this often leads to nail injuries.
• Use cutters for their intended purpose. Many beginners choose bullet and flame cutters to lift cuticles. However, they leave cuts.
• Select the correct abrasiveness. If the cuticle is hard, then you can take a coarser cutter, and if it is thin and soft, then you should use a cutter with red or yellow markings.
• Let the device rest. To prevent it from overheating, the machine should be stopped during operation.
• When polishing, do not hold the cutter in one place or close to the edge of the nail plate.
• Clean the cutters after working with the machine. The attachments need to be disinfected and cleaned of sawdust. Otherwise, this will not only reduce their service life, but also lead to problems with nails and hand skin.
A few words about disinfection and sterilization
Speaking about hardware manicure, one cannot help but touch upon the topic of sterilization of instruments and their disinfection after work.
This must be done after each use of the device. Minimum treatment consists of placing the cutters in a special container with a disinfectant for 15-20 minutes. After this time, the nozzles are removed and washed under running water, after which they are wiped dry with napkins.
The second stage of instrument processing is its sterilization in a dry-heat oven at high temperatures. Special craft bags are used to store sterile instruments.
Only this procedure can guarantee the health of you and your clients!
Step-by-step instruction
Let's see what a manicure performed with a special device is.
- First, a diamond cutter is used, which is a cylinder with a sharp edge. This cutter removes the cuticle from the nail, lifts it and processes the side ridges. Try to work with the device carefully, sticking to one direction and placing the cutter parallel to the nail.
- After removing the cuticle, the nozzle is changed. Now a finely shaped narrow cylindrical cutter is used. With its help, the area under the cuticle is treated - the pterygium is removed. Periodically clean the nail with a brush. This attachment is also held parallel to the nail, and the treatment is carried out in the same direction.
- Next, a corundum stone attachment is used, designed for working with natural nails. She removes the pterygium from the surface of the nail plate, and processes the free edge. The quality of processing with the device is much higher than with conventional files and pushers. This cutter can be used instead of a manicure buff.
- If the nail folds are deep, then another diamond tip, called a “bullet,” can be used to remove remnants of the pterygium. In this case, the cuticle will be processed even better.
- The last attachment that is used when performing manicure with the device is a spherical one. Its purpose is to remove raised cuticles and polish the skin around the nail. Do this with soft and smooth movements, affecting the area of the nail folds.
A hardware manicure turns out to be very neat, since it can be used to remove things that cannot be processed with a conventional tool. You can perform this manicure at home if you purchase a special device. You may need to take lessons from experienced professionals to gain practical knowledge. But if you are used to doing your own manicure, then watching the video will help you get all the information you need. You can start lessons right now by watching a detailed and understandable video.