02/23/2019 Vyacheslava Lisitsina Fashion and style
Today, many women are familiar with this type of manicure, such as Hollywood. Its creation is impossible without the use of special foil. In this case, it is not necessary to go to beauty salons. You can make it yourself at home, but for this, in addition to special material, you also need to have high-quality glue for nail foil.
Properties of nail glue
This type of glue was specially developed taking into account the characteristics of the nail plates. This viscous product can be used for fixation:
- foil;
- tips;
- lace;
- rhinestone
This glue is also used in cases where natural or artificial nails require repair. It helps with their serious breakage in a situation where the plate has moved too close to the meat.
The glue is based on cyanoacrylic polymer, which does not cause irritation, but only a high-quality product has this property. The substances included in the composition do not lead to changes in the structure. Many users emphasize that after using the glue, the nail plates become stronger. The rare quality of this composition is that it starts out white, but gradually becomes invisible. If you apply design material in a timely manner, the resulting coating will be:
- uniform;
- smooth;
- resistant to damage and scratches.
Glue for foil is sold in bottles with a brush; it is very convenient to precisely apply the composition to the nails. This product does not need to be dried in special devices. High-quality glue costs approximately 100 rubles. In specialized stores it is presented in a huge assortment.
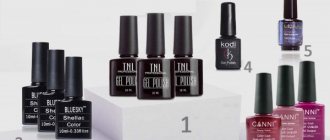
Global Fashion
The foil adhesive for gel polish of this brand is one of the most popular. It is produced in South Korea. It has hypoallergenic properties. It is used very economically. Experts note its quality as the ability to reliably glue foil and other decorative elements used to create a design. This product dries quickly and then changes color. One 15 ml tube lasts for a long time. Sold with a regular or fine brush.
How to use nail foil?
Nail foil is very easy to use as a decorative element. You just need to know a few nuances:
- It is applied to the varnish coating, with the exception of minx thermal film and liquid foil.
- If there is no sticky layer on the foil film, you will need special glue: Jina, HONGYI, Rio Profi, Global Fashion. Or you can glue it to a sticky layer of gel polish. The result is approximately the same. Each girl chooses what is more convenient for her to work with.
- The transfer foil must be ironed for an even print, paying special attention to the areas on the sides and at the cuticle. For smoothing, use an orange stick, an ear stick or a pusher with a rubber tip.
- Fixation with glue is carried out after it dries a little and becomes transparent. Different companies have different drying times. On average they wait 2–3 minutes.
- After applying the foil, a finishing coat must be applied. Otherwise, the decor will wear out very quickly.
A high-quality “metal” design retains its presentable appearance for 14–17 days. The homemade version does not last as long - 3-5 days. If you want to prolong its existence, you need to do household chores with gloves. You can also cover your nails with a fixative on the 3-4th day.
When using transfer foil, wait a while before applying the finishing layer, otherwise it may shrink and crack. It also cracks when pressed repeatedly, for example, when they try to print the spray several times. You need to work with the material carefully.
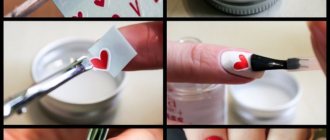
Fixation with glue
Before using the glue, the nails are covered with the main color of the varnish. You need to wait until the base is completely dry. Only then is the adhesive composition applied in a thin layer to the surface of the nail plate. The foil is glued at the moment when the glue changes its color.
How to properly glue transfer foil:
- Get your nails done. Use a nail file to give each nail the desired shape.
- Polish the nail plates with a buff with an abrasive level of 300 grit.
- Use a degreaser and then apply the base.
- Place your nails under a lamp to dry the gel polish.
- Remove the sticky layer from the gel polish with a special napkin.
- Apply a base color coat.
- Dry the gel polish and remove the sticky layer.
- Apply a thin layer of glue to your nails. Apply it to the entire surface or to individual areas, depending on what design you plan.
- Wait a few minutes until the glue becomes clear.
- Place the foil with the matte side on the nail and smooth it with a rubber pusher or a cotton swab.
- After 15-20 seconds, quickly remove the foil.
- After 2-3 minutes, apply the topcoat.
When using sheet foil, decorative elements are first prepared. To create the “broken glass” effect, the foil film is randomly cut, and then the “shards” are laid out with tweezers on the nail surface coated with glue.
Some types of glue are dried under a lamp. HONGYI glue is suitable for use without a lamp. It holds not only foil, but also rhinestones perfectly. Dries within 5 minutes.
Foil for gel polish without glue
If you don’t have glue on hand or don’t want to spend extra money on it, you can make a beautiful design with adhesive-based foil. It is glued to the dried gel polish with the sticky layer removed. Sheet and transfer films, on the other hand, are applied to an adhesive layer.
How to properly use transfer foil without glue?
- Get a manicure and then buff and degrease your nails.
- Apply base and dry.
- Cover your nails with the main color of gel polish and place under the lamp for 2 minutes.
- You need to apply the foil to your nails immediately, without removing the sticky layer.
- Level the film with an orange or cotton swab.
- Remove it quickly.
- After waiting 2 minutes, apply the finish.
- Dry your nails under the lamp and remove the sticky layer.
Foil always adheres well to special glue. But you need to get used to using it without glue. It may print poorly and fall off. Dense and textured layers are not glued to gel polish.
Fixation with regular varnish
To make a manicure with foil, you don’t need to have a lamp - you can glue it to regular nail polish. Sliders and adhesive tapes are torn off from the protective layer, glued to already dry nails and immediately covered with a fixative. You can also use transfer foil, but you need to take into account that it is difficult to print the entire design on regular varnish. But chaotic prints and patterns come out quite well.
How to use transfer foil?
- Get your nails done.
- Polish the nail plate and degrease.
- Apply nail polish and wait until it hardens but is still sticky.
- Place the matte side of the foil on the varnish and straighten it out.
- Remove it by moving away from the nail bed.
- After 5-10 minutes, cover your nails with 1-2 coats of clear sealer.
Experts advise choosing a type of foil with “gasoline” stains for home application. It is translucent, shimmers in different colors, and thanks to this, defects are not noticeable.
Rio Profi
Another great quality adhesive for gluing such material is Rio Profi. The consistency of the composition is transparent and thick, it spreads evenly for gluing all types of foil and stickers. The product is developed on a rubber basis. It contains no allergenic components or harmful substances. After applying the transparent composition, the coating becomes glossy. The product is resistant to damage and moisture and takes 2-3 minutes to dry. The composition is poured into a 10 ml jar. Keeps foil for 2 weeks or more. Its properties are poorly affected by low temperatures. Produced in Russia.
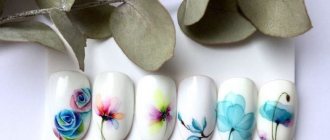
Nail design with foil
Nail foiling allows you to get a luxurious result both with a continuous coating and as patterns. Let's consider several interesting options for this nail design.
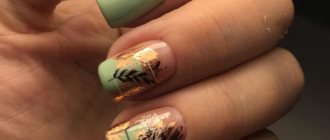
With gold foil
Gold foil allows you to create a sophisticated and bright design on your nails:
French with foil
French manicure with transfer foil , as you can see in the photo , looks laconic, but not at all boring:
Lunar manicure
The opposite of a French manicure - a moon manicure - only benefits from the addition of a shiny area in the form of foil! Look at the photo!
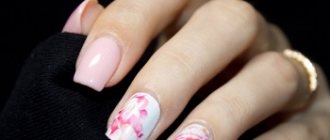
Manicure with foil and gel polish
Gel polish allows you to apply several layers of fragile crumpled foil to create a mosaic and not worry about its safety:
With stripes
Ribbons and strips of foil will allow you to create a fashionable design from color blocks, as in the photo, even for a novice in the field of manicure:
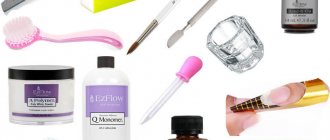
Required materials and tools
To create a Hollywood manicure at home, you need to prepare tools and materials, without which it is not possible to do this. This list includes:
- base and top coat;
- gel polish;
- UV or LED lamp;
- orange stick or pusher;
- special foil.
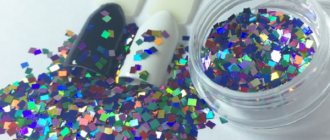
There is non-transfer foil, from which patterns are cut out, and from them a certain design is created on the nail plate. Pieces of foil are carefully placed on the varnished nail with tweezers. The most common transfer foil is in the form of a small notepad with tear-off leaves. They are also available in rolls, which are in glass jars. The choice of foil colors and patterns is huge. You can completely cover your nails with it or create unusual patterns. The transfer form of this material is more convenient to use and is equipped with a film that protects the manicure from damage. The foil should be applied with the matte side. Also produced is crinkled (tear-off, leaf). It stands out with a certain structure, and comes with or without a pattern. It is produced in the form of a sticker or a whole sheet.
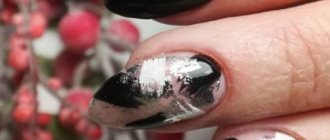
Casting effect on nails
To create a casting effect, transfer foil is often used. The foil on the nails turns out to be of magnificent beauty. This method can be carried out using gel polish or glue.
To complete the process you will need:
- gel polish coating;
- adhesive for transfer foil;
- foil tape;
- sanding file;
- drying lamp;
- degreaser;
- fixative
The work is performed either on artificial plates or natural ones.
Process:
- plane preparation;
- cuticle removal;
- base coat;
- drying;
- applying a tint coating;
- drying;
- grinding;
- apply glue or varnish base;
- wait the necessary time;
- apply foil;
- press and smooth;
- sharply remove excess material;
- dry;
- cover with liquid stones or acrylic powder.