From this article you will learn:
- What are the main causes of brittle nails?
- What to do if your nail is broken, and what not to do
- What tools are needed to repair a broken nail?
- What to do if a nail breaks under gel polish, a nail extended with acrylic, or a natural nail
- What to do if a nail breaks in the center, on the side, at the root
- How to restore a nail plate after a broken nail at the root
- How to repair a broken nail yourself using a tea bag and special glue
- How to temporarily restore a broken nail before visiting a specialist
- What are salon methods for restoring a broken nail?
- What are the main measures to prevent brittle nails?
Neat nails of suitable length are a real decoration for women’s hands. Therefore, a beautiful manicure is rightfully considered one of the main components of an impeccable image. But none of us is immune from possible troubles, and the strongest nails can also “let down” the hostess by breaking right before an important event. However, there is no need to be upset in advance, because the problem can be easily fixed. In the article we will tell you what to do if your nail is broken, and we will also understand what can provoke such situations and how to prevent them.
The main causes of brittle nails
If you always want to have beautiful and strong nails, it is important to know what can cause nail plates to become brittle and weakened.
Most often, nails begin to break for the following reasons:
1. Lack of vitamins , trace elements and minerals intended to maintain health and beauty. A sufficient amount of these substances in the body is synonymous with healthy and strong nails.
Therefore, the first thing to do if your nails break quite often is to reconsider your diet.
Foods rich in vitamins and microelements for healthy nails:
- seafood;
- milk and other dairy products;
- nuts and sesame;
- seaweed;
- zucchini, cucumbers;
- fatty fish;
- vegetable juices;
- basil, parsley, cilantro and other greens;
- pumpkin seeds.
2. Improper care. Most of the cosmetics that we use to take care of our hands and nails every day contain acetone and formaldehyde. Due to contact with these substances, natural nail plates weaken, lose their natural hardness, and become brittle. Detergents and poor quality water cause no less harm to them.
Taking good care is the second thing that is important to do if your nails begin to break. There are a huge number of wellness procedures, most of which you can do yourself. For example: baths with oils, masks, special varnishes to strengthen the plates, various folk methods.
All of the above helps improve the condition of the nail plates. However, it is equally important to know what to do if the nail has already broken. We'll talk about this later.
Read material on the topic: Medical pedicure: features of the procedure
Preventive measures for a broken nail
! Restoration of a nail can only be performed if it is broken off once.
If your nails break and crack regularly, it is best to trim them and begin restoration procedures. To do this, you need to find the cause of the problem and eliminate it. No one can help you better than a specialist - you should consult a dermatologist.
Preventative measures to combat brittle nails are:
1. Timely contacting a specialist and solving health problems. 2. Proper care: use high-quality nail products, use various baths, oils to strengthen the nail plates, moisturize the cuticle. 3. Compliance with the drinking regime: fragility and delamination of nail plates directly depend on dehydration of the body. 4. Doing housework with gloves - limiting hand contact with household chemicals. 5. Careful handling of nails: they should be protected from mechanical stress. 6. Using nail polish remover without acetone in the composition. 7. Correct performance of manicure: filing nails at right angles, cutting, not tearing off hangnails, using a glass or ceramic nail file, etc. 8. Periodically resting nails after manicure. 9. Proper sleep patterns (at least 8 hours) and good nutrition: food rich in vitamins A, E, D, calcium, phosphorus and other microelements. You need to monitor the health of your nails, not forgetting about the condition of the body as a whole. Don't despair if your nail breaks due to negligence: your manicure can be saved with these simple fixing methods that won't take much time, preserving the beauty and flawlessness of your hands!
What to do if your nail is broken, and what not to do
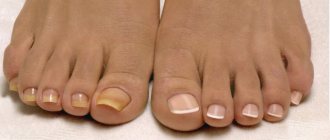
The mechanism of the procedure for breaking a nail will depend on how severely the nail plate was injured. First, let's list the most common types of damage:
- Lateral detachments without injury to the bed;
- Breakage of the nail plate at the very “root”;
- Cracks with damage to the bed;
- Injury with a detachment of the plate and damage to the skin under the nail.
The last option is the most unpleasant and painful.
A broken nail brings a lot of problems to girls: an unaesthetic appearance of their hands, snags on their favorite clothes, scratches on the skin. "First aid" will depend on how badly the nail was damaged.
Actions to take as soon as a nail breaks:
- cut or file a plate;
- glue the broken part of the nail;
- resort to the services of a manicurist.
What to do at home if your nail is broken, but you want to keep your manicure? The damaged area can be glued together. The technology of this process will depend on where the nail plate was broken: in the overhanging part of the nail or in its center. Additionally, the size of the fracture is taken into account.
A small crack can be sealed with a patch made of natural fabric or a paper plaster. This method will work if the fracture occurs on the side of the plate, along the “smile” itself or along it.
Recommended articles on this topic:
- Where to buy nail files
- Files with an inscription are a great option for business development
- Professional pedicure files
If the free edge of the nail is completely broken, then a tip (a special acrylic product) is applied on top.
The tip is also used if the nail is broken along the axis of the finger.
You can solve the problem for a long time only if your nail is broken no more than 1/3 of the entire free edge.
When asked what to do if your nail is very broken, we recommend turning to the services of a manicurist. A deep break with damaged skin under the nail is very difficult to fix on your own.
What not to do if your nail is broken:
- Squeeze glue onto natural surfaces not protected by varnish.
- Apply your natural nail to glue. Aggressive chemicals corrode the natural plate. This method can only be used in case of extended nails.
- If the nail is broken “to the meat”, you cannot wet it in acetone or other compounds. Aggressive substances will cause severe irritation and inflammation of the open wound.
- There is no need to put off restoring the plate. Usually cracks grow quite quickly, and the broken part can come off completely. Then it will be more difficult to correct the situation.
Next, we’ll take a closer look at what to do if a nail breaks.
Ways to fix a broken nail
Method No. 1. Fake nails
With this method of eliminating damage, square-shaped false nails are needed. You need to prepare glue, nail polish remover, nail scissors and a cosmetic file.
Use nail polish remover to remove excess oil from the surface. Then apply glue to the damaged plate and to the inside of the overlay material. Not many girls know how to fix a broken nail this way. Carry out the procedure at home with caution.
Apply an artificial nail over a broken one. Do not hurry. After a few minutes, trim the unnatural plate so that it matches the natural nail. At the end of the procedure, it is necessary to level the surface with a nail file and glue the joints.
Method No. 2. Adhesive tape
The nail can be restored by gluing a piece of tape with a margin of length onto the nail crack. Then, having distributed the device over the plate, cut off the excess. This method helps to temporarily fix the problem.
Method number 3. Tea bag
This repair option is used if the plate breaks along the arc line. You will need a nail file, glue, nail polisher, a piece of tea bag, an orange stick and a disinfectant.
You need to start by disinfecting the surface to avoid infection. Then, using a nail file, make the plate smooth. You need to use 2 pieces of tea bags. One will be applied directly to the crack area, and the other will be applied over the entire surface.
To begin, coat the broken area with glue and apply the first piece of the bag. Using an orange stick, press the patch and apply glue again. Then you need to polish the surface of the plate.
To consolidate the result, repeat this procedure again. Use the second piece of the bag over the entire area of the plate.
What tools are needed to repair a broken nail?
Restorative procedures should be started as early as possible, as the fracture may increase. Necessary equipment:
- Disinfectant. It is better to use something whose action is aimed not only at degreasing the plate and removing contaminants, but also at eliminating excess moisture. At the same time, the nail should not dry out.
- Special fabrics. To restore the plate, you can purchase natural fabric (silk, linen) or artificial fabric (fiberglass). The most convenient options are silk and fiberglass. They are sold in strips or individual samples according to nail sizes.
- Special nail glue , whose composition must be safe for nail plates. This restoration adhesive is quick-drying.
- Nail files, as well as buffs . The tool you will use to repair a broken nail must have an abrasiveness of at least 240 grit. Buff is a special polishing file. If you use a cloth, a buff will be very convenient for smoothing the surface of the nail plate.
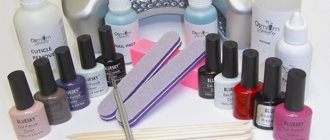
To perform high-quality restoration procedures, we advise you to purchase a set with all the described devices. This way you will save your time and finances.
Read the material on the topic: Disinfection of manicure instruments is an important stage in the work of a master
What to do if your nail breaks under gel polish
The first thing to do if a nail under gel polish breaks is to remove the coating. It is enough to remove the varnish only from the broken plate. Depending on the type of coating you have, use shellac or biogel remover. If you can't get rid of the old varnish, you can make a patch over it.
The patch is applied to the gel polish in the same way as to a natural plate. Next, the sealed area is covered with a new layer of varnish and dried in a UV lamp.
If the nail is broken along the edge, then the broken part can be cut off and extended with biogel. Take a piece of foil and place it under your nail. It will serve as a “support” for the gel polish. Dry the nail in a UV lamp and carefully remove the foil.
Read material on the topic: Which file to remove gel polish: manicure at home
How to fix a natural nail
The first thing to do is remove the varnish from the damaged finger . It is not at all necessary to redo the manicure on your entire hand if it was recently done and is still aesthetically attractive. Craftsmen have long come up with a way to fix a nail at home alone, when all the others are left long, without redoing the manicure on the entire hand, having tools and gel polish on hand.
Removal of gel polish is carried out with special devices and chemicals. You can do this either independently or by seeking professional help from a specialist.
If you decide to do without visiting the salon, then to remove the old gel you will need:
- file;
- fat cream;
- cotton pads;
- orange stick;
- alcohol or acetone-containing liquid;
- foil or a material replacing it.
So, having collected all the necessary tools, let's get started.
- File off the top layer of the coating and file the top of the nail , lubricate the finger up to the second phalanx inclusive with cream, moisten the discs in liquid and wrap the injured nail, wrap foil over the disc (so that the acetone and alcohol vapors do not evaporate quickly), leave for 15 minutes and remove the foil and cotton pad disc together with gel polish, using a cotton swab. If once is not enough, repeat all the above steps in the same order again.
- Thoroughly polish the broken or cracked area.
- Place foil folded in 4 layers or a special form under the plate, secure it with tape or adhesive tape.
- Perform degreasing.
- Treat with primer and dry in a UF lamp.
- Apply the base to the treated broken area and foil to the desired length. To obtain the missing part of the nail, the layer applied to the foil must be thicker than the layer applied to the nail itself.
- Dry in a UV lamp. Drying should take 2 times longer than usual.
- Paint the prepared nail with 2 layers of gel polish, drying them alternately according to the same principle as the base.
- Apply top. Dry in a lamp.
- Get rid of the stickiness of the finishing layer.
- Remove the foil and use nail scissors and a nail file to straighten the nail to the required length and shape.
To avoid mistakes, watch the video where a specialist explains how to properly fix a cracked nail.
The video talks about a nail that cracked on the side
That's it, the manicure has acquired its original appearance.
What to do if a nail extended with acrylic breaks?
Restoration should be done with acrylic tips. These are artificial devices, so the use of synthetic glue (“Moment”) will be harmless. You can use filter paper, silk strips or paper plaster as fastening patches.
What to do if a nail extended with acrylic breaks:
- If the damage is too severe, you can re-grow the nail.
- Apply glue to the plate and attach a paper strip.
- Apply a second layer of glue, and after it dries, apply a third.
- The next step is to polish the plate with a nail file.
- Apply new varnish.
A simpler option is to replace the damaged acrylic tip with a new one.
Read material on the topic: What files are needed for nail extensions and how to use them
Nail extension repair
Extensions are done with acrylic tips . They do not have a living structure, so if they break off, they can be glued with synthetic glue for plastic (superglue, “Moment”). The fastening materials are the same - filter paper, silk strips, paper plaster.
The technology for gluing the extended plate is as follows:
If repairing the extended nail is impossible, you can replace it with a new one.
- Apply glue to the nail and place paper strip on top of it .
Place another drop of glue . the third layer of glue on top of the dried second. - Treat the repair area with a nail file .
- Apply varnish on top .
Another repair option is to replace the broken tip with a new one.
What to do if your natural nail breaks
Usually a fracture of the nail plate forms directly along the “smile”. Restoration will preserve your manicure, but the nail will lose strength.
What to do if your natural nail breaks:
- Remove the varnish and wipe the plate with an antiseptic.
- Polish the bumps on the surface of the nail with a special buff file.
- Make a patch. The piece of fabric should be 2-3 mm larger than the break (from each edge).
- Lubricate the coating with glue and place the fabric. To evenly distribute the patch, you can use the sharp tip of a toothpick.
- After the glue has dried, treat the nail with a polishing buff file.
- Depending on the degree of damage, apply another 1-2 layers of fabric.
- The final stage is coating the plate with varnish.
If your nail is broken, you need to choose the right way to solve the problem.
What to do if your nail is broken in the center
In this case, you will need a tip. Blank products must be square and transparent in color.
What to do if your nail breaks in the middle:
- Use a polishing file to smooth out any uneven edges of the nail.
- Wipe your nail with nail polish remover.
- Cover its surface with special glue, and do the same with the inside of the tip.
- Place the tip on your nail so that the edges of the product and the nail match.
- Wait until the glue dries completely.
- Adjust the shape of the tips to match the look of the rest of your nails, leaving a small margin.
- Shape the nail, align the plate (it should coincide with the edge of the tip). Seal the joint.
Read the material on the topic: How to choose a manicure set for a novice master
Nail repair kit
Many people do manicures on their own, without the help of professionals. But there are situations when you can get confused. For example, a woman broke her nail under the meat. What if she is on vacation in another country and does not plan to spend money on a beauty salon? Stores that sell varnishes always have glue for tips on sale. The composition contains cyanoacrylate. It glues cracks formed on the free edge of the nail well. If the nail is so broken that there is no longer a free edge, you can try sticking a piece of tea bag on top. For the convenience of nail repair, a kit is available, which includes fiberglass (silk for repair), glue and degreaser.
Repair instructions:
- Degrease the nail.
- Cut out a piece of material for repair.
- Apply a drop of glue to the nail.
- Place the cut piece and smooth it out.
- Glue the patch again.
If desired, you can repeat the procedure. If you glue several layers, gluing each one, you will get an improvised papier-mâché, replacing a natural nail. You can varnish it, and no one will guess that the nail is disabled.
What to do if your nail breaks on the side
Now let's figure out what to do if the nail breaks on the side:
- As in previous cases, you first need to wipe the nail with a disinfectant solution. Then polish the crack until you have a smooth surface.
- Prepare a fabric patch.
- You need to make two stripes. The first piece should be slightly larger than the break; this will be the first layer. The second one should match the width of the nail; it is used as a second layer.
- Now let's move on to the restorative procedure that needs to be done if the nail is broken. To fix the fabric on the plate, it is pre-lubricated with glue. You can straighten the material with the sharp tip of a toothpick. The fixed strip of fabric is covered with glue. After it dries, carefully polish the surface.
- The same needs to be done with the fabric that we prepared for the second layer. After this procedure, treat the nail with a buff. Restored, it will retain its appearance until the plate grows up.
How to repair a nail with gel polish
First, you need to completely “dismantle” the old gel polish coating, if there was one on the nail. After this, you need to determine the nature of the damage and then follow one of the two basic instructions described below.
Crack repair
First of all, it is necessary to prepare the surface for applying gel polish. Using any usual method, it is necessary to carefully treat the free edge of the nail and cuticle without aggravating the damage to the nail area. After this, using a buff or a file, the gloss is removed from the plate (pay attention to the crack: it should not continue to “cling” after processing). Then the phalanx is thoroughly degreased and covered with a base (preferably rubber).
!— Yandex.RTB RA-461895-21 — >
—>
Important! When applying the base, you need to slightly lift the edge of the plate with the crack so that the base slightly fills it.
The base is also applied to the damaged area from the inside, if possible. Without allowing it to dry, you need to pour a small amount of acrylic powder onto the plate.
After the coating has dried, you need to shake off excess powder, file and level the nail, and then apply another layer of base and wait for it to dry again. When all of the above operations are completed, you can proceed to standard gel polish coating. Of course, such a manicure will not last long, but this method of repair has established itself as one of the most practical.
Chip repair
Everything is a little more complicated if the corner of the nail breaks off. In this case, the only way out seems to be extensions, but at home it can only be done using a base and special molds. Only small (up to 3 mm) chips are subjected to this repair method.
—>
So, we will need a thick rubber base, extension molds and a certain amount of patience and perseverance. To begin with, as in the previous case, the nail plate must be prepared for applying the base.
The extension form is then placed on the prepared nail surface. It must be placed in such a way as to ensure that the area of the chip is captured. In this case, the base is applied not only to the chip, but also to the entire surface of the nail: this is necessary for its leveling. Then, using a lamp, the coating is polymerized and the base is applied again, but only to the chipped area.
After the second layer has dried, it is necessary to correct it with a file and apply the third, final and leveling layer. When everything is ready, you can also apply gel polish.
Reference. To strengthen the “structure” you can use fiberglass.
What to do if the nail is broken at the root
The most unpleasant situation for lovers of flawless nails is a severe fracture of the nail plate. Let's look at what to do if the nail breaks at the root. The first step is to thoroughly blot it in a disinfectant. Hydrogen peroxide, chlorhexidine, miramistin, etc. are suitable. Such a nail is very difficult to restore. Therefore, we advise you to contact a manicurist.
The procedure can be done only after the wound on the skin under the nail has healed.
In salons, this manipulation is done using special biogels. These coatings contain proteins that restore the nail plate. Biogels also protect cracked nails from infection.
Many biogels dissolve when interacting with detergents and acetone. To keep your manicure intact, it is better to wear rubber gloves when washing dishes or cleaning.
Read the material on the topic: How to properly file nails and care for them
How to restore a nail plate after a broken nail at the root
- Remove the broken nail.
The first thing to do if the nail is broken at the root is to completely remove the broken part of the plate. This is necessary to heal a wound on the skin. It is more convenient to cut off the broken edge with nail scissors. If you need to lift the broken part, use tweezers.
After removing the broken nail, it will become more convenient to treat damaged skin. This will avoid infection and further inflammation. The remaining part of the broken nail can be left, but in this case the treatment will be more difficult. The deformed edge will separate as the plate grows.
- Stop the bleeding.
The next thing to do if the nail breaks at the root and causes the formation of a bleeding wound is to stop the bleeding. Apply a piece of bandage or disc to the wound, press firmly on it, and hold for several minutes. - Trim off the rest of the nail.
Next, use nail scissors to remove any bumps from the damaged area. This will prevent the crack from growing.
If the injury causes very severe pain, then a specialist should restore the nail.
- Soak your foot or hand in cold water.
After trimming the broken edge of the nail, soak your finger in cold water for 20 minutes.
Choose a temperature of the liquid that would help to gradually reduce pain. This procedure helps normalize blood flow in the limb.
- Soak your hand or foot in salt water .
Now place your hand in a previously prepared bowl of warm salted water (the solution should contain 1 teaspoon of salt and 4 mugs of clean water).
Keep your finger in the solution for 20 minutes. Liquid with added salt prevents infection. This procedure should be done 2-3 times a day for the first three days after the injury. Dry your finger with a cotton cloth.
- Use antibiotic ointment.
To restore damaged skin faster, gently wipe the wound with antibiotic ointment.
Your hands must be clean throughout the entire procedure.
- Apply a gauze bandage to the nail bed until the plate grows out.
This must be done so that the nail broken at the root does not cling to things. Gauze will also protect the nail plate from infection.
Repeat the procedure until the plate grows back. The gauze must be changed with each subsequent wound treatment. The damaged area must be dry. If the bandage gets wet, it should be replaced.
- Monitor the condition of the wound.
During the first time after injury, care must be taken to ensure that no infection gets into the wound. This is especially true in the first 72 hours after injury.Signs of infection: fever, inflammation, heat in the wound area, pain, swelling or suppuration. Monitor the condition of the wound until a new healthy nail grows. If you realize that you have an infection, go to the doctor immediately.
Read material on the topic: Types of manicure files and features of their use
How to repair a broken nail yourself using a tea bag
A tea bag, a nail file, and superglue are all you need when you need to “fix” a broken nail. What can I do to restore my manicure using these items?
Procedure:
- Remove the tea from the bag. Cut a small strip out of it in the shape of a rectangle. It should be slightly larger than the break.
- Treat the nail with a polishing file until the surface is smooth.
- Apply a small layer of superglue to the cut strip. Place it on your nail and apply another layer of glue on top. After this glue has hardened, apply a third layer. The protruding ends of the paper can be trimmed using nail scissors.
- Treat the nail with a polisher, remove the glue with acetone or an alcohol solution. Finally, coat your nails with clear polish.
Read the material on the topic: Files for grinding nails: how to choose the ones that are right for you
How to fix a broken nail without harming your health - safety rules
Manicurists recommend following a few tips that will protect you from common mistakes that often arise in the process of fixing broken nails:
- You should try to fix a broken nail immediately after the problem occurs. Especially if the damage is at the crack stage. It is easier to restore the integrity of the nail plate at an early stage, before the crack has grown, the break has not increased, and the edge of the nail has not completely separated.
- If you use glue, it should be either a specialized product, PVA, or a rubber (rubber, silicone) based product. It is not recommended to use other types of adhesives, since the aggressive chemicals in their composition can corrode the natural nail plate.
- If a broken nail causes a wound, you need to ensure that glue, acetone or other chemicals do not get on the damaged tissue. Otherwise, severe pain, chemical burns, irritation and inflammation of tissues may occur, which will take a long time to heal.
In order for the result of the restoration to please you as long as possible, you need to try to protect your nails from any negative effects - mechanical, temperature, etc.
How to repair a broken nail yourself using special glue
A good remedy is a special glue for broken nails. Let's consider what to do if you want to correct the situation with its help.
- The first step is to wash your hands thoroughly to remove any greasy residue from creams and oils. Dry your fingers well with a towel.
- Heat the water in advance. Dip the broken nail into it. This must be done so that the plate does not harden. If the nail is only cracked without coming off completely, then this procedure can be skipped.
- Apply a small amount of glue to your nail. It is convenient to distribute it over the plate using a toothpick or the sharp tip of an orange stick.
- In manicure supply stores you can purchase special glue for restoring damaged plates. But if you cannot do this at the moment, you can use regular superglue. Try to do everything carefully so that the product does not get on your skin.
- Now let's proceed to the main procedure that needs to be done if the nail is broken. To fix the deformed area on the plate, apply it and hold it there for one minute. This will be enough to ensure that the nail plate is well secured.
- Next, remove excess layers of glue with a cotton pad soaked in nail polish remover. This must be done as soon as possible so that the glue does not have time to dry. This is necessary to ensure that unnecessary irregularities do not form on the plate.
- Once the glue is completely dry, polish the plate with a fine-grit polishing file. You should get a flat, smooth surface. An important rule when working with a nail file: guide the tool in one direction only. This will avoid even more damage to the nail plate.
- At the end of the procedure, apply a protective coating (varnish) to the nail. Now wait until the composition dries. The restoration is complete!
The first thing to do if you have a broken nail is to assess the extent of the damage. If it is insignificant, then you can carry out the restorative procedure yourself. However, if you are faced with an extensive injury that is accompanied by severe pain or even bleeding, then it is better to go to a specialist.
Many girls get their manicures done by the same master, who has proven his professionalism with quality work. But if you have a broken nail and require immediate intervention from a specialist, you will probably have to wait, since the influx of visitors is usually very large.
Next, we will tell you what to do if your nail is broken and requires temporary restoration, but your nail technician is unable to see you.
Read material on the topic: Which nail file is better - a review of the most suitable options
Tools you will need for gel polish repair:
- Ultraviolet lamp
- Base coat, top coat, natural or clear gel polish
- Means for degreasing the nail surface
- Foil (small piece, for one nail)
- Scotch tape or adhesive tape
- File, scissors for manicure.
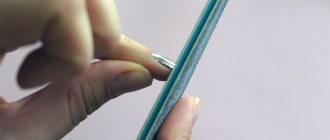
Stages of the procedure: 1. Lightly polish the nail plate in the broken area. 2. Fold the foil four times for rigidity, cut a long strip wider than the nail plate.
3. Place a strip of foil under the nail, bend it from the inside, giving it a curved shape, and secure it with an adhesive plaster.
4. Degrease the surface of the nail plate, apply a base layer to the part of the nail closer to the break, apply a thicker layer on the foil, further than the border of the future nail, you need to try not to get it on the adhesive plaster. Place your finger under the lamp, increasing the exposure time by 2 times. 5. Apply a layer of gel polish in the same way, thicker on the foil. Also keep it in the lamp twice as long. Apply the second coat of varnish and light it as usual. 6. Apply a layer of top, hold under the lamp and remove the sticky layer. 7. Carefully separate the foil and adhesive tape.
8. Using manicure scissors, cut off the excess part of the extended edge, sand and file it, giving it the desired shape. 9. Sand the nail surface with a nail file at the junction of the natural and varnish layers, moving from the base of the nail to its tip.
10. Polish the nail. If a nail with an artificial coating is broken, it makes sense to fix it only by removing the gel polish or shellac or artificial nail. The repair methods in this case do not differ from those listed above.
| It is worth noting that an absolutely inexpensive option is to fix a broken nail using a tea bag. This method is also possible if soft tissue is not damaged. The tea bag material is quite suitable as it is thin but durable and will not be noticeable on the nail. The sequence of the procedure is the same as when repairing with silk. |
The ideal option would be to go to a salon if your nail breaks or cracks.
– If a natural nail is cracked and soft tissue is affected, the specialist will treat and disinfect the affected area.
– After that, he will seal it with silk and apply a special fastening agent.
– The crack will not heal, but painless growth of the nail will be guaranteed.
– In the salon, they can apply biogel to the damaged nail, which, in addition to gluing, will strengthen the nail plate.
A method of temporarily restoring a broken nail before visiting a specialist
- You will need a narrow roll of tape. Cut a small strip, it should be slightly larger than your nail. This can be done carefully using nail scissors or regular scissors. If you only have large scissors on hand, use the ends.
For the procedure you need to take single-sided tape. Transparent adhesive tape for gift paper, multifunctional adhesive or any other type, but always transparent, will also work. Make sure that its adhesive power is not too strong. In our case, it is worth excluding electrical tape.
- Now let's proceed to the main procedure that needs to be done if the nail is broken. To restore the damaged area, stick the prepared piece of tape onto the nail plate. You need to try to make sure that the middle of the gluing surface is above the break itself.
Press on the damaged area and hold it there for a while. Carefully place the tape on both sides of the plate; it should completely cover the nail.
Before covering the nail plate with tape, you need to check that its broken halves meet.
Press down on the taped area to better secure the tape.
To avoid causing even greater damage, straighten the tape in the direction of the crack.
- Cut off any excess tape. This is convenient to do with nail scissors. If the tool is not at hand, use the ends of large scissors.
The edge of the tape should be very tightly attached to the nail.
The method described is exactly what you need to do if your nail is broken and a trip to the nail technician is not coming soon. A specialist will eliminate the problem using more effective methods.
Read the material on the topic: What an ideal manicurist’s workplace should look like
Salon methods for restoring a broken nail
If your nail is broken, it is better to contact a specialist. Almost any nail salon provides nail restoration services.
- Sealing.
Sealing with wax is usually done in the following sequence:
- plate design;
- grinding;
- removal of contaminants;
- waxing the nail;
- lubricating the plate with nutritious oils.
Important! Varnishing should be done no earlier than 20 minutes after the procedure. Afterwards you need to wash your hands well.
Sealing is a restorative procedure. If your nail is broken, we recommend having it done to improve the condition of the nail plate.
This process is also useful for treating nails after extensions; in addition, it helps to “revive” the plate after contact with household chemicals.
The effect of the procedure lasts for several days. Re-sealing can be done after the film is completely erased.
- Reinforcement with fabric or paper.
This procedure is usually used to fix a nail that has already broken. But we will consider its use to strengthen the nail plate.
Procedure:
- polish the nail;
- apply glue or clear varnish to it;
- stick a piece of fabric;
- bend it under the plate;
- apply a fixative;
- Keep the “structure” for 3-4 days, you can apply varnish on top of it.
If you want to reinforce it with paper, then you should not apply varnish. This manicure will not look attractive. In this case, the varnish takes a very long time to dry.
Read material on the topic: Ideal file for manicure: choosing the best
Where to buy high-quality and professional nail files for damaged nails
Among the huge number of online stores offering manicure accessories, we invite you to our “WORLD OF NAILS”! You should choose our services because:
- “MIR FILOK” – own production of nail files.
- "WORLD OF FILES" is the main supplier!
- The showroom is located in Moscow.
- Delivery throughout our vast Motherland!
Why is “WORLD OF FILES” the best option for purchasing a product for you?
- Our store is built on our own production of saws. Thanks to this, you get: minimized cost of service, tested and confirmed product quality, fast production, attractive conditions for distributors.
- Our nail file is made only from materials that have repeatedly proven their quality (South Korea).
- Wide variety of product. Thus, a manicurist with any level of professionalism will be able to satisfy his interests.
- You can figure out which file is right for you. We carry out individual orders.
- Another advantage is the application of your brand logo on the working surface of the files.