Differences between overhead tips
Nowadays, such products are presented in a varied assortment. You need to know how the tips differ from each other in order to make the right choice:
- design. They can be plain or have a pattern;
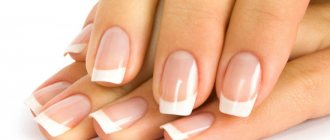
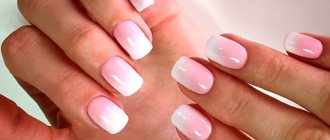
- form. False nails are produced in various shapes and lengths. You can purchase short plastic false nails and long plates. You can always buy tips that match the natural shape of your nail plate. If you are used to long nails, short false nails, for example, with a French manicure, will look much more attractive. Short false nails, by the way, are more comfortable;
- gluing method. Tips can have an adhesive layer on the back of the plate or be glued by applying liquid glue to them;
- quality. The cost of production and the natural appearance of the result will depend on the quality of the tips.
How to make false nails at home: the secrets of a beautiful manicure
The perfect manicure is a dream, which can sometimes be very difficult to achieve.
Lack of time or effort, high cost of the procedure (especially if you take into account megacities like Moscow or St. Petersburg), difficulty in finding a good specialist - all these factors force girls to abandon the classic varnish or gel coating in favor of more affordable and multifunctional alternatives . The most popular of them are long false nails. From the information presented, you will learn about the intricacies of home extensions, get acquainted with current designs and design options.
False nail design
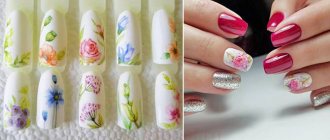
On sale you can see short false nails with a design or long ones without it.
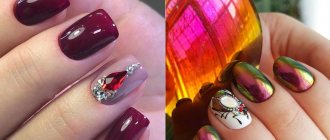
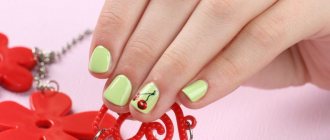
You can apply a varnish coating of any color yourself to transparent or beige tips. You apply the polish as if you were painting your natural nails. In this case, the layer is applied evenly, and the color becomes saturated. To make your manicure look brighter, you can draw a flower or write a word, for example, kiss.
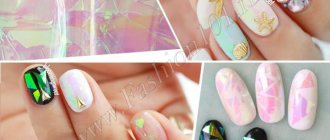
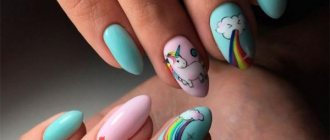
The design of tips is very diverse. Any idea can be realized on false nails: from all kinds of prints, patterns to single-color nails decorated with sparkles or rhinestones. You can get a French manicure. In addition, short false nails will look more natural.
Let us note once again that for the most natural look, you should buy short artificial false nails that do not have a design, and apply the varnish yourself so that the manicure looks natural.
A wide range of nail gluing kits is represented by the Maybelline and L'Oreal brands. Both short and long false nails with available products can be ordered online or purchased by going to a specialized store.
How to do a manicure using tape correctly?
Technique for performing manicure using tape step by step.
- Apply base coat. Make sure the layer is completely dry.
- Paint your nails with colored polish. Give time to dry thoroughly.
- Apply strips of tape to create your favorite design. Smooth out well.
- Apply another colored polish to the exposed part of the nail. Don't be afraid to color the edge of the tape. Allow time for the second coat to dry completely.
- Carefully remove the tape.
- Apply a transparent base to the design.
- Decorate your nails with glitter if desired.
How to glue the plates?
It is necessary to prepare for the manipulation in order to get the expected result. First, remove the remnants of the old varnish. Use a file to smooth out the surface of the plate. After that, we take manicure accessories, tips and a substance for gluing. If you plan to do a manicure with overlays once, then buy tips that have a self-adhesive base.
How long will it take? The whole procedure will take no more than 10 minutes, and your hands will be beautiful and well-groomed. And for gluing plates for a long time, you better study the step-by-step description of the process.
Pasting instructions:
- we decide on the shape of the plate. You should know that nails are divided into three types: classic, flat and with a pronounced bend.
- We place the pads and a tube of special glue on the workplace. The main thing is to eliminate the use of superglue in order to subsequently avoid problems with removing the plates. We prepare our hands: wash, dry, remove the remnants of the previous coating, remove the cuticle. It is important to remember that your nails should be short. You should trace the outlines of both hands on paper. If you place short tips or false nails on painted fingers, then these pictures will help you follow the order of gluing;
- Apply glue to the back of the tips if they are not self-adhesive. Place the plate on the surface of the nail and press lightly for 10 seconds. And so on every nail.
Doing a false manicure at home is not at all difficult. Note that false nails can also be used for pedicures.
About false nails for children: paper nails for girls and teenagers
Little girls really want to be like their mother in everything. Baby nails are no exception. Even at a very young age, daughters ask to have their nails painted. How harmful false nails are for children, and how you can get out of this situation without harming children’s hands, is described in this article.
Caring for children's nails
Manicure for the little ones is limited only to cutting nails and removing hangnails. In this case, you need to not make the edges too small and cut your nails in a rounded shape so that sharp corners do not form.
When performing the procedure, you should be careful and not cause pain to the child. If it happens that blood starts to flow, then a very small child needs to apply a bandage soaked in hydrogen peroxide to the finger, and for an older child, apply a bandage. Keeping the bandage on the wound is enough until the bleeding stops completely.
Caring for children's nails
If an abscess appears on the nail, apply Levomekol and secure the bandage. When it happens that the nail was not cut quite correctly, ingrowth into the skin can occur.
In this case, the best remedy would be a bath with furatsilin (1 tablet = 1 glass of water), in this solution you need to keep the ingrown nail a little. If inflammation occurs, brilliant green will help.
If the ingrowth turns out to be deep, then it is better to visit a doctor.
Important! Cuticles should not be cut on children. The maximum is to push it away with an orange stick if there is a strong build-up.
Basically, active interest in manicure appears after 4 years. It is better to push back the cuticle while taking a bath, when the fingers are best prepared for this; steamed skin yields more easily and does not cause discomfort to the child. This will help save you from a lot of hangnails, when the nails begin to grow faster, the skin does not have time and reaches for them.
The child must understand exactly how to cut and care for nails, be able to use scissors and a nail file, and regularly use cuticle and nail oil. The oil is useful from the age of 4 years - it nourishes the nail and helps it grow beautiful and healthy. Home treatments are no less useful than salon treatments.
At what age can you do it?
It is better to start painting your nails as late as possible. As a last resort, you should choose a product that does not contain formaldehyde. Be sure to use a base coat under the polish so that the nail does not lose its color; cover it with a top coat - it will last longer. In the summer you especially want bright colors; it’s better to choose more natural shades for school.
It is better to start painting your nails as late as possible.
Gel polish can be used no earlier than 10 years of age. This manicure is useful for those who cannot stop biting their nails. The girl will feel sorry for spoiling her beauty, and she will quickly lose the habit.
Important! The use of an iron nail file is strictly prohibited. This can lead to nail deformation and abnormal growth, resulting in an unattractive nail shape in an adult.
Rules:
- Trim the nail at a distance of at least 1 mm from the edge. Cutting “at the root” will lead to a reduction in the nail plate, and it will be small and ugly;
- The cuticle is only allowed to be softened for further removal with an orange stick;
- The burrs are cut off with nippers, the skin is soaked in a vitamin composition;
- You can finish your children's treatments with a massage or paraffin therapy. Such procedures will be beneficial for nails and will appeal to young fashionistas.
Nowadays false nails for children are gaining more and more popularity. They are sold in different shapes and sizes, with fun and bright designs depicting your favorite cartoon characters. Such nails will not cause harm, they will help the baby look fashionable and as beautiful as her mother.
How to do a children's manicure
Paper nails for girls
If a girl wants long nails, but her age does not yet allow her to get extensions, then you can cheat a little and make paper nails. It's not scary that they will be white. It’s not difficult to do, it will be fun and interesting. How to make paper nails for girls? To do this you need:
- Prepare nails for manicure, carry out all care procedures;
- Measure the child’s nail and transfer its dimensions onto paper, draw the length that the baby wants, but not too long. It’s better to make the drawing a little larger rather than smaller, then you can adjust the size on your finger. The paper must be of good quality;
- Cut out all painted nails;
- Cover the child’s nails with clear varnish and immediately apply the prepared blanks. You need to glue the paper to the nail well, otherwise it will look ugly. You can use glue for false nails. Excess is removed with a cotton swab soaked in nail polish remover;
- Press the artificial (paper) nail against the nail for 15 seconds for better attachment;
- Your paper nails are ready, you can start decorating them.
The advantage of this procedure is that there is no negative impact from the varnish on the child’s nails. It is not difficult to remove such decoration, but you can easily replace it with a new one.
On a note. To prevent the paper from becoming soggy when you first wash your hands, before gluing it from below, you should go over it with transparent varnish. It will protect (for a short time) from exposure to water.
Nail extensions at the age of 9-12 years
If a beautiful nail plate is formed on a girl’s hands and there is no deviation such as “gnawing” of nails, then it is better not to do extensions until the age of 16.
Nails are forming, puberty goes through, and extensions can cause undesirable consequences. But there are always exceptions.
For example, if fighting the habit of biting your nails does not help, then experts may recommend gel extensions.
Nails for girls 12 years old are performed with high-quality materials and a professional nail technician. The extension is performed once, after a month the habit goes away, the nails grow back and are filed down.
False nails for 10-year-old children may be suggested if pain occurs in the nail area when it begins to grow “in the wrong direction.” But they offer not extensions, but gel coating. This way you can restore the correct growth of the nail plate. Monitoring of the nail should be constant; the length and thickness are adjusted as the nail grows.
Important! You should not overuse such procedures at this age, therefore, you need to take large gaps between coatings.
From 9-12 years old, it is worth considering simply applying gel polish instead of extensions. The child will not bite such beautiful nails, and the nail plate will level out and continue to grow correctly. To maintain intervals, you can offer your child to do their nails for holidays and important events, for example, for a birthday, New Year or March 8th.
Manicure for girls
How to remove tips?
You should not use artificial tips for a long time - plastic tips are harmful. If you use tips systematically, allow your nail plates to rest so that they look healthy.
Removing false nails is also quite easy. To do this, you need to hold your hands in hot water for 15 minutes. As a result, the glue will dissolve, and after the lining can be easily removed. If the pad is holding tight, place your finger in nail polish remover. You can also easily remove the plates. The remaining adhesive can be easily removed using nail polish remover.
Today, reusable false nails have every right to be in the cosmetic bag of all representatives of the fair sex.
The main thing is not to forget that plastic overlays should only be glued to healthy nail plates.
It is necessary to provide constant care to your nails, no matter how long it takes. Follow the advice, read reviews and enjoy a beautiful manicure.
Useful videos
join the discussion
Share with your friends
False nails are an ideal opportunity to get a stylish manicure for those girls who don’t have a minute of free time. Similar services are provided in nail design salons, however, the cost of such services is quite high. This is why many fashionistas stick their nails on themselves at home.
Preparation
Before you add nail extensions, you need to do a regular manicure. For this:
The next stage will be the actual nail extension using tips.
@yulianikolaychik9780
@nail.art.studio_kovrov
Pros of false nails
In the frantic pace of life, it is quite difficult to combine work, home, caring for loved ones with quality self-care, and most often the choice is not made in favor of the latter.
Long nails are very beautiful, but due to constant worries about the house and contact with household chemicals, growing them is quite problematic. And many professions are not compatible with length: doctors and teachers in most cases wear short nails, and in offices with a strict dress code, length is also often prohibited.
Types of false nails
To glue your nails yourself at home, you need to decide on their basic characteristics.
- Overhead tips can have a pattern, or they can be plain.
- They differ in shape and length: both short plastic nails and long plates are available for sale, so every woman can choose those that will fully suit her style and image.
- Method of fastening: usually tips have an adhesive layer on the inside, but you can often find another type of product that is glued using a special compound.
- And, of course, false nails are distinguished by their quality, on which their price and the naturalness of the finished coating largely depend. Consumer reviews indicate that it is best to choose products from well-known brands Maybelline and L'Oreal. These cosmetic companies produce a wide range of both false nails themselves and improvised products, and you can buy them in specialized stores or order them online.
False nails for children: paper nails for girls and teenagers
Little girls notice beautiful things quickly, especially if it comes from their mother. Little ones will definitely want to recreate well-groomed hands, and even with an attractive, bright manicure with a pattern, on their still fragile fingers.
What can you offer to little fashionistas 5-6 years old and girls under 14 years old, so as not to harm their health and fulfill their desire? One of the best options for getting out of a situation with two unknowns is false nails for children.
False nails for girls
Nail care for children and teenagers
The technique of performing children's manicure and design is completely different for five-year-old children and teenagers 12-14 years old. To carry it out correctly without causing injury, you should know that up to the age of 15, the formation of the matrix occurs - the zone in which the nail plate is formed.
This area is located next to the cuticle, so it is not recommended to use tools to remove it, as in a classic manicure for adults.
Up to 8 years, the cuticle is simply slightly moved with a soft stick, if necessary. For 8-10 year old girls, soft, gentle treatment with preparations such as a dissolving agent or hand balm is allowed.
Cuticles cannot be cut with scissors or removed with any abrasive materials.
At home, without proper experience, you should not manipulate in children's manicure, so as not to cause serious injury to the matrix.
Teenagers 12-14 years old are allowed a more intense effect during manicure, if the thickness of the skin and the location of small vessels near the nail plate allow.
Professionals in spa salons use non-abrasive tools when performing children's manicures.
Technology of unedged children's manicure
- You should remember the main rule of manicure: do not start working on your nails without disinfecting your child’s hands. This will prevent the possibility of contracting a fungal infection. Any antiseptic in the form of a gel, spray, or wipe will cope with this task.
- Next, select a nail file to process your nails. The best option for thin nails of girls would be ceramic and glass, which have a degree of abrasiveness in the range of 220-320 grit. Ceramic - has the property of sealing the processed edges of the nail; both materials do not allow the nail plates to delaminate.
- File the open edges of the nails, leaving at least 1 mm in length.
- Get rid of cuticles using a remover cream. Apply it in a thin layer, then use an orange stick to gently push back the cuticle.
- Use rounded scissors to remove existing burrs.
- If a little fashionista still allows herself to bite her nails, then she should use a special anti-biting coating. This will allow the polish to last longer after application.
- The penultimate step is varnish coating, for which it is better to use gentle bio-varnishes for children.
- The finishing touch will be the application of care oil to protect the baby's delicate hands and nails. It can be used from the age of 4 years.
Important! When a child gets a small cut while doing a manicure and there is bleeding, the area is treated with hydrogen peroxide and a bandage is applied.
If an abscess occurs on the nail, apply levomekol and make a bandage. If you do not trim your nails properly, the nail may become ingrown into the skin.
In this case, baths with furatsilin (1 tablet/cup of water) will help. If your nail is deeply ingrown, you should definitely visit a doctor.
It is better to push back the cuticle after a preliminary warm bath, when the skin has steamed and is easily affected. Then there is less chance of burrs occurring.
Gradually, the child will gain nail care skills and learn to use a file and scissors.
At what age are false nails acceptable?
False nails for little ones
Is it possible for pregnant women to do shellac?
The later a girl starts using nail polish, the better. It’s good if the mother controls the composition of the product that her daughter applies to her nails. Children's varnish should not contain formaldehyde and toluene.
False nails for children are a good alternative to polish, but they have their drawbacks. This is fashionable, you can choose them for any event: for the holidays, for the time of year, for your mood. They can be long, short, round or straight. But, in order not to harm the nail plate of children, it is better to wear them for a short time, not constantly.
The false nail and the natural nail are firmly attached to each other with glue. In case of damage to the upper artificial nail, a moist environment is formed in the layer between them, favorable for the development of infection. When wearing false nails for a long time, the infection is invisible, but can lead to serious consequences (fungus, etc.).
Artificial plates dry out natural ones, thinning them and making them brittle, which is not beneficial. In addition, gel and glue can cause an allergic reaction, which leads to various types of inflammation of the nail bed. The time when false nails will cause less harm comes at the age of 14-15 years.
Advice. Nails for girls 12 years old can be decorated with thrips of different types. Fortunately, there are entire sets on sale, complete with glue and false nails.
How to make nails out of paper
When your child doesn’t have enough patience to wait until it’s safe to apply false nails, you can suggest that your daughter use white paper thrips. Making and decorating them will turn into a fun activity. The sequence is as follows:
- Measure the sizes of the nails and sequentially transfer them onto paper.
- The length is selected to be medium, slightly protruding beyond the nail plate.
- Marigolds are cut out of thick but soft paper.
- Girls apply colorless varnish or glue for false nails to the nail plates and attach paper blanks to it, holding each 15-20 seconds.
- Decorate your nails with a design.
You can get rid of paper thrips without difficulty and harm to the nail plates. Knowing how to make paper nails for girls, all that remains is to decide on a design for them.
Stages of nail extension for children 9-12 years old
In some cases, manicure specialists advise girls 10-12 years old to have their nails done with gel polish. The cause may be pain arising from improper nail growth (in the wrong direction) or a bad habit of biting nails. The extensions are done once for a month, after which they are cut down as they grow.
For the same reason, salons often recommend replacing false nails for children 10 years old with gel polish. This way the correct direction of growth of the nail and its surface is restored.
It is important to give your nails a rest and take breaks when applying gel.
In order to maintain the intervals between coverings, it is better to introduce them to holidays and significant events (March 8, summer, New Year, school).
The gel nail extension technique consists of stages that differ in duration and purpose:
- hand disinfection;
- cuticle removal;
- surface grinding;
- applying primer;
- applying gel polish with a brush (without touching the skin);
- lamp drying up to 2-3 times;
- applying the finishing layer;
- shape correction with a file;
- drawing.
Correctly performed gel extensions last 3-4 months. After which the child needs to take a break.
It is important to know! Only professional salon technicians can do nail extensions correctly.
Advice from experienced manicurists
Experienced manicurists will never advise children under 14-15 years of age to perform shellac nails or extensions for no apparent reason. They will always warn the child about the consequences of the procedure and offer an alternative option.
Professionals will use soft surface files. Experts advise preventing the appearance of burrs and regularly cutting them off with sharp scissors, followed by disinfection. It is recommended to only move the cuticle, but not cut it. When doing nail extensions, it is important to apply a base (base) under the gel, and at the end - apply hand and nail cream.
Beginning fashionistas are recommended to use stickers of different themes: stars, flowers, stripes. Each age has its own patterns on the nails. Extended nails for teenagers will be closer to the design of young girls. This is natural, because they are almost adults.
Girls, becoming familiar with hand care, take the first steps towards neatness and beauty. If they are interested in this, then parents have only one thing left to do: support the younger generation in their passion and guide them along the right path. The main thing is to contact competent specialists in salons.
Source: https://ameno.ru/uxod-za-licom-i-telom/nakladnye-nogti-detej.html
How to make false nails
Gluing false nails at home is very simple, however, you will still need some skill. For fashionistas who do not have relevant experience, we will give simple recommendations.
Choosing false nails
To begin with, we advise you to buy a couple of packages at once so that you have plenty to choose from. It is best that the packaging is transparent and soft: then you can try the nail on your nail plate in the store and make sure that it will match the shape of your natural nails. Usually finished nails are produced in a square shape, but it is quite easy to change it with a regular file. Keep in mind that the higher quality the material from which the nails are made, the more natural they will look.
Nail preparation
Before you start gluing your nails, you should get your hands in complete order; Of course, you can neglect the manicure, but without it the result will be completely different, and false nails will not be so impressive.
After you have processed the nail plates, removed the cuticles and cut off the keratinized side ridges, you should thoroughly wash your hands with soap and dry them, then prepare the overlay plates and proceed directly to application.
Attaching nails
Each artificial nail is coated with an even layer of glue on the back side, after which it is pressed firmly against the nail plate. It is held in this position for about 10–15 seconds so that the glue can set and dry. This should be done with all remaining nails.
Gluing the nail on is only half the battle. Afterwards the adjustment of the nail plate begins. It should be done carefully and diligently, otherwise false nails will look untidy.
First, you need to decide on the length and shape: it should be noted that shortened nails, protruding above the tops of the fingers by no more than 2–3 mm, look much more natural and attractive. The plastic is trimmed with a margin, and after that, using a nail file, the tips are brought to the required length and shape.
When work on one finger is completed, it can be used as an example for the rest: the hands should be identical, so when working, you should focus on the same shape of the nails.
It is very important to remove the border between false and natural nail plates; files and buffs are used for this. Only after this can you start decorating your nails: usually they are painted with decorative varnishes and covered with glitter, rhinestones or beads.
Let's look separately at how to remove tips. Everything is simple here: just hold your hands in hot water for about 20 minutes. At this time, the glue dissolves and the pads can be removed quite quickly and easily. If the nail still holds, dip your finger in nail polish remover for a few seconds, this way the plates can be removed very quickly.
Children's manicure and pedicure: how to combine beauty and safety?
Have you noticed how kids copy adults? Do they repeat their words, intonations, actions? Young fashionistas want to wear heels, paint their lips, and get their nails done. Trying on their mother's images, girls feel like princesses. Don’t forbid them to do this, remember yourself as a child.
The main thing is to choose safe means and methods. When it comes to manicure, many questions immediately arise. Can children paint their nails? Which polish should I choose? At what age is it allowed to apply gel polish and do extensions?
Manicure and pedicure are a set of cosmetic procedures for the care of nails, skin of hands and feet. It includes massage, baths, polishing, decoration, nail plate extension.
Until the age of 9–10 years, pediatricians and manicurists advise limiting yourself to regular hygienic treatment: shortening the length of the nail plate, cleaning from dirt, removing burrs.
This will be enough for boys. But girls have a different opinion. At the age of 4–5 years, they already come to their mothers and demand to paint their nails. And at 11-12 years old, children want gel polish on their nails for a long-lasting manicure.
What should parents do?
Teach your child to regularly care for their nails and treat them with care and precision. Until the age of 14–16 years, the nail plate is still developing. It is thinner and softer than that of adults. Any aggressive impact can cause its deformation, disruption of structure, delamination, and fragility.
When getting a children's manicure, you cannot:
- cut the cuticle;
- use adult varnishes;
- apply a decorative coating without preliminary hygienic treatment, a safe choice for children up to 14–15 years old is a dry European manicure;
- grind, polish the surface of the nail plate;
- leave a large length (no more than 3 mm of free edge is allowed), babies are very active and careless. Long nails will get in the way when playing or changing clothes, clinging, bending, breaking off;
- make a pointed shape. Only round or square with rounded corners are suitable.
Lucky
A safe coating for a child’s nails is a children’s varnish that:
- is made on a water basis;
- washes off with warm water and soap, and not with acetone and other chemical solvents;
- does not contain or contains a minimum of harmful components (formaldehyde, toluene, dibutyl phthalate) that can cause irritation or allergies.
Children's polishes are produced in plastic tubes with a dispenser or in the form of a sippy bottle. You can buy sets of nail polishes for children in different colors along with stickers, glitter, and decals.
When are children allowed to paint their nails? The packaging for the varnish usually indicates the age at which it is allowed to be used. When buying, it is important for mom to pay attention to this.
Baby polish is considered safe. With its help, young ladies can do a manicure themselves, but under the supervision of their mother, turning the process into a game. The coating helps to cope with the habit of biting nails, which affects up to 30% of children under 10 years of age and up to 40% of adolescents from 12 to 18 years of age. In medicine, this disorder is called onychophagia.
Girls of high school age can use adult varnishes with a gentle composition, but they should not often get carried away with them. Before using them, it is recommended to apply a protective medicinal coating as the first layer. To remove such varnish, you need products without acetone.
Fake nails
False nail plates are available not only for adults, but also for children. They stick easily to your nails and can be easily removed. Due to the water-based glue, to remove them, just put your hands in a bath of warm water for 10 minutes. You can buy false nails for children in toy stores, in the children's departments of adult cosmetic stores.
Despite the safety of such decor, you should not leave them for a long time and use them frequently. Too thin, sensitive nail plates will experience stress, which can cause complications.
Children's false nails are suitable for short-term use. For example, for a matinee, a visit, a children's party. When you give your children false nails, don’t forget to tell them to be careful to avoid injury. Long nails are unsafe. In addition, with them the little girl’s hand looks unnatural and inharmonious.
Gel polish
Gel polish is the most popular coating among women. His beauty and durability attract the attention of teenagers. From the age of 11 to 12, after watching beautiful photos of gel polish on their nails, children wonder when they will be allowed to have it done?
The opinion of experts on this matter is clear. Children can paint their nails with gel polish no earlier than 16 years of age, when puberty ends, hormonal levels stabilize, and the nail plate is finally formed.
The danger of gel polish is that its components partially change the structure of a child’s delicate nail plate. This is fraught with cracking, deformation, and detachment. It can also cause allergic reactions.
To convince her daughter about gel polish, her mother needs to tell her about its shortcomings and possible complications. As an argument, say that children's nails grow faster than adults'.
This means that the effect will not be so long-lasting. In terms of time, it will be comparable to three paintings with high-quality varnish. And it will be three manicures with different designs, colors, and not the same one for three weeks.
In addition, the lower growing edge will not be visible.
Sometimes gel polish is used for medicinal purposes to correct abnormal growth of the nail plate and combat onychophagia. In this case, the coating is applied to the child for a month, and as it grows, it is cut off.
Building up
At what age can children get nail extensions? For teenagers, extensions are even more prohibited than gel polish. Mothers know this, so they make concessions to their daughters and agree to gel polish as a safer alternative to extensions. Choose the lesser of two evils.
Why aren't nail extensions done for children?
- Until the age of 14–16 years, nails are not yet fully formed. They are quite soft and flexible, so the modeled elongated nail plate will not hold well.
- The coating for extensions is applied in a thick layer, putting pressure on the native nail.
- When applying extensions, the smooth surface of the nail plate is filed down and made rough. This is necessary for better adhesion of the nail to the polymer material. This mechanical impact causes serious harm.
- First of all, you need to be able to wear long nails. You will have to forget about ball games and sudden movements. Even writing with a pen at school is difficult with them.
- If moved carelessly, the extended nail plate can peel off along with part of the keratin of the native nail, undermine it, disrupt contact with the nail bed, and lead to wounds and bruises.
The best way to grow your child’s nails is to take care of their health, then they will be strong and quickly grow to the desired length. If your nails grow slowly, peel, or break off, consult a doctor. Perhaps the body simply does not have enough vitamins or minerals.
Design Tips
So, we found out that the safest decor for the nails of children and adolescents under 14 - 16 years old is varnish. But how to choose a design? You need to take into account the child’s age, ask what he would like to do on his nails, take into account the reason for decorative manicure, and the time of year.
Designs with drawings are suitable for little girls. You can try to make them on the nails of children under 8–9 years old at home, contact a specialist, or simply stick on a finished picture. You should not choose too complex patterns from many details. They will be difficult to apply on a tiny nail plate and will look bulky.
From the drawings we can suggest:
- animal faces (bunnies, cats, panda), birds, butterflies;
- favorite cartoon characters, princesses;
- floral motifs;
- hearts;
- funny emoticons;
- multi-colored dots, lines, shapes.
Manicure with animals, cartoon characters, geometric patterns is a universal option at any time of the year. In spring, floral motifs and delicate pastel colors will be relevant. For summer nails for children, bright, rich shades are suitable: green, yellow, orange, blue.
You can draw fruits, butterflies, paint each nail with a separate bright color, or depict marine motifs. For example, a combination of blue, white, red, turquoise colors fits perfectly into the marine theme.
Drawings for summer nails for children include an anchor, a steering wheel, shells, droplets of water or starfish.
For girls over 10 years old, offer geometric patterns, motifs of lace, flowers, leaves, and a gentle gradient.
For children 13 – 16 years old, nails in soft, pastel colors are suitable: mint, pale pink, lavender, light blue, powder, coffee.
Remember that teenagers are already following trends and trying to try them on themselves right away. For example, in 2021, manicures with motivational and newspaper inscriptions on individual fingers are fashionable.
If we talk about manicure for school, then we need discreet, discreet options that emphasize natural beauty and do not attract the attention of teachers.
Choose translucent coatings with a light pink or beige tint, nude colors, and pastel shades.
As for the design, it is better to choose a simple monochromatic coating without designs or patterns, a classic French nail polish or a moon manicure for children.
For a holiday, decor with sparkles, glitter, and rhinestones is suitable. If the child is going to a themed party (Halloween, Valentine's Day, New Year), the manicure can be neutral or appropriate for the occasion.
Source: https://g2f.ru/stati/detskij-manikyur-i-pedikyur-kak-sovmestit-krasotu-i-bezopasnost
How to make your own false nails
If you wish, you can try to make false nails yourself; most often the material for making them is tape. You will need single-sided adhesive tape, you can use clear or colored tape depending on your individual preferences.
A piece of tape is cut and wrapped around the nail and a strip is cut so that it is twice as long as your original nail, after which it is applied as a whole so that the entire nail looks glossy. Then press on the sides of the tape so that it bends and looks more natural. If the tape is too wide or long, you should cut it to the desired size.
If the tape is thin, you can apply a second layer, but try to do it as carefully as possible. The outer part of the tape is coated with decorative varnish, and the sticky part is coated with transparent varnish.
As a rule, children resort to such “decorations”, as well as women who want to test this or that nail design on their hands.
Required tools and materials
Of course, for nail extensions using tips, you will need the tips themselves that you choose.
You will also need:
Before applying the top, you can use a colored gel coating, so that later you can proudly show off your perfect manicure, saying, “Wow, how good I am at doing my own nails!”
Tools for nail extension with tips
@kashlanskaya_nail
@nail.art.studio_kovrov
Hot glue snowflakes
Do you want to give your home interior a fabulous atmosphere? Create decorations for the holiday, original hanging decorations for furniture and doorways of your home yourself. Crystals, bunnies, Christmas trees and other New Year's crafts made from hot glue will be one of a kind, and if you involve a child in the process, their making will turn into an exciting game.
To make snowflakes from hot glue, you will need:
- pencil with soft lead – 1 pc.;
- electric glue gun;
- metal tweezers – 1 pc.;
- wax paper - 2-3 sheets;
- nail polishes – 3-4 jars of different colors;
- cosmetic sparkles (glitter) – quantity to choose from.
Let's start making crafts. Start by laying a sturdy wax-soaked sheet on the table. Foil and cardboard will not work - under the influence of the high temperature of the glue, they will firmly stick to the work surface and ruin it. Below are seven templates for your convenience.
Tip: the working surface can be replaced with heat-resistant baking parchment.
Transfer the depicted figures with a pencil from the drawing to the sheet or use your own stencils. Then grease with sunflower oil, this will make it easier to remove the crafts. To make glue, just heat the rod in the gun. Draw patterns, clearly following the lines. Some of the decorations can be painted with paint and nail polish. To do this, wait until the glue has cooled and then paint the figures to your taste.
To decorate the rest of the figures, sprinkle glitter on a piece of paper. Don't let them cool completely or the glitter won't stick. Next, take each figure with tweezers and carefully roll it in grains of sand on both sides.
Tip: if you haven’t had time to decorate your crafts with sparkles, grease them with PVA glue and cover them with glitter.
To make a hanging decoration, string the toys on craft thread or lurex cord. In addition, by gluing crafts to threads and tying them to a hoop or other ring, you can make a round garland (mobile). This craft will be great fun for children and a unique gift for a loved one.
Watch how to make such a craft from glue in the video:
Slicker glove (Furminator) for a cat
Combing a cat's fur is a thankless task, and if your pet could talk, he would certainly say a few kind words to you for annoyingly manipulating a strange object. However, if you neglect this procedure, then there is a need for constant cleaning. Cleaning carpets and clothes from pet hair is long and tedious, especially since it must be done often. You can simplify the procedure for combing a mustachioed purr if you create a convenient furminator with your own hands and at home. To do this, you need a detailed description and two components:
- thick rubber glove – 1 pc.;
- electric glue gun.
It's easy to make glue; to do this, insert the rod and turn on the heat gun. Next, apply small drops of glue to the glove. They can be arranged as you like: chaotically, in a row, or in a checkerboard pattern. Wait 3-4 minutes for the glue to cool and dry. When the beads on the glove become hard, the work is complete. Test your homemade cat brush in practice: stroke your pet with it during the shedding period, while ridding it of shed fur without any extra effort.
Anti-slip shoes without pads at home - life hack
You bought your daughter or son beautiful shoes, but they slip. The unscrupulous shoe manufacturer did not worry about the main thing - their safety. The sole turned out to be so slippery that you have to constantly catch the baby as he walks and worry that the child does not get injured. This story is familiar to many mothers. What to do if your child constantly slips in new shoes?
We recommend the fastest and simplest solution to this problem. No preliminary preparation is needed, you will need hot glue. Description of work: take slippery shoes and apply glue to the sole in the form of several transverse lines. If you want to interest your baby, use a pistol to draw an inscription or a funny picture. Additionally, you can glue rhinestones to the edges of the soles. We guarantee that in this case the boots will become the child’s favorite shoes. Wait for the glue to dry. Shoes with anti-slip coating made from hot-melt adhesive are ready.
Hot glue button
Every person sometimes suddenly needs something that is not in the house. What if you lost a button and there are no more fasteners? This problem can be easily fixed with a heat gun. Create a beautiful glue button that can be used to decorate a child’s outfit before the next matinee. To do this, prepare:
- glue gun;
- glitter (sparkles) of any color – 1 jar;
- toothpick – 1 pc.
The manufacturing process is simple and consists of only four steps.
- Scatter the glitter onto a cutting board, then use a plastic drink lid to gather it into a circle.
- Heat the glue in the gun and fill the glitter circle with it.
- While the craft is still wet, sprinkle a small amount of glitter on top of the glue.
- After the glue mixture has dried, take a toothpick or gypsy needle and poke holes in the button. Your button is ready.
Hot glue vase
This original vase will dilute the restrained design of the apartment and refresh any interior. As a bright accent, a handicraft item will attract the attention of every guest in your home. To make a candy bowl with your own hands, prepare:
- baking parchment – 1 sheet;
- spray paint for decoration;
- deep glass container – 1 pc.;
- hot glue gun;
- hand cream.
Step-by-step manufacturing instructions:
- Cover the surface with parchment and place a glass bowl there upside down. Coat the outside of the container with cream.
- Turn on the glue gun and wait for the glue to heat up.
- To make the bottom of the craft stable, apply glue in a continuous layer of the same thickness. If desired, the bottom of the product can be made shaped, but in this case, nothing heavier than candy should be placed in it.
- Now you need to decide on the design. Show your imagination and draw your own unique ornament, or use the drawings that we have prepared (see above).
- Start from the base of the craft: carefully draw the selected pattern.
- When the glue is finished, wait until it dries completely. It is impossible to predict the exact hardening time, since it depends on the quality and properties of the rod used.
- The craft has cooled and dried, thanks to the cream it can be easily removed. Grab the edges of the vase and slowly release it from the container.
- So, the almost finished product needs to be given color. To do this, paint over the craft with spray paint.
The glue vase is ready. This method is suitable for making a candlestick and a candy bowl, a stand for pens and pencils. The vase can be placed on a light bulb as a lampshade, creating a cozy and romantic mood in the room.
Before you get started, we recommend watching a video on how to make a vase from hot glue.
Extension technology step by step
The presented instructions tell you how to do nail extensions using classic (disposable) tips:
Your manicure on tips is ready!
@seeyour.nails
Hot glue bracelet
For an adorable hot melt glue bracelet, making glue is quick and easy. This craft will not leave your daughter indifferent and will be a wonderful gift even for an adult girl. Prepare:
- empty tin for drink;
- hot glue;
- materials for decoration - stones, sequins, sparkles, bouillons, rhinestones, beads, liquid pearls to choose from.
Follow the complete manufacturing instructions to ensure the craft is a success. First, heat the glue in the gun. Lubricate the surface of the jar with sunflower oil to prevent the glue from sticking, then apply several horizontal rings parallel to each other. Don't overdo it: the number of strips and the gap between them determine the width of the finished product. Use a heat gun to fasten the horizontal rings together by drawing vertical or zigzag lines, and additionally wrap a colored thread around the can. While the craft is still warm, decorate it with the prepared decorations. You can also use a can of spray paint to give your decoration the color you want.
When the work is finished, wait until the glue cools and hardens, then very carefully remove the craft from the container. This product will take one of the first places in the list of your best crafts.
Hot glue crafts: butterfly
A cute decoration will decorate a pot of flowers, tulle curtains, lampshades of table lamps and many other home furnishings. If you attach a winged beauty made of hot glue to a magnet, it will become a bright accent on the refrigerator. Glue the decoration to the tip of a child's pencil and your child will be delighted with the unique innovation. To make this decor with hot glue, you will need:
- glue gun;
- glass;
- wire or unnecessary hairpins;
- hand cream;
- sequins, rhinestones.
Decide on a work surface; it would be wiser to choose a kitchen table. Lubricate the glass with cream for easy removal of finished crafts. Before you start, you need to make some glue. Heat the hot glue stick, then draw each part separately. First, draw the body - it should be solid, then the antennae. Outline the contours of the wings, then fill the void with diagonal lines. Choose the pattern yourself: vertical or horizontal lines, as well as wavy ones, are suitable. The main thing is to fill and fasten the contours of the wings so that they do not change shape in the future.
Don’t waste time, make several of these decorations at once. When the crafts have frozen, carefully remove them from the glass. Glue all the parts together, then secure the bodies with pins or wire. Decorate the products with sequins and rhinestones, if desired, paint them with nail polish or acrylic paint. The best crafts created at home are ready.
We recommend watching a video on how to make a butterfly from hot glue at home:
Let's sum it up
There are many recipes for making DIY hot glue crafts. This is a limitless storehouse for human imagination. Decorations made from hot melt adhesive can also serve as toys; making them will lift the spirits of the whole family and provide an excellent reason to spend time together with benefit and pleasure. Follow the advice in the article and go for it - we wish you fresh solutions for creativity, inspiration and success!