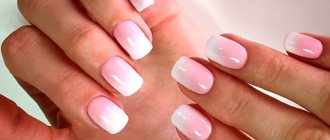
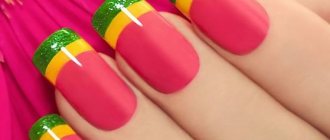
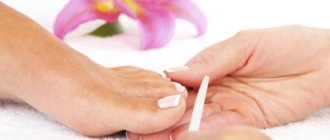
What is hardware manicure
Hardware manicure is one of the methods of nail care that is rapidly gaining popularity, and more and more women prefer it. It was invented not so long ago in Germany by beauty salon masters. It is based on a method of caring for nail plates without the use of cutting tools (or with partial use).
Principle of operation
The essence of this method is to remove the cuticle with a milling cutter. Afterwards, using various types of attachments, the nail plate is thoroughly polished, and the skin along the contour of the nail is removed. Hardware manicure is classified as a class of gentle nail procedures, which are recommended to be done no more than once every 2 weeks.
It is strictly forbidden to use the device on wet skin, since the cutter operating at high speed will begin to tear the skin steamed in hot water instead of cleaning it.
A technician with little experience may not be able to control the pressure and, pressing the attachment too hard, will scratch the nail and leave grooves on the surface. The same problem applies to beginners who decide to purchase a similar device for home nail treatment. In both cases, you should be extremely careful and calmly gain experience.
Hardware manicure is a good choice if the cuticle grows too quickly or the nail plate becomes layered with unevenness and ribbing.
It is also recommended to perform it on extended nails for gentle care.
The impact of such a procedure is hardly noticeable on neglected nails and is not at all related to the quality of the attachments. In such cases, manicurists use combined solutions, first treating the nail plates with a machine, and then completing the process with cutting devices.
Requirements for the treated surface
For owners or future owners of the device, you need to know what the surface of the nail should be during treatment.
The hardware procedure should be carried out exclusively on dry nails. Even very well wiped nails should no longer be treated with a tool after washing your hands, as they absorb moisture very quickly. When working due to moisture, such nails will begin to heat up, which will cause, at best, unpleasant sensations or lead to damage to the nail.
If the device has a system for manually adjusting the number of revolutions, a beginner should not set the speed too high or too low. In the first case, you can accidentally damage the nail, in the second, it can lead to heating of the plate, even if it is perfectly dry. An acceptable option would be no more than 10,000 rpm.
Benefits of hardware manicure
Once you pay a large sum and purchase the device, you can forget about expensive hand care products and tools forever. Working with nails becomes safe, eliminates the risk of injury, makes the procedure painless and allows you to simultaneously work with both the cuticle and the nail. Also, with timely sterilization of attachments, the chance of infection after treatment disappears.
Hardware manicure (training for beginners helps to learn the basics of safe nail adjustments) provides the opportunity to process even very fragile and thin nail plates without risk and takes less time than working with hand tools, helping to quickly change the length and shape of the nail.
All these advantages, despite the presence of a list of some contraindications, allow you to treat problem nails with this method.
Disadvantages of hardware manicure
The hardware method has its drawbacks, such as mandatory training, even if a beginner is going to carry out the procedures at home. After all, for efficient and trouble-free work, you need to choose the right nozzle and its speed for processing each individual area.
The lack of professionalism of the master can turn an initially useful procedure into a painful horror, especially when it comes to treating nails for a person with a thin nail plate. It is best for such people to contact professionals with extensive experience in this field.
How to properly do a hardware manicure at home
Attention: To treat your own nails, it will be enough to read the step-by-step description of the hardware method on the Internet and watch the corresponding video materials intended for training beginners. However, if you plan to serve clients, you should complete professional courses where they will tell you about the secrets and intricacies of this procedure.
Hardware manicure for beginners step by step
Apply disinfectant solution to your hands.
We give the free edge of the nail plate the desired shape with a file with an abrasiveness of 180 grit.
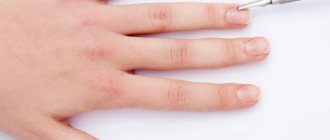
Before doing a hardware manicure, carefully push back the cuticle using a pusher or a wooden stick (the second method is more delicate).
We remove the pterygium and lift the cuticle using a cone-shaped cutter with a rounded tip.
Important: The nozzle must be positioned parallel to the nail plate so as not to accidentally make a cut.
We work in reverse. When moving the cutter to the right, move your hand to the left and vice versa. Correctly performing a manicure involves first treating one side of the nail on all ten fingers and only then, after switching the cutter, the other.
At the same time, we grind the side rollers.
Manicure for beginners at this stage is optimally done at 15 - 17 thousand rpm.
We thin the cuticle with a spherical bur, d 1.2 mm.
Important: Hold the cutter perpendicular to the nail plate. We move the ball only along the skin so as not to leave scratches. It is very important, when going through the sinus, not to change the position of the cutter, following the shape of the nail, otherwise you can snag and tear the cuticle skin. We guide the nozzle all the time in one direction, turning not it, but the finger.
We cut the cuticle with a round bur, d 3.0 mm, with fine abrasiveness. Here you need to move parallel to the nail, repeating the shape of the hole. We work at 17 thousand rpm.
Important: do not hold the ball at one point for more than 5 seconds. Even if the desired result was not achieved, it is necessary to move to another area to avoid overheating of the skin.
Using a rough grinder, we process the nail plate for a decorative coating. You can replace the cutter with a buff with the same abrasiveness.
Use a gray polisher to go over the skin adjacent to the nail. The rotation speed of the cutter should be no more than 7 thousand rpm. We work only with the tip of the polisher, making light pushing movements and moving along the cuticle growth zone.
Using oil with regenerating properties, we nourish the nails and, at the same time, remove sawdust from them. Remove excess with a napkin.
The main mistakes in performing a manicure
- Careless attitude towards the router and other working tools. Poor quality, poorly cleaned of sawdust, undisinfected attachments can lead to problems with nails and skin of the hands.
- High speed. While we are just undergoing training in hardware manicure, we cannot work at high speeds, this is fraught with injuries.
- Incorrectly selected cutters when removing pterygium. “Bullet” and “flame”, loved by many beginners, do not open the cuticle enough and also leave cuts on the nail.
- Working with a polisher. Do not hold the cutter in one place for more than 1 second or bring it close to the edge of the nail.
- Incorrectly selected abrasiveness. Nozzles with blue markings are suitable for coarse cuticles, while those with red markings are only suitable for thin or weakened cuticles.
- Continuous operation of the device. It is necessary to stop every 6 - 8 minutes to allow it to overheat.
- Cuticle remover oil should not be applied before the procedure, as its effectiveness will not increase, but will decrease.
Nails after a hardware manicure should be ideal in shape and retain their original appearance for a long time.
Contraindications to the procedure
It is not permissible to perform a hardware manicure on the nails of a woman suffering from one of the following ailments:
- The cuticles are inflamed and swollen;
- The skin next to the nail has damage (scratches, wounds);
- The nail is affected by a fungal infection;
- The cuticle is too thin;
- Microvessels are located too close to the cuticle;
- Severely deformed nail plates also cannot be treated with the device.
Don't miss the most popular article in the section: How to draw monograms on nails step by step for beginners. Instructions with photos.
Hardware manicure: tips, warnings and contraindications
- Before starting work, make sure that the device is in working order, is plugged in, and that all attachments are well secured and disinfected.
- Carry out manipulations only on dry hands .
- The router handle must be held correctly in relation to the nail - at an angle of 45º . Movements should be directed from the center to the right or left.
- Do not immediately turn on the machine at the maximum number of revolutions per minute, you must first master the skill and virtuosity. Then the procedure will only take you a few minutes.
- Let the device rest after every 5 - 7 minutes of operation, even if the instructions indicate that the machine can work for quite a long time without turning off. This way you will significantly increase its service life.
- Do not press the handle too hard on the skin ; it is better to replace the nozzle with a coarser one or add speed. Otherwise, you risk injuring yourself or bending the handle head - the most common failure of the device.
If you still have questions about the hardware manicure procedure, the master will answer them:
So, hardware manicure is a new word in the modern beauty industry. Today it is available to every woman who cares about the beauty of her hands. A simple and effective procedure is no longer exclusively a salon procedure: household manicure machines are designed for use at home and are quite easy to use.
More interesting articles:
Preparing for a manicure
Hardware manicure starts in another 30 minutes. before starting to work on your nails. The client's hands should be washed well with soap and then allowed time to dry completely.
During the training period, beginners need to learn that before starting the procedure, all elements involved in it must be disinfected. This applies to manicure tools, hardware attachments, skin and nails on the hands of the client and the master. Antiseptic solutions or regular medical alcohol are good for this.
After this, the nails are degreased. If there is old varnish, it is removed with a special solution (preferably not containing acetone compounds). A softening agent is applied to the cuticle of the nail, after which it remains to wait for its effect.
General rules
A proper hardware manicure, the master class for which is shown in the video, is performed strictly on dry fingernails. Otherwise, you risk not only ruining the cutters, but also harming both your nails and the skin of your hands. Also, such processing will not be effective enough.
Before or after using cutters, they must be disinfected. Although such a manicure does not involve injury, there is still a risk of infection, although very low. Therefore, the device must undergo antibacterial treatment, especially if you do not use it alone.
The cutter must be held strictly parallel to the nail. Although its operating principle is such that delamination of the nail is practically impossible, you should still move it in the direction opposite to the direction of rotation of the cutter. As the hardware manicure lessons presented in the video show, this method of work is the safest for plates. You also need to carefully ensure that the processing is carried out with the side of the cutter, and not its tip, as this will cause scratches on the nail.
https://youtu.be/fzOht6pCK7o
Hardware cuticle processing technique: step-by-step instructions for beginners
When performing a hardware procedure, you should first adhere to the following list of rules:
- After the softening agent has taken effect, you should immediately begin treating the skin and cuticle. A diamond bit is best for this. The main thing is to listen to the client if he feels discomfort, pain or heating of the nail.
- Once the skin treatment is completed, you should switch to maintaining the nail itself to give it the desired shape. To do this, the nozzle changes to trapezoidal or cylindrical. It is important to ensure that the length of the remaining nail is not less than 2mm.
- The most difficult stage for beginners in hardware manicure is polishing. The edge of the polishing attachment does not come close to the nail plate. The difficulty of performing this work is compensated by its speed, since its important part is the rule - the device does not linger at each point for more than one second.
Polishing the edge of the nail is the most difficult stage in hardware manicure for beginners. - The final stage of the entire procedure is the application of nourishing oils to obtain ideal care. Apart from its cosmetic and medicinal purposes, the nourishing oil also helps get rid of skin and nail particles.
Cutters for hardware manicure: types
The hardware type of manicure is replete with a variety of cutters, which are not limited only to the difference in abrasiveness. Quite important parameters are the limitation of operating revolutions per minute and differences in tip diameter.
Depending on their purpose, all nozzles are divided into three large groups:
- Attachments for working with the shape of the nail plate and for filing it.
- Attachments for grinding the surface of the nail and cutting it.
- Attachments for final polishing work to make the surface shiny.
Also, these groups have their own divisions of attachments with other features.
What cutters are needed for hardware manicure:
Ceramic tips
Hardware manicure (training for beginners involves starting practice with a ceramic type of attachment) involves removing the old coating, for which the most common attachment among nail service salon workers is ideal. It is called “corn” because it has a characteristic appearance.
Its purpose is high-quality and painless removal of gel polish (there is a version of the attachment for left-handers).
Also on the list of popular attachments is the “carrot”, which has received recognition for the quality of nail polishing.
The main purpose of ceramic attachments is to treat the nail and the skin around it.
Such attachments have an inherent hardness indicator, which is marked with special colors on the rim under the main working surface.
Correspondence of color to cutter rigidity indicator:
- Pink or blue color – fine-grained cutter.
- White – a cutter with a medium grain size.
- Black – coarse grain.
The first type from the list is well suited for soft treatment of the skin along the contour of the nail plate. The second one will serve for removing pterygium and gently removing gel polish. The latter is designed to remove keratinized areas of the skin or calluses. Such attachments should be stored carefully so that they are not subject to harmful mechanical influences.
Diamond bits
Diamond bits are an important tool, divided into many types according to the shape of the product and its abrasiveness. Typically they consist of a steel rod coated with a diamond coating (natural or artificial).
Just as in the case of ceramic cutters, abrasiveness can be determined by the color of the rim:
- Yellow color is the smallest crumb, no more than 15 microns.
- Red color – small crumbs, from 30 to 50 microns.
- Blue – medium crumb, from 90 to 125 microns.
- Green – slightly coarser than average, from 125 to 181 microns.
- Black – large grains, within 300 microns.
- Two black marks are very large grains, around 500 µm.
Rare are diamond attachments with white or three black marks, the so-called grinder cutters, which simultaneously serve as a polishing tool. Scarce. Designed to remove heavily keratinized skin areas and thick layers of gel.
The successful outcome when cutting off gel polish depends on abrasiveness. Diamond cutters with green or red notches, made in Germany, are in great demand. It is believed that they are of the highest quality in execution. But there is an analogue made in Russia.
Metal nozzles
Metal cutters, unlike diamond ones, have a lower price, although they are used for the same purposes. Usually made from alloys of carbide and tungsten - medical steel. Among the features of steel cutters, one can note the patterns (notches) on the working surface. They can be straight, oblique or spiral.
Such attachments are well suited for removing dead skin, and not with dust, as usual, but with shavings. It is noteworthy that among the models of steel cutters there is a version made in a “corn” shape, which is used for removing old gel polish.
Silicone tips
Silicone nozzles belong to the group of polishing nozzles suitable for both artificial and natural nails. Adding shine to the nail plate can be achieved precisely by using these attachments.
They have divisions according to abrasiveness, which is determined by touch: from almost smooth to rough options for grinding. They are made of silicone interspersed with abrasive particles.
Manicure technology using a router
For each stage of processing, several attachments are offered and craftsmen choose the most convenient options for the job. Without practice, it is difficult to understand what action each cutter has, so it is better to purchase sets of attachments equipped with different models. Watch videos of different masters to get an idea of what cutters to use at each stage of the procedure:
First stage
At home, before the procedure, you need to wash your hands and treat them with an antiseptic. Regular pharmaceutical products such as chlorhexidine are quite suitable. You can use a degreaser. At the preparation stage, it is advisable to remove the varnish coating; if it is acrylic, then certain attachments are used.
Second phase
The cuticle is pushed back with an orange stick or a metal scraper or a pusher in the form of a spatula. Here it is important to make a gap between the nail plate and the edge of the cuticle, so that during further processing it will not touch and not cut through the nail. There is no need to clean out the subcutaneous cavity.
Editor's choice: Forms for nail extensions: varieties, materials and modeling technologies
Grinding is carried out only on a dry plate. For primary processing, you need a cutter in the form of a cone or a needle-shaped attachment. The position of the cutter should always be parallel to the surface of the nail; a perpendicular position will injure the nail plate. The handle of the router always lies freely in the hand of the master in a horizontal position. In the video you can see the details of the processing by the device:
An overview of the attachments will help you understand the variety of tools.
Using a fine abrasive attachment, the cuticle is polished using the rollers, and the cuticle is raised without pressing the router handle. Movements are smooth from right to left. It is important to ensure that the rotational movements of the nozzle are against the direction of the working hand. Application of the nozzle - with the entire side surface to the skin, the tip is used to remove burrs, calluses, and cracks. In the video, the master explains the correct direction of the cutter and switching reverse, and also explains in detail the most common mistakes. When processing from left to right, the reverse changes! This video also shows how to change attachments and at what power it is better to start working.
Third stage
After cleaning the pockets of the side rollers and the sinuses of the cutila, you need to remove all dead cells. For this purpose, spherical, cylindrical, trapezoidal, and bullet-shaped shapes with fine abrasiveness are used. The recommendations of specialists must be taken into account, but the more convenient it is to perform each operation with a specific attachment, the better the result will be.
Editor's choice: Nail primer: what is it for?
The final touches are polishing the treated area, for which silicone or plastic nozzles are suitable, but many manicurists use fine abrasive diamond cutters with a red and yellow marker at this stage.
After all manipulations with the router, dust and skin residues are cleaned off with a brush and the cuticle is moistened with oil or wax.
Toolbox processing
Tools and attachments should be cleaned after each use. The cutters are washed with water, and at the same time, particles of skin are removed from them using a brass brush.
Cleaning in an ultrasonic sterilizer is also a good option. It works on the principle of purification by vibration, which causes the liquid to vibrate. Microbubbles formed as a result of such exposure explode, clearing dirt from hard-to-reach places on the instrument.
Instruments are treated with antiseptic solutions or sterilized in special cabinets, for example, in a dry heater.
All instruments made of solid materials are placed in it, after which they are heat treated in an environment with a temperature of 180 ᵒC for 30 minutes, then removed and placed in sterile containers with a sealed lid.
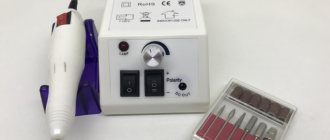
Criteria for choosing devices for manicure
Hardware manicure (training for novice specialists sometimes takes place on a self-purchased device) is closely related to understanding the criteria for choosing a device.
The first one is power. For personal use, you don’t need a very powerful milling cutter, so you should pay attention to models with a stated power of at least 35, but not more than 50 W. However, if the specialists are visited by at least 5 clients every day, then you should pay attention to models with a power of 100 watts or more to reduce the procedure time.
The second is the number of revolutions. Models with up to 20,000 rpm. suitable for home use. If the number of clients is more than 5 people per day, you should choose a device operating at 35,000 rpm. and more. In cases of professional manicure, the machine must have a speed of 45,000 rpm.
The next criterion will be the provided cutters included in the package. It is very good if the device is equipped with a starting list of basic attachments.
In the best case, you need to include among them:
- For treating rollers and cuticles.
- Nozzles for grinding work.
- Nozzles for polishing the nail plate.
- Attachments for working with keratinized skin.
The devices also differ in the method of clamping the nozzle. There are 3 types in total:
- manual;
- semi-automatic;
- auto.
Inexpensive models for home use use a manual clamp that secures the working part of the tool when tightening the washer. A more expensive device will be equipped with a semi-automatic method of fixing the nozzle when the lever is tightened. And the most expensive devices come with an automatic clamping system that locks the nozzle immediately after its installation.
Working tools for performing hardware manicure are equipped with a brushed or brushless motor. The difference is that a brushed motor is designed to last for several hundred hours, while a brushless motor lasts for several thousand.
A machine with a brushless motor will cost more, but it is quieter than its counterpart with a brushed motor, and is distinguished by the quality and durability of its design. Devices with a commutator motor, despite their shortcomings, can handle a home manicure quite well.
The last selection criterion is related to the fine dust released during operation of the machine. To reduce its amount, you can choose a model of the device with a vacuum cleaner built into the countertop, equipped with a retractable tray for quickly cleaning the filter from accumulated sawdust. If a vacuum cleaner is not provided at all, you can purchase it separately complete with a stand, dust collector and filter.
Types of devices for nail and hand skin care
At home, an amateur or semi-professional device is more suitable for high-quality manicure. The shape and large size of the cutters in such a set reduce the risk of damage. It is recommended to purchase a professional manicure machine only if you have the necessary skills and experience.
As an example for comparative analysis, we can take machines from two companies: Vitek and Strong. The latest manicure device has established itself as a professional model. The set includes cutters for manicure, which can be replaced with additional attachments after wear. The professional Strong device has more power compared to the amateur model.
The Vitek machine is a less expensive option. A correctly selected model will make a hardware manicure a pleasant and quite effective procedure. The machine will do an excellent job with cuticles, but due to its low power it will not be able to clean areas of the skin that are too rough. The hardware manicure set can be equipped with a nail dryer and bath. We invite you to watch a short video. Beauty blogger Galina will tell and show which home manicure machine she purchased for personal use.
Review of popular devices for home use
Hardware manicure (training for beginners is also accompanied by the choice of the first device) cannot be done efficiently without a convenient tool. When choosing, they take into account in which room it will be produced and how the device will be used.
There is no need to spend money on expensive equipment if you have to do a manicure on yourself at home.
| Name _ | Production | Description | Advantages | Flaws | Average cost in Russia |
| RUNAIL PM-25000 | Russia (Assembled in China) | Inexpensive model ideal for home use. |
|
| 4500 rub. |
| TNL MP-68 | South Korea | Rich functionality for little money. Set includes 4 cutters. |
|
| 4300 rub. |
| IRISK JD-400 | USA (Assembled in China) | Bidirectional rotation mechanism with good power for modest money. |
|
| 5500 rub. |
| SCARLET MS95006 | China | A completely budget option for the simplest nail work. |
| Unsuitable for serious manipulations with the nail plate. | 700 rub. |
| VITEK VT-2201 VT | China | Cheap set for home nail care. |
|
| 2000 rub. |
| STRONG 90N 102 | South Korea | A good quality device in the mid-price segment, suitable for all types of manicure work. |
| The kit does not include attachments. | 17,000 rub. |
Don't miss the most popular article in the section: How to extend nails with gel polish. Nail extension instructions for beginners. Photo.
What videos with master classes will help even a beginner get the perfect manicure?
To learn how to do a hardware manicure correctly, you should start with simple lessons that can be learned from video content with training for beginners. For example, Nadezhda Primak provides comprehensive information about hardware manicure on her official channel or during broadcasts on Periscope.
Olga Zyablova and Tatyana Shestakova show how to properly apply varnish and use artistic techniques in manicure. On the Kasya Nail Club channel, the presenter, Evgenia Isay, shows in close-up and talks in detail about working with a manicure machine, and about adjusting the result with cutting tools.
Author of the article: Fierce Oga
Article design: Svetlana Ovsyanikova
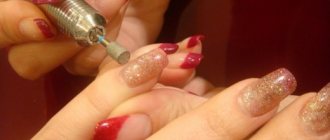
How is nail treatment done using the device?
Treat the surface of the skin with an antiseptic and, if necessary, with a degreaser. To perform hardware manicure both at home and in the salon, special attachments are used. The cutters can be ceramic, carbide, or diamond-coated. To get a truly high-quality manicure, choose a device with a high number of revolutions.
Step 1
Shape your nails using a nail file. If desired, use a special disc cutter that can be supplied with the manicure machine.
Step 2
If the cuticles and side ridges are not very rough, clean them with a ceramic cone-shaped nozzle. When doing a hardware manicure, you should not press the cutter too hard against the skin and move it along the nail plate ! Moving from left to right, in the direction of rotation of the nozzle, lift and move the skin to the base of the nail, as in the photo.
Apply the cutter at an angle of 45° and move it along the nail, without stopping in one place. The rotation speed of the nozzle is no more than 5000 rpm. To learn how to do a hardware manicure at home correctly, practice without the motor running.
Step 3
Next, remove the cuticle by moving the nozzle in the opposite direction, from right to left. The cutter should now be almost completely adjacent to the skin. To ensure a neat hardware manicure, try to fix your working hand. Any careless movement and the machine will leave behind ugly cuts. Remove dust periodically to see the results of your work.
Step 4
A manicure machine is usually equipped with a spherical diamond nozzle, which is very convenient for cleaning the nail sinuses. Thanks to its special coating, the cutter can easily cope with rough areas of the skin, so it can also be used at the initial stage. The nozzle slides along the surface against its movement.
Step 5
Continue doing a hardware manicure using an egg-shaped cutter, as in the photo. Thanks to its fine abrasiveness and convenient shape, the nozzle perfectly cleans the remains of the pterygium and grinds the proximal and lateral ridges.
Step 6
To work with particularly rough areas of the skin on your hands, such as calluses, use a drum-shaped manicure attachment. Unlike the above-mentioned cutters, in this case the motor rotation speed should not exceed 2000 rpm . This is important because the manicure machine can cause significant harm to the skin. When working, the nozzle should only slightly touch the surface. A cutter with coarse abrasiveness allows you to create a neat manicure even on the rough skin of men's hands.
Step 7
To complete the hardware version of nail treatment, polish using a felt cutter. By the way, if you prefer a classic manicure, a similar attachment can also be used for final polishing. It will perfectly remove yellowish nails and get rid of pterygium particles.
For a visual representation of hardware manicure technology, watch a video lesson from a professional master. After watching the video you will have no questions left. You may find it helpful to write down some points. The video lesson is quite long, but the benefits from it are undeniable!
Now you know how to do a hardware manicure correctly and painlessly. Be patient, and after the procedure your hands will sparkle, like in the photo from the cover of glossy magazines. You can perform hardware care yourself, and our final video lesson confirms this. For a change, we have prepared a video in which a man does a manicure. In the video, master Roman, using a professional device, will give you lessons on how to process short nails. Enjoy watching!