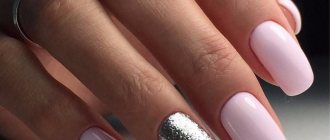
A stylish look also means having a beautiful manicure. There are many techniques that make it very easy for beginners to master gel polish design. This technique includes patterns on nails with a needle. Schemes of such nail art can be easily found on the Internet to master its creation step by step. Therefore, always start by studying the diagrams.
Drawings on nails with a needle
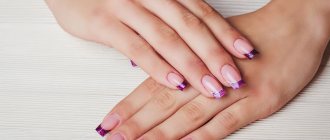
A manicure can set the tone for the entire image. It’s so easy to diversify your look, causing everyone’s admiration. The most important manifestation of such a manicure is a thoughtful pattern. Just how to paint your nails beautifully, where to get inspiration? In fact, learning how to draw with a needle step by step is very simple.
For a manicure at home you will need the following materials:
- different colored nail polish;
- primer, base, top;
- needles of different diameters (can be replaced with a toothpick, dots would also be a good alternative).
With a thinner needle you can make the curls of the pattern more graceful. But you will also need a thick needle, which can be replaced with a dots needle. With its help you can make a beautiful flower or other large element on your nail.
It is better to start mastering the technique with conventional coloring agents. Then a primer with base and top will not be required. But clear varnish will be needed. Take nail polish remover - this way you can immediately correct unsuccessful experiments.
Of course, without skill it is inconvenient to draw with needles - they are small and thin. But you can resort to a little trick: you can insert the needle into a regular pencil or fix it in an empty pen using a plate. Then drawing will not cause you much trouble - you will draw various valves, curls and ornaments, just like with a regular pen.
You should start with abstract patterns - without experience, it will be difficult for you to recreate the same pattern on all nails. It would be a good idea to first practice on artificial tips.
How to paint flowers on nails with polish
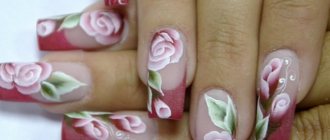
Varnish is a wonderful way to paint a variety of colors on your nails, be it cornflowers or, for example, roses. It is the nail design with roses that we will consider. Of course, you can depict flowers with paints, but we’ll talk about that next time. So, let's start creating a masterpiece with varnishes.
- Prepare red and white varnishes.
- Using a needle, carefully place 4–6 dots on the plate, alternating red and white so that they touch each other.
- Using the same needle, start mixing the colors in random order so that the outline of the rose emerges.
- Once finished, you can paint the leaves around the roses with green paint.
Here in this photo you can see what simple manicure with roses looks like. As you can see, it is very elegant and suitable for the most special occasions.
For short and long nails
Let's consider options for the simplest designs on nails with your own hands, taking into account the length of your nail plate. If you have short nails, then the main thing is not to overdo it. A minimum of patterns is the main rule of successful design! It is also better not to use large and thick ornaments - they look rather tasteless. It is better to decorate just one or two fingers on each hand with delicate thin curls.
But for long nails there are no restrictions. But you should still follow some rules:
- It is better to draw patterns on a thick layer of the base coating.
- Start with simple shapes. These include: stains, twigs, peas, leaves, roses, stars, butterflies.
- Usually done on a single-color coating, but you can experiment. For example, you can divide the space of the nail with two shades of polish, applying a different pattern to each half.
- The drawing should start from the little finger, then you will prevent the shape from breaking.
- Create shallow strokes when you draw specific images.
- You can only draw on the ring finger - this technique is very popular now.
- Additionally, if desired, any design can be decorated with stickers, decorative ribbons, and sparkles.
Simple beautiful patterns in 10 minutes
Beginning craftswomen should start with the simplest patterns. They allow you to create original designs on your nails with polish and a needle in a minimum amount of time.
On the Internet you can find many schemes that do not require much experience, but are extremely effective for creating a stunning manicure. For example, by painting the sides of the nail with two contrasting varnishes and making zigzag movements with a needle in the center, you can get a unique stylish design similar to a “water” manicure.
It is important to know! To create the most beautiful patterns, a fairly thick layer of varnish is required. As a result, the coating may take longer to dry.
To speed up the drying process, you should use a special top-end product, which can be purchased at any cosmetic store. The topcoat will also extend the life of the manicure.
Drawing technique
There are two main techniques for applying images with needles:
- Dry . Apply drops of varnish to the already dry varnish, creating beautiful stains on the surface using a needle.
- Wet . Apply the drops directly to the wet varnish, quickly using the needle.
Of course, the first technique is preferable for beginners due to its simplicity. But in the case of the wet version, you need to have time to create a certain pattern before the varnish dries. In the case of gel polishes, the task is simplified - they will not dry without a special lamp.
The application scheme is very simple. Apply drops of varnish of the desired color to the main background. Start moving the needle from the middle of the drop beyond it, drawing some kind of pattern. In this way you can create circles, lines, figures of eight, flowers, leaves. You can paint with several colors of varnish at once - this way the result will be more impressive.
Floral nail design ideas and execution
There are certain popular flowers that are usually depicted in manicure. One of them will surely brighten up your look too!
Lilies on nails
How can you depict these beautiful flowers with your own hands? So, let's draw lilies on our nails !
- First, coat your nail with a base polish.
- Draw a five-pointed flower, shaped like a star. Use a light varnish - white or pale pink, pale yellow.
- Outline the petals with a darker outline.
- Draw stamens in the middle by applying several dots of light varnish using a dot. Play with shadows, creating thin strokes inside the petals.
- Cover the lilies with topcoat once completely dry! The result should look something like this.
Photo: lilies on nails.
Another way:
Manicure with poppies
Poppies are one of the favorite flowers to display on the plate. We will describe step by step how to create this masterpiece on your nails!
- On the prepared and varnished plates, use a brush to paint several red petals.
- Take a little black varnish on a dots or needle and draw thin black lines and the black core of the flower.
- Use white polish to create shadows and droplets on your poppy. Cover with top coat and you're done! This is what nails you should end up with.
Wonderful master class:
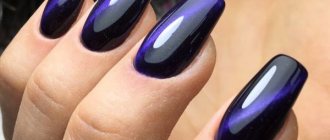
Drawing on gel polish
If you have artistic skill, then you can create real works of art on your nails. With the help of gel polish, the resulting manicure will delight you for a very long time - up to three weeks. Consider the option of creating a manicure using a varnish strip and a needle.
- Prepare your nails thoroughly - this is the key to wearing gel polish for a long time. To do this, remove the cuticle, process the side ridges, and give the nails the desired shape. Sand the surface of the plates using a buff.
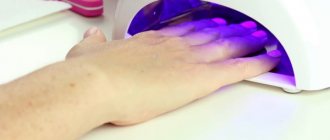
- Apply primer for better adhesion, followed by base. Dry in a lamp. In a UV lamp, the base layer dries for two minutes; in an LED lamp, half a minute is enough.
- Next, apply a layer of colored varnish and dry. It is always better to apply gel polish in two layers - this way the color turns out more saturated. But at the same time, the layers should be very thin, do not put a lot of varnish on the brush. The manicure will also be more neat; it will be easier to apply the polish as close to the cuticle line as possible.
- In the middle of the nail, draw a stripe in a contrasting color or simply apply stripes of dots. After this, do not dry the varnish, but immediately proceed to painting.
- Use a needle to make wave-like movements from the center of the strip beyond its outline. Repeat these steps on the other side of the strip. Complete the resulting pattern with small chaotic dots that can be applied with dots.
- If you are satisfied with the result, dry it safely in a lamp. If not, remove the layer of wet varnish and try again.
- Don’t forget to secure the finished result with a finishing coat and seal the loose ends well - this will guarantee that in just a few days there will be no chips or cracks in your manicure.
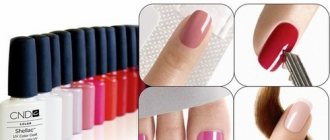
Necessary tools and materials
First of all, you need to decide on the color of the varnish and choose a needle. You can use either a sewing one or one purchased at a professional store for manicurists - it has a long, comfortable handle. In principle, you can use an ordinary pencil with a needle inserted as a tool.
as a tool you can take a regular pencil with a needle inserted
The main thing is the thin tip, which can be used to draw elegant patterns. In addition, you should take care of purchasing:
- 2 or 3 fresh varnishes. Excessive thickness, which appears over time, can reduce the entire holiday manicure to zero. The ideal option would be when the varnishes belong to the same manufacturer. They have a similar composition, which ensures perfect mixing during the application process.
- Base and top (final) coating. The first will help protect your nails from accidental damage while drawing with a needle, while the second will speed up the drying time.
- Special proofreader. If the varnish goes beyond the edges of the hole, the corrector will be able to quickly correct the situation.
Note!
- Before realizing your fantasies directly on your nails, you should practice on other materials . Glass or tiles work great. The main secret to successfully applying a pattern is speed and attentiveness. Only thanks to the “wet”, not dry surface, designs on nails with varnish and a needle are ideally beautiful.
- You should carefully monitor the movements of the needle , because it is quite easy to damage the nail plate, but it will take a long time to restore the health of your nails.
- Smooth yet clear patterns require some skill . The needle should be at an angle of 90⁰ relative to the nail - only in this case the pattern on the varnish will be perfect and will appeal to even the most demanding fashionistas.
- Do not forget to regularly wipe the tip of the needle with nail polish remover - this will help avoid the appearance of lumps that can completely ruin the entire composition.
Adviсe
To have beautiful nails, visiting a nail salon is not necessary. Master the art of nail art at home and please yourself with beautiful and well-groomed hands regularly at no extra cost.
Just take into account a few nuances so that the resulting result never disappoints you:
- think over the design in advance, first you can recreate it on tips, and then try to transfer it to the nail; choose the colors of varnishes so that they harmonize with each other;
- movements with the needle should be light - you can damage the nail with it;
- start painting with your non-working hand so as not to leave the most difficult part for later. If this is difficult for you, then let a friend or someone else help you;
- Always seal your designs with a clear polish or top coat to ensure your manicure lasts longer.
Believe me, beautiful nails are easy! Start experimenting, use your imagination and everything will work out for you. Watch training videos or photos with a finished manicure - this will motivate and inspire you to immediately start creating masterpieces on your nails.
We create using stamps and stencils
Creating floral patterns using tools such as stamps and stencils is even easier than using additional tools. Stencils work on this principle - the design is glued onto the nail, after which those parts where there are voids are painted over with varnish. After which the adhesive base is removed, and a flower .
And here is the video!
Creating nail art using a stamp is a simple matter. Stamping is carried out in this way - the design printed on the plate is copied onto the stamp pad, after which this stamp is placed on the nail. As you can see, you don’t need to have any knowledge at all to put beautiful flowers . And here's what it looks like:
Stamping is a voluminous topic! Read: nail stamping and how to use it: photos, videos, design ideas.
Manicure technology using a needle
Any nail art is not only a creative, but also a rather delicate process. Therefore, perseverance, measuredness, attentiveness, and accuracy are your main assistants when performing the procedure. These qualities, with due desire, can be developed by any female representative. And if you also have talent, then the execution technology will not cause any trouble.
Manicure with a needle at home can be performed using two methods. Each of them has its own advantages:
- The wet method is the best option for beginners, as it is extremely simple.
Nails are covered with colored varnish. The pattern is applied immediately, no need to wait for drying. The original design is obtained by displacing the main shade from the needle with varnish. As a result, you can create a very interesting design. You can complement it with sparkles, dust or rhinestones. - Dry method. First of all, the nail plates are covered with colored varnish, which serves as the base. After waiting for it to dry, you can start decorating. Any color options are allowed - you can simply apply several dots of one shade with a large needle, then a few more of another, and do this on the first, but with a thinner needle.
You need to work with a needle carefully, easily, without excessive pressure on the nail plate. With each new action, it is better to wipe the working tool with a napkin. High speed of work is desirable in both methods, so all devices should be nearby.
Preparing for a manicure with a needle
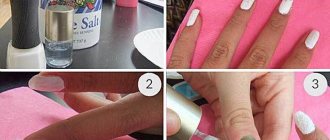
The preparatory stage, which precedes the application of the original design, involves performing a regular manicure, giving the nail plates a beautiful shape, removing or pushing back the cuticle using an orange stick.
It won’t be superfluous to degrease your nails. This will ensure good adhesion of the material to the top layer of the nail plate. Clean your hands from sawdust residue. In general, in preparation, do everything that a standard nail care routine would suggest before applying polish.
The main element that makes this manicure stand out is the needle pattern.
. In order for it to turn out well the first time on your nail, it is better to train your drawing abilities. Glass can serve as a test site. On it, using a corner or a toothpick, it’s worth trying your hand at it. When simple patterns come out well, you can move on to implementing more original ideas.
Ideas for drawings with a needle
There is no limit to the number of masterpieces that can be created using a regular sewing needle. You just need to learn how to work with varnish and iron “thorn” and come up with ideas. We suggest you start with simple ones and gradually improve your skills. Here are a few options you can try:
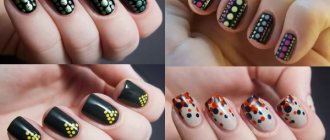
- Cover your nails with pastel-colored polish . Apply contrasting dots with a brush, and form uneven black dots around them, creating the notorious leopard pattern. You can create a zebra color by moving the needle from the center to the sides of the nail.
- Chess board. Quite an impressive and quite simple drawing. After you have coated your nails with polish of a certain shade (white, black, yellow, red or another of your choice), use a brush to apply lines of the second chosen color. Using a needle, adjust the contours of the grill so that they are even. You can also leave an empty space, drop a little varnish and direct it with a lattice to create a square or diamond.
- Flower arrangements . Floral motifs can be complemented with sparkles, multi-colored sand, rhinestones or stickers. The simplest example is to apply one drop of varnish and use a needle to shape the flower in a circular motion (if you want to make an aster or a rose). Wait until the varnish dries. Take a little varnish of a different tone with a needle and draw the leaves and core of the flower. Using this technique, you can paint lilies and other flowers that you prefer on your nails.
- Feathers . To draw a feather, apply 3 drops of varnish of different shades or tones diagonally onto the dried base color. Carefully connect them with a needle into a single blot and draw the needle diagonally from bottom to top.
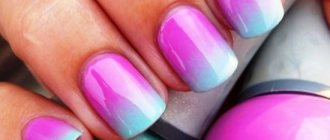
- Fiery elegy. It’s incredibly easy to create such beauty! To “light up” your nails, decide on the color of the fire and the main tone. Paint one part of the nail plate with one color, and the other with another. At the junction of the colors, give the outline of fire. It is advisable that both varnishes be thick.
- Magic dots . Apply two layers of background varnish. Immediately place 3-4 dots near the base of the nail with varnish of two different colors. Using a needle, pull the drop into an elegant curly blot. Do the same with each drop. Additionally, you can decorate your nails with rhinestones or sparkles.
- Lines and dots. Don't get hung up on complex drawings, which may not always turn out well. Think through the details and create an interesting design through dots and lines. For example, these could be hieroglyphs, ethnic motifs, the British flag, small spiders, geometric motifs, etc.
- Asterisks . Cover your nails with a uniform layer of background polish. Before the background has time to dry, apply 5-7 drops of varnish of a different color, barely touching the nail with varnish. Using a needle or toothpick, draw 5 lines from the central part of each droplet in different directions, imitating a star. Do the same manipulations with the remaining drops. Don't forget to consolidate your results.
- Cobweb. On the background layer that has not yet dried, draw a line with a needle from the upper middle of the nail plate and stretch it to the end of the nail. Make a cross line, then draw a few more lines between these lines. Connect the lines with an arc, make several arcs inside the web. Cover with clear varnish.
- Bricks. Cover your nails with brown, red, orange, black or another polish. Using silver, gold or white varnish, draw parallel stripes with a needle. Then make several vertical lines, like a brick wall. You can also make bricks on the background varnish that has not yet hardened, and then cover your nails with clear varnish.
- Butterfly wings . Prepare matte light chocolate polish, dark brown and gold polishes for nail decoration, as well as glitter polish. Apply chocolate-colored polish to your nail and while it is still wet, draw three stripes diagonally in the lower corner: gold, brown and glitter polish. From the corner of the nail to the outer edge, make wave movements along the stripes. Do these steps for all other nails.
- Loretta. Take black, white, gray matte and silver classic polishes. Apply gray varnish to the nail and before it has time to harden, make a black, silver, white and another black line. From the last line you made, draw down five times. Repeat the operation with each nail.