How to dilute thickened nail polish?
Nail polish thickens because the liquid evaporates from it. Knowing this, you can use a lot of ways to bring it back to life.
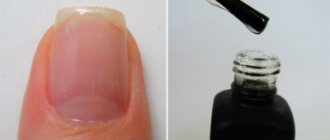
- Special product for thinning varnish. Manufacturers know that varnishes often dry out, and therefore they came up with thinners. They are sold in the same department where varnishes are sold. Instructions for use are written on them. In appearance, the thinner is a transparent liquid resembling varnish
- Add varnish without color. This method will not help save your favorite polish. But on the other hand, the colorless product will take on some of the color and can be applied to the nails
- The easiest and most affordable way is to add nail polish remover. You don't need much of it to make the varnish come to life. Unfortunately, the effect is temporary
- Heating the varnish is another easy way. To do this, heat the water until hot and place the varnish in it for 10-15 minutes. After this, the varnish can be used again
- Paint thinner. It would be useful to remind you that paint thinner is a strong chemical and is not very beneficial for nails and skin. However, if there is no other way out, the varnish can be diluted with it.
Ways to thin nail polish
Shellac coating of wood
Before applying a decorative coating, the wood must be properly prepared . In this case, the surfaces are sanded with sandpaper No. 220 - 240. The darker the color of the shellac solution, the more thorough the sanding should be, because this varnish, like stain, accumulates in the smallest recesses and highlights all scratches and defects.
Application with a swab
Error-free and precise application of 12% or 18% shellac is possible using a cloth swab . Moreover, the thickness of each layer applied in this way is less than when applying more concentrated compositions with a brush (24-35%). This method is better suited to flat surfaces on parts before final assembly, so you don't have to worry about liquid pooling in the inside corners. To make a tampon, wrap a thick, lint-free cloth, such as an old linen napkin, around a ball of cotton wool or wool the size of a tennis ball . Then pour a little shellac polish into the middle of the tampon so that it soaks through, but does not drip.
When applying shellac, move the swab across the wood in long, parallel strokes, barely overlapping each other. Do not pass the tampon repeatedly over one area. When the tampon begins to dry out, replenish it with a new portion of the composition. And if it gets hard, add a little alcohol to soften it. After 45 minutes, lightly sand the resulting surface with 220 - 240 sandpaper. Then apply additional layers and let them dry for at least an hour before starting sanding. After applying several layers, the tampon begins to glide worse and sticks to the surface. This is due to the fact that the fresh solution partially dissolves the previous coating layer. In such cases, apply stripes with a swab one at a time, without going over the previous one. If the solution is not applied too liberally, the boundaries of the stripes on the finished surface will not be noticeable. For most jobs, applying four coats using this method is sufficient.
Application by brush
Also, a brush with thin natural bristles is suitable for this work . A high-quality brush leaves a layer of shellac on the surface, which has time to spread and level out before drying. When first encountering this type of finishing, in the initial stages use a 12% solution for the primer layer, and for subsequent layers use compositions containing 18-24% shellac.
Instead of moving the brush back and forth as you would with polyurethane, apply the shellac in one motion . Make long strokes quickly so that each of them has time to merge with the previous one before it begins to dry out. If you notice brush marks on the dry coating, dilute the composition so that the layer has time to even out before drying. Do not try to correct any omissions and continue working. This area will then be covered with the next layer. Let the first coat dry for two hours in a ventilated area before sanding it down with sandpaper. Subsequent coats should also be allowed to dry for at least two hours before any mistakes or brush marks are removed by sanding.
Final polishing of the coating
The final stage is polishing the shellac coating . To do this, level the surface by starting sanding with waterproof sandpaper No. 320, moistening it with petroleum jelly. This will help get rid of clogging. Gradually move on to finer abrasives up to #600. When changing sandpaper numbers, thoroughly clean the surface with white spirit. Continue using progressively finer abrasives to achieve a high-gloss finish, finishing with 1500-grit grit. The final step is to buff the surface with a mixture of pumice powder and petroleum jelly or automotive polish using a baize scrap board.
As a conclusion, I would like to add that using shellac for wood , you can achieve uniform tinting of species such as cherry, birch or pine. This varnish prevents the release of resinous substances onto the surface of the wood, clogging the wood pores. By adding universal concentrates, you can create multi-colored translucent coatings yourself.
What to do with dried nail polish, what to add to it?
There are many ways to restore hardened varnish. But as the saying goes: “A problem is easier to prevent than to solve.” Therefore, use these tips to keep your polish fresh longer:
- Varnish does not like cold or heat. Therefore, do not store it in the refrigerator. The common myth that polish should be kept refrigerated has ruined many of your favorite nail products.
- Also, do not leave the varnish in direct sunlight or near heating elements.
- The varnish should be stored in an upright position, in a dark and cool place.
- Shake it a little before using the product. But do not overdo it so that bubbles do not form in the varnish.
- To make the polish open easily, wipe the tip of the jar with nail polish remover after use. This will remove any remaining product and prevent the lid from sticking to the jar.
Here's how to properly use varnish thinner if it's dry:
- Add a few drops of the product to a jar of varnish and actively shake it. You can open the varnish and stir it with a brush. The procedure is carried out until the varnish is diluted
- There is no need to add a lot of solvent at once; it is better to do this in several stages. Then the consistency of the varnish will be ideal
- The solvent has a long shelf life and is suitable for varnishes of any manufacturer. It should be stored in a cool, dark place, away from hot objects and children
Varnish thinner
Reasons for drying gel polish
The main reasons why gel polish becomes too thick are:
- expiration date (if the expiration date has expired a long time ago, it is better to throw away the varnish, as the quality of the coating and, accordingly, its durability is significantly reduced). If used correctly and all stages of application technology are followed, the manicure will last about 3 weeks, that is, after a year of use, the varnish will not have time to be used up;
- the varnish was exposed for a long time. Despite the fact that gel polish particles harden only under the influence of special radiation, sometimes it can deteriorate due to the regular entry of air and dust particles into it;
- improper storage conditions - too high or too low a temperature, exposure to direct sunlight can negatively affect the quality of the varnish and its deterioration before the expiration date.
You should not use dried varnishes, as this will significantly affect the appearance and quality of the manicure:
- A thick base for gel polish may not harden well under a UV lamp and the coating will peel off, which will shorten the life of the manicure;
- A thick gel polish topcoat may increase the risk of chips and scratches on the surface;
- If the colored varnish has thickened, the shade may be unevenly distributed over the nail or roll into lumps.
Gel nail polish
Attention! You should pay attention to the fact that the shelf life of gel polish is 3-4 years, but the shelf life after opening is usually 1-2 years.
How to dilute thick gel polish?
To prevent the gel polish from thickening, it should be stored in a dark and cool place, avoid contact of the product with sunlight
There are several ways to dilute gel polish:
- Using alcohol. Regular medical alcohol is what you need to save gel polish. To begin, add a few drops of alcohol and mix it thoroughly with the varnish. If the product is not liquid enough, repeat the process.
- You can also add gel polish remover. It will naturally prevent the polymerization process. However, this method will make the gel polish less durable; it will chip off the surface of the nail.
- You can dilute the gel polish with the same color gel polish. Another way is to dilute the product with a top coat for manicure.
Thick gel polish
Ways to dilute thickened gel polish
In order to revive thickened or dried varnish, we have come up with several tricks that will help extend the life of your favorite shade and save your budget:
- If the varnish has not thickened too much and the shelf life and storage period have not exceeded the periods indicated on the package, you can hold the gel polish in hot water for a while and then shake it vigorously;
- Sometimes clots of varnish form on the brush itself. In this case, it is recommended to replace it with any other brush with synthetic bristles;
- Use a special liquid to dissolve gel polish. It is produced by some manufacturers of manicure products: Severina. It is very simple to restore gel polish using this method - just add a few drops of liquid to the tube and shake until you obtain the original consistency;
- Buy a new gel polish of a similar shade and mix some of the new polish with the old one. Just as in the case of diluting with a special liquid, it is recommended to shake until the desired consistency is obtained. If this is a base coat, you need to mix it with a new base varnish, proceed in the same way with the top varnish;
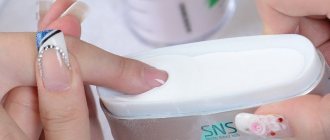
Painting nails with gel polish
Advice! Do not use products containing acetone to dilute gel polish.
As you can see, diluting thick gel polish is quite simple, but sometimes these methods do not help. In this case, it is better not to risk it and throw away the spoiled product.
Bright colors of gel polish
When applying all of the above methods, you should not forget that any intervention in the composition of the gel polish can significantly affect its properties and reduce the quality of the coating - it may not be as durable as before or the drying time under the lamp will increase significantly .
In order to avoid such situations in the future, you should continue to try to better monitor the storage and correct use of gel polishes. The best solution is to have a special box or container for storing manicure products that will prevent direct sunlight or overheating of materials.
Manicure with gel polish today is becoming a necessity to maintain the beauty and well-groomed appearance of a woman. This coating is the most durable and reliable of all previously existing ones. Professional and home craftsmen sometimes face the problem of thickening gel polish and wonder whether it is possible to revive their favorite product.
How to dilute matte nail polish?
- Matte nail polish is essentially no different from glossy polishes. Therefore, any means for diluting regular varnish are suitable for it.
- Since the matte finish is very capricious, you should not experiment. The best solution is to use a special varnish thinner
- Matte varnish quickly loses its dullness and chips. It is better to apply it in 2-3 layers and dry naturally for at least an hour
How to dilute matte nail polish?
How to dilute
It is proposed to dilute the composition with several compositions that will mix evenly with the gel thanks to a complex chemical formula. Do not dilute thickened varnish with acetone or any other liquid that contains this component. It's better to do this with:
- A special liquid for diluting thick varnish, for example, Severina, Domix Green or THINNER. It is enough to use 2-3 drops of the composition per one full bottle; it can also revive the base and top coat for nails. The thinner does not affect the quality of the gel polish and its future shade; it is absolutely safe and is the most progressive solution for nail salons and home use.
- An alcohol solution will be an alternative to a special diluent. Ethanol in alcohol negatively affects the quality of the future color (it becomes duller) and shine.
- Top coat or clear gel polish can also be used if your favorite color has thickened. It is necessary to mix the products together to obtain the desired consistency in a bottle with gel. The disadvantage of this method is the loss of color intensity, but the quality of the coating does not suffer at all. It is necessary to use the top; the base is not suitable for such a case.
How to clean brushes from dried varnish?
- The easiest way, which is always at hand, is nail polish remover. You need to pour it into a small plastic container and place the brushes there for a couple of minutes. After this, wipe the brushes with a cloth and rinse with water.
- Another way is to clean with paint thinner. If you have it in the house, then use it according to the instructions. After this, the brushes should be thoroughly rinsed under running water, because the solvent is toxic.
- Brushes can be cleaned from gel polish with a special product to remove the sticky layer. Also - gel polish remover
- Manicure brushes need to be cleaned promptly so that the product does not harden on them. This will make the cleaning process easier
Means for “resuscitation” - what can you dilute if it’s dried out?
If you don’t know how to dilute nail polish, buy a special thinner for this purpose.
It is sold in cosmetics stores. This product can only restore thickened coating.
If your nail polish has dried out, they haven’t yet figured out how to dilute it to completely restore it. Therefore, get rid of it, do not waste your time on a meaningless activity.
Dried varnish, even if it can be diluted, will no longer lie on the nails as beautifully as it did initially.
The product will extend the life of the coating by several months. It is best to use a thinner identical to the brand of varnish. It should be used like this: add a few drops of diluent to the bottle and shake. Most manufacturers produce products in tubes with a pipette, making it convenient to dose and drop into a bottle of varnish. Shake the bottle for about a minute so that the thinner mixes well with the varnish.
If the product does not reach the desired consistency, add a few more drops to it and shake again.
Find out why the skin between your fingers peels.
The amount of thinner used depends on the degree of thickening of the varnish.
The cost of such a product is not very high, so it makes sense to purchase it rather than spend money on new nail coatings.
There was a time when everyone used acetone to “reanimate” varnish. This tradition is not entirely correct, since the property of acetone is to destroy the structure of the varnish, and not to dilute it.
After applying it, the coating will peel off from the nails, so do not practice this method if the nail polish has thickened.
Acetone destroys the structure of the product, which is why the varnish can bubble, lie unevenly, with bald spots and stripes.
Acetone has a negative effect on the nail plate itself. Therefore, its content in a decorative coating is undesirable.
If you are wondering how to dilute nail polish if it has thickened, it is better not to use acetone for this purpose.
Modern products designed for dilution will cope with this task best.
Watch the video: professional tips for saving varnish
Take homemade hand cream recipes into your piggy bank.
How can you save dried varnish?
- Metal balls. To slightly extend the life of nail polish in professional brands, special metal balls are placed inside the bottle, which, when shaken, help mix the polish, preventing it from stagnating in places inaccessible to the brush. However, always buying only varnishes with such balls is not an option.
- Dilution agents . On the nail industry market you can find special products for diluting thickened varnish (precisely thickened, because if the varnish has dried out, then there is no way to save it: even if you manage to soften it a little, it will never lie on your nails as well and beautifully as you would like it). As a rule, a few drops of this product extends the life of the varnish by several months, so regular use of it may well save the situation. It is better to choose a product of the same brand as the bottle of varnish.
- Dilution with acetone . Not so long ago, the most popular means for diluting thickened nail polish was acetone or nail polish remover containing it (Apparently this tradition passed on from diluting ordinary paint). About 15 years ago I did this too. However, it is better not to use this method of dilution. It's simple: the liquid is created to remove polish, so it destroys its structure, and after adding it it will only get worse - the polish will begin to peel off from the nails.
Nail polishes are quite affordable, and there is no ideal solution for thinning them, so it’s still easier to buy a new one. And even if it was your favorite color, with the current range you will not have difficulty finding something similar, if not exactly identical.
I also recommend reading the article on how to store and care for varnishes so that they last longer.
In the same material I would like to touch on one more topic, since many are interested in whether it is possible to dilute gel polishes, which also thicken over time and cost a lot of money.