Beautiful, well-groomed nails are perhaps every girl’s dream. Manicure may seem like an insignificant detail, but it can say a lot about its owner. Therefore, you need to be able to turn your nails into a work of art. And it is very important to choose the right means to achieve this goal. The nail art market is represented by a huge number of interesting jars that differ in their properties and texture.
But there are also universal materials that are very convenient to use. These include gel paste.
Many companies produce nail art products based on this texture. This is a universal material for creating a masterpiece on your hands. It is used to seal the nail, as a primer, as a “camouflage” for the bed, and also to create a unique three-dimensional design.
Example of a design with gel paste
What is a primer?
This is a kind of nail primer. It is necessary to create high-quality extensions. If you apply it before the procedure, it will securely secure the tips and also protect your original plate from contamination.
Acid-free primer
Main properties of the primer:
- degreasing;
- long adhesion of the artificial nail to the real one;
- protection from external influences;
- restoration of the nail plate.
How does it work?
The primer dries out the plate very much. It makes it rough and porous. Dehydrated and degreased nails are completely unsuitable for the growth of bacteria, so the plate under the tip is not susceptible to inflammatory processes. This effect can be achieved by careful grinding, but this will make the plate so thin that it will cause irreparable harm to the manicure. If the primer is not applied, a kind of greenhouse is formed under the tip. Temperature-induced sebum will become an excellent habitat for bacteria. And as a result, the nails will become stained and become very brittle and flaky. Painful sensations may appear, and the treatment of marigolds will take about a year.
What kind of primers are there?
There are acidic and acid-free primers. If you only want to protect the plate from external influences, it is enough to apply prep or, as it is otherwise called, bond. It differs from other coatings in its hypoallergenic composition.
Note: The product will only protect the top layer of the nail from brittleness. This primer is not always suitable for extensions; it can only be used as a base.
The varnish applied to the bond will last longer and will not be harmful to the nails. When building up, the prep is applied after filing the surface. This coating is very easy to apply. Bonds protect the nail from discoloration and prevent it from turning yellow or white. Also, the nails will not begin to peel after applying this product. And the most important property of the bond is its strong drying of the plate, as a result of which the real and artificial nails are well bonded.
Acid coating is best used for acrylic extensions. It contains methacrylic acid (at least 30%), which completely dries out the nail. The more acid in the product, the stronger and more durable the nail extension will be. It is necessary to wait until the plate is completely covered with a white coating. Only then can acrylic powder be applied. You need to be careful with this product - if it comes into contact with the skin, methacrylic acid causes a strong burning sensation.
An acid-free coating should be chosen for gel extensions. It degreases and disinfects, and also attaches the artificial nail well. The acid-free product is not as caustic as with acrylic extensions, but it should still be handled with caution, especially for people with sensitive skin.
Acid-free gel paste is also suitable for those who have thin and brittle nails. It is recommended to use it before long-term varnish.
How to apply primer?
First prepare your nail. Move the cuticle using an orange stick. It is also necessary to file the plate. The primer should be applied in a thin layer. Here the principle “the more the merrier” does not work. The effectiveness of the primer is greater if you cover the nail very thinly. Avoid areas of periungual skin. If the coating gets on your skin, wash your hand under running water.
Wait for the nail product to dry. This usually takes a few minutes. Afterwards you can begin the extension procedure.
Primer application process
Sealing the nail plate
Mineral-based paint has healing properties. It contains oils that have a beneficial effect on the structure of the nail. For example, apricot, castor, olive, flax and almond. The mineral base is magnesium aluminum silicate. It is obtained from clay and has a protective effect. Beeswax and glycerin penetrate deeply into tissues, preventing the penetration of excess moisture. As a result, the beneficial substances are literally sealed into the nail. The mineral base creates a protective layer on the plate that deeply nourishes the nail.
How to apply it correctly?
Mineral gel paste is applied to degreased hands. The nail should be sanded, making the surface matte. Movements - from the cuticle down. It is most convenient to apply the product to a soft file, then gently rub into the surface of the nail.
You should not apply the mineral paste close to the rollers or cuticle; it will be enough to cover the main part of the plate.
It is necessary to polish the surface of the nails for the “sealing” to occur. After which you can apply nail polish and cuticle oil. Sealing the plate is not recommended after hand baths.
Flower made from stretch paste.
Creating a background
Step 1. For the background, I chose a very gentle and warm shade of gel polish from Fiore No. 104. I cover it in 2 layers. I dry each one in a lamp.
Step 2. I apply the matte finish from TNL onto the sticky layer of gel polish as evenly as possible. Remember that all matte topcoats must be mixed (rolled between your palms) before application and then dried well in a lamp. I dry it in the SUN2 lamp for 2 minutes.
In addition, you should not apply a glossy topcoat under a matte finish, as this coating may peel off.
"Camouflage"
You can create a beautiful manicure without using complex designs. It is enough to give a neat natural look. For this purpose, “camouflage” is used. You apply the product to your nails, which gives them a well-groomed and healthy look. The palette is colored, its tones reminiscent of foundation. The peculiarity of manicure is that it is possible to use several products. You can mix dark and pinkish shades, creating the color that will best suit your skin color.
This is what camouflage gel looks like
You need camouflage paste if your nails:
- look unhealthy;
- very brittle;
- have a heterogeneous texture;
- does not have a natural expressive color.
There are many options on how to apply this type of material. You can change the color of the nail plate and give it a neat shape. Occasionally, “camouflage” is used to create a three-dimensional design. They are also suitable for procedures such as French style extensions.
How is camouflage applied?
Lengthening the nail plate so that it looks natural is quite simple. Apply gel paste to match your skin tone and fix with a UV lamp. Since it is colored, it will take some time to cure. Afterwards, remove the sticky layer from the nails and degrease the bed. You should saw off the surface and paint a French pattern using a durable coating. A permanent varnish will do. The finishing touch for the perfect nail shape is to use a modeling gel.
Technology of sealing nails with mineral paste Patrisa Nail
Beauty is first and foremost health. Agree, elastic, peeling nails, firstly, simply cannot look well-groomed, and secondly, due to their fragility, they hardly reach the optimal length.
In today’s article, KrasotkaPro will tell you how to strengthen and treat the nail plate yourself at home, and give it a healthy look with the help of professional products.
We will need:
- mineral paste PATRISA NAIL;
- lint-free wipes;
- cuticle remover PNB or SOPHIN;
- polishing block for nails MASURA;
- polishing file;
- manicure orange stick;
- nail file with abrasiveness 220/280 grit;
- nail and cuticle oil FAMOUS NAMES, DADI OIL.
Prepare your hands. Apply cuticle remover gel with a brush to the skin of the nail fold. Leave for a couple of minutes. Then, using a lint-free cloth and an orange nail stick, remove excess skin and push the cuticles back.
Cuticle remover gel prevents the formation of hangnails and quickly softens the cuticle, as well as moisturizes and conditions. The product gently removes rough skin particles.
Using a sanding file, remove the natural gloss from the nail plate, moving from the cuticle to the edge of the nail.
This way we prepared the nails for sealing with mineral paste.
Blot your nails with a lint-free cloth soaked in degreasing liquid or alcohol. Next, using a manicure stick, apply a small amount of paste to the middle of the nail.
Using a polishing block, begin to rub in the paste, moving from the free edge of the nail plate towards the side ridges. To avoid injury to the skin, slightly lift the polisher at the edges, as if rounding it. Separately polish the end of the nail.
Repeat the procedure for all nails. After this, you will notice how their surface is leveled.
Mineral paste penetrates the cells of the nail plate and creates a water-repellent barrier. Nails become less brittle and elastic.
Use a buffing file to give your nails an extra shine, then apply a nourishing, moisturizing nail and cuticle oil. We used Dadi Oil from Famous Names.
Dadi Oil consists of 95% natural essential oils, of which there are 21 in the mixture. It perfectly moisturizes the cuticle and nails, and is quickly absorbed. As a result of use, the skin around the nail becomes soft and tender.
Voila! We completed the procedure and as a result we received well-groomed, beautiful nails, restored them and gave them a healthy shine.
We recommend repeating this home spa procedure 1-2 times a month, and then you will definitely be satisfied with the condition and appearance of your nails.
We hope the article was not only interesting, but also useful and relevant, because November is a busy time of preparation for New Year's Eve. We wish you beauty and health!
| Sealing nails with PATRISA NAIL mineral paste: |
| Mineral paste PATRISA NAIL | PATRISA NAIL, MINERAL PASTE |
| PNB cuticle remover | PNB, CUTICLE REMOVER, 15 ML |
| Nail polishing block MASURA | MASURA, POLISHING BLOCK MASURA KICHIN |
| Oil for nails and cuticles DADI OIL | FAMOUS NAMES, DADI OIL 3.75 ML (OIL FOR NAILS AND CUTICLES |
| Nail Polishing File | MASURA, WHITE FILE ON WOODEN BASE, NARROWED (180/180) |
| Nail polishing with abrasiveness 220/280 | PLANET NAILS, NAIL GRINDING SPONGE SEMI-ROUND 220/280 |
Colored gel paste
You can create a voluminous design on your nails using this product. It has an advantageous consistency compared to other nail art products.
Manicure with red gel paint
Firstly, the product does not need constant drying. This paint does not flow and retains its shape very well. And this is a huge plus when creating complex nail art.
Secondly, dense texture is easier to work with. If you are just gaining experience in nail art, then gel paste will be the ideal choice for a beginner.
Thirdly, you can increase the volume of the drawing. To do this, just dry the nails after applying the layer under an ICE or UV lamp, and then apply the next layer of coating.
Fourthly, the thicker and more viscous the paint, the faster it dries. Therefore, give preference to the thickest materials.
Fifthly, with the help of the tool it is very easy to draw small details and fine lines, which will help you create a unique hand-painted painting.
What is gel paste?
Gel paste is a material for creating nail designs that allows you to draw the smallest details, since it has a thick consistency and does not spread over the surface of the nail. It is perfect for creating drawings with three-dimensional elements, planar design and sculpting. It can be applied to a topcoat that helps create 3D patterns.
Gel paste for nails is an excellent option for creating complex decoration elements, as it has the necessary viscosity, which allows it to keep the shape that the nail technician gave it before polymerization under the lamp. What is the difference between colored gel and gel paint? Many beginning craftsmen ask themselves this question when choosing materials for their creativity.
And the fact that some consider them practically synonymous is not true, since there are differences between them.
Gel nail paste
Colored gel must be mixed before use, because the pigment tends to settle. It is applied as a base for modeling gel, since it is translucent and several layers need to be polymerized to achieve the same color as in the jar. Colored gel is more suitable for internal designs, because when doing external ones it can flow onto the cuticle.
Gel paints do not need to be stirred before application; they are dense, pigmented and are perfect for creating external designs, painting and French. They can be applied directly to the surface of the filed nail; they are quite saturated when applied in one layer, but it is better to build up the color in two layers. Gel paints can be used to create both internal and surface designs; when drawing a French jacket, the smile line does not spread.
Flowers
A great idea for a manicure is to draw delicate flowers on one or all nails. This nail art looks very beautiful, but at the same time it is not so difficult to do.
First, apply your foundation. If you want the coating on your nails to last as long as possible, use a long-lasting varnish. Wait for it to dry. Then prepare a few brushes and a small palette for blending the paint. In order to draw the petals of a flower, you need to apply a little paint to the palette with a brush. Blend it until the gel paste is completely absorbed into one edge of the brush.
Floral design using gel paste
Hold the brush at a slight angle. Make a small semicircle with a light movement. The movement of the brush in this case is from the edge inward.
Before applying it to your nails, it is advisable to practice drawing on tips.
Using a thin brush, draw an outline to make the flowers clearer. Delicate blue shades will look very advantageous on pale pink nail polish. You can make a monotonous flower, it all depends on your imagination. After application, the design should be dried under a UV or LED lamp.
You can make flowers using several shades. Gel paste of one color is applied to the tip of the brush, and another color to the wide part. Usually the tips of the petal are made darker than the middle. Then blend it a little on the palette. Afterwards, you can apply the pattern in the same way as when drawing a monotonous flower.
Palette
The color palette is very wide. The Lovely line includes 16 colors. Shades can be mixed with each other or used in their pure form.
Lovely 001 – snowy white shade
Lovely 002 – jet black
Lovely 003 – Purple color
Lovely 004 — Cornflower blue Lovely 005 — Shine of steel Lovely 006 — Forest green
Lovely 007 – Mint Green
Lovely 008 – Cobalt Blue
Lovely 009 – Carmine red shade
Lovely 010 – Granite gray shade
Lovely 011 – Pea yellow
Lovely 012 – Cocoa color
Lovely 013 – Hot pink shade
Lovely 014 – Pastel orange shade
Lovely 015 – Gold
Lovely 016 – White gold
Monograms
If a manicure with flowers is delicate and airy, monograms give nail art a bohemian look. A manicure using monograms in black and white looks very beautiful. Nails decorated with golden monograms take on a chic look. Also, monograms will be a wonderful decoration for wedding design.
Note: You do not need a palette for shading. Monograms must be painted with a very thin brush, which is saturated with paint in a matter of seconds.
First draw a line. It must be done very accurately, in one movement. If you paint in several stages, it will turn out uneven and intermittent. Draw a neat semicircle on top, which will be a curl. And with a slight movement, connect these two elements. This is a very simple art, but at the same time one of the most beautiful. Improvise, draw a few curls, change their direction. Paint the entire bed, or just a corner.
You can go tricky and create a visual three-dimensional image. So the monograms, applied in one layer, will look like a bas-relief. To do this, just take a translucent dark varnish and apply it under the drawing.
This will create a shadow effect, adding dimension to the image.
There is another way. Mix dark polish with clear polish and cover the entire surface of the nail with it. Then dry under UV or LED lamp. If you lightly file the surface, the monograms will become light again, but the shadow from the drawing will not disappear anywhere and will emphasize the drawing.
Top 5 popular gel paste brands
It is recommended to choose a gel paste for work experimentally. This is due to the fact that not everyone is suitable for the same brands. Considering these features and reviews from experienced specialists, you can easily create your own circle of favorites among well-known brands.
The most popular brands are:
Kodi
The products are high quality and professional. It is especially popular among manicurists. The product is available in small jars and is presented in the form of a gel.
Thanks to its thick consistency, it does not spread and helps to create unusual designs on the nails. Gel paste can be used both for regular design and for creating volumetric elements.
RuNail
The product is presented in a round jar with a screw cap. The gel is easily applied to the surface of the nails, while forming a dense coating. There is no unpleasant smell, which makes working with this brand quite pleasant and cozy.
Gel paste is used to create patterns and flat designs on nails
Gel paste is used to create patterns and flat designs on nails. It comes in a varied color palette, including 15 shades. Colors can be easily mixed to create unusual shades. An important advantage of this brand is the low price for quality products.
BlueSky
The presented product has a variety of colors, which allows you to make your manicure colorful and unusually beautiful.
An excellent option for a single-color nail coating and creating a design of any complexity.
An excellent option for a single-color nail coating and creating a design of any complexity. The gel can be applied with a brush and does not spread on the surface of the nails.
Irisk
Cheaper option among other brands. The color palette is represented by pastel tones, which are soft and muted.
The color palette is represented by pastel tones that are soft and muted
This product can be used to create a romantic or wedding nail design. Gel paste can be used both for modeling and for final coating of nails.
Emi
The products of this company are considered to be of sufficient quality and do not cause an allergic reaction. The product is made in Germany and includes a huge number of shades.
Please note that individual tubes and ready-made kits are available for sale. Products that allow you to create silver and gold plating have become extremely popular. They have richer pigmentation compared to paint. The gel does not spread, is densely covered with color, and dries quickly.
Bas-reliefs
If you want a stunning volume of drawing, you should use 3D gel. For a small bas-relief, gel paste is also suitable.
To create a picture, you should choose varnish and paste that are similar in color. Apply your foundation first. Dry it under the lamp. Then you should cover the surface of the nails with top. This is very important, as the sticky layer prevents the bas-relief from losing its shape or crumbling. And only after the top can you draw a pattern.
One of the most popular bas-reliefs is the image of a rose.
A selection of interesting bas-reliefs on marigolds
After the first layer of bas-relief you need to wait half a minute. A good quality thick paste does not require much drying time. Then you can apply a new layer to the drawing. And so on several times until the volume suits you.
Step-by-step instructions for using gel paste
In order for the work to be carried out efficiently, it is best to use material from well-known brands. The paste should have a thick consistency and be easy to apply to the surface of the nail.
It is important to remember that before creating a design on your nails using this material, you must first carry out the procedure of applying gel polish to them.
Step-by-step instructions for applying gel paste include the following points:
- The first step is to prepare your nails, for this they should be treated with a nail file. This will allow the gel polish to better adhere to the surface.
- Then you should remove the shine from your nails. This is done with the help of a buff. After which the surface of the nails must be degreased with a special product.
- Primer is applied has another name - double-sided tape. This will remove excess moisture and improve the adhesion of the product to the surface.
- Then apply the base coat. This is done with a brush, and the movements should be rubbing. The end should be sealed, after which the hand should be placed in the polymerization apparatus.
- You can start applying gel polish. It is better to apply it in a thin layer; if desired, the nail can be painted several times. In this case, it is recommended to seal the edge of the nail. Each applied layer must be cured with a UV lamp.
- To create a three-dimensional image on the nail plate, use a nail gel paste . How to use the product with and without a sticky layer will be discussed below.
- If you are using a product without a sticky layer, then it is applied after the finishing coat. This gel paste is suitable for creating flowers, patterns, and monograms. Each color and new design must be dried in a lamp.
- If the gel paste has a sticky layer , then it is applied after the second layer of gel polish, dried in a lamp. It is suitable for creating designs such as “casting”, “shell”, “knitted manicure”. After drawing all the details, the nails must be polymerized. The final touch is to apply the finishing coat and remove the sticky layer using a lint-free cloth.
It is important to know that in order for your hands to look well-groomed, it is recommended to apply oil to the cuticle.
Diamonds
The voluminous design with diamonds looks quite interesting. It is also called quilted manicure. It’s very simple to create, you just need to try to make all the elements the same size. This is the main secret of this nail art.
Choose a base and paint of the same tone. This manicure looks best in one color scheme. The most advantageous are peach and turquoise tones. After applying the polish, draw diamonds on the nail. Start from the center.
The rhombuses should not touch, let them be at a short distance from each other.
After the outline has been applied, you can fill each diamond with paste inside. Manicure in geometric style is ready. If you want to add some zest to this nail art, add gold or silver stock to the edges of the diamonds.
Types of gel paste
The above properties of the paste would not make sense in the design if it were not for the multifaceted color palette. What makes the product stand out is not only its composition, but also its color range, which is available from famous brands. Let's take for example bluesky gel, sold in small 8 ml jars. The manufacturer claims that the composition is suitable for modeling realistic patterns with a 5D effect.
There is a simple black gel paste for nail design. The appearance is not particularly attractive - the usual composition with good, dense pigmentation. However, black paint is indispensable in casting techniques, where it is very important to correctly combine two decorative materials and obtain the desired pattern.
Gold material is involved in modeling the Empire and Art Nouveau styles on nails. The design style must necessarily contain gold painting or repeating elements.
Black paste is indispensable in casting techniques. For 3D design, you simply need a black substrate with a thick consistency, which will become an excellent basis for the next stage - foil printing.
Colored – intended for nail art. A good example is Chinese painting with a lively presentation of a floral plot.
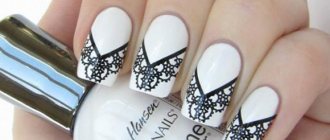
Lace
A lace manicure looks royal on your nails. This is an ideal solution for a festive evening, as well as a wedding celebration.
Decide which area of the nail you would like to paint lace on. Place dots along the edge of this area at equal distances from each other. Afterwards, apply the paste to the center of the area. Don't worry if it looks shapeless for now.
To ensure that the paint applies evenly, you should wet the brush in degreaser before using it.
Afterwards, you can shade the paint towards the outline, just do not go beyond it and damage the drawing. As a result, you will end up with lace fabric without a pattern. Afterwards, you should remove the paint in those places where you want to make a drawing. The most convenient way is to do this with a special nail design stick with a small ball at the end. It will be convenient for her to remove the paint layer. To start, try the simplest pattern - a few daisies. Just pass the ball in the center, making a middle. And a few stripes from the center, which will be petals. The main thing is to place the flowers symmetrically from each other, as if it were real lace fabric. As a result, your nails will have a unique pattern.
Inscriptions
You can create a festive mood by decorating one or more nails with some letters. This could be the first letter of a name, perhaps someone's initials. You can frame the inscription with the outline of a heart, sun, or flower. Letters should be applied with a thin brush. The first letter of the name, written on a red background with a golden outline, will look quite stylish. To do this, you can complement the outline of the letter with a beautiful monogram. A sunny and cheerful design can be applied using bright letters on an equally bright background. This will add color to your look.
There are many ways you can use this unique design tool. It can serve as a primer, indispensable for nail extensions. Some types of this remedy have a healing effect. It can restore the appearance of your nails if you choose pastel shades. But it is also an excellent long-lasting paint for creating unique nail art. Definitely, gel paste should be in any girl’s beauty arsenal.
What designs are used to create gel paste?
The product is used to decorate nails. Gel paste can be used to create the following design:
- Drawing small details. This work involves drawing various lines on the nails, creating patterns, and depicting flowers.
- Performing complex painting: gold and silver monograms.
- Creating volumetric nail art. This group is represented by a huge variety of drawings; the design depends only on your own imagination. An example would be a voluminous manicure with negative space, when parts of the nail remain unpainted.
- Patterns with 3D effect. There is a wide variety of patterns with which you can easily decorate your nails.
You might be interested in learning about how to restore nails after removing gel polish. Strengthening agents
The most common designs are:
- crumpled foil effect;
- knitted manicure;
- frozen window;
- lace;
- shell;
- 3D rose.
Design with rhinestones - the gel paste is beautifully combined with rhinestones; this design not only decorates the nails, but allows you to create rich and luxurious patterns.

